What's new
What's new

A Couple of Threading Questions

Rick_B

Stainless
Joined
Sep 16, 2011
Location
Winston Salem, NC
I'm going to be attempting some treading next week so I've been reviewing the steps. I've got a tool ground, I understand the use of the thread dial, I know I need to set the compound at 29 degrees and use that for depth adjustments and I know the tool needs to be on center and perpendicular to the work.

My first question is spindle speed - the the thread will be 1/2 - 13 - do I use a spindle speed the same as turning or slow it down quite bit?

Second question - HTRAL doesn't talk much about how far to advance the compound - there is a formula for depth of thread that I think is the amount the compound would be advanced (in total). Based on that formula the compound should be advanced .0496" - does that sound right for a 1/2-13 thread?

Finally, I've read/heard that it is a good idea to put a groove in the work piece to run the end of the thread into it. Is that typical?

Thanks
Rick
 
threading on a lathe?

Common thread? Less than an inch? Run the first pass "heavy". Nearly full depth if you dare. Follow it with a threading die and be done with it.

Special or hard to get threadingg die? Still take a very healthy first pass. If it's a big coarse thread, make the second pass by "missing" the treading dial. Then on the third pass revert to your first dial reference. This moves out the meat in two or three passes. Take finish passes as needed.

Measuring over wires? florest's clay can give you a third hand.

Another tip? Practicve the thread you are wanting on a piece of scrap. Limbers up the machine, finds the numbers, and gets the operators attention.

Internal threads? Set a dial indicator and a "soft stop", then Practice ;-)

Cheers
 
First of all, it's not the tool bit that needs to be perpendicular to the work piece, it's the 60 point of the tool that needs to be centered in the plan view. There's a tool for doing that, called a center gauge. It has a couple of 60 degree notches cut into it and you align one of those notches with the 60 degree point of the tool and then make sure that the side of the gauge is parallel to the piece you're threading. I think HTRAL covers this aspect.

Spindle speed for threading needs to be slow--lowest pulley speed in back gear. It'll be something less than 50 RPM or so. The slow speed is so that you can see what you're doing and so you won't have to have dragon fly reflexes when you come to the end of the thread. Yes, it's easiest if you thread into a groove at the end of the thread but it's not necessary if you run at low speed and can withdraw the tool point from the thread fast enough when you come to the end.

The depth of the cut you take depends on how far into the thread you are. On the first pass, I usually take quite a light cut, just so I can see the thread and can fix anything that seems to be wrong. Early passes can be .020 or .030 on the diameter. As you get deeper into the thread, you take away move volume of material with each pass so you can expect to end up taking a chip that's only a few thousands thick as you approach the final diameter.

I would strongly caution you against taking a heavy cut. If you're using a pre-ground carbide tool, a heavy cut is a sure way to snap off the end off it. You can even snap off the point of a HSS bit if you take a very heavy cut. And the worst thing that can happen with a heavy cut is that the tool will jam in the workpiece, spin it in the chuck (remember back gear provided tremendous torque capability ) and lose your thread index.

Be sure to use plenty of cutting fluid. I use one of the commercial tapping fluids. There are several to chose from. I had recent conversation with a guy who runs a machine shop and he strongly recommended a sulfurized cutting fluid for threading operations. It's the brown, nasty stuff that smells a bit like a backed-up sewer.

Take it easy and you can have success at this. It just take a bit of practice.
 
My first question is spindle speed - the the thread will be 1/2 - 13 - do I use a spindle speed the same as turning or slow it down quite bit?

You need to slow the spindle speed down as low as you can, Especially if this is your first time threading. Make sure you take a couple of practice runs And get used to the way things work before you start threading.


Second question - HTRAL doesn't talk much about how far to advance the compound - there is a formula for depth of thread that I think is the amount the compound would be advanced (in total). Based on that formula the compound should be advanced .0496" - does that sound right for a 1/2-13 thread?

How far you advance depends on the type of threads that you are using, and the angle of the compound rest. If you're using a sharpie thread the depth of cut is .866 that of the pitch, "60° Thread". If you use a truncated thread. You'll have to reduce this number by the percentage of thread your working with. The angle of the compound rest will change this number. This is basic math, "A squared plus B squared equals C squared". It is best to use a nut or bolt With that thread pitch as a gauge.


Finally, I've read/heard that it is a good idea to put a groove in the work piece to run the end of the thread into it. Is that typical?

for a beginner, you need to cut a groove for the threading tool to wind up In. it takes someone with Advanced skills to cut threads without a group.

stay safe and have fun.
Joe.
 
A brief comment if I may.

The desire here is to put the compound angle at 29 degrees. Here's a good way.

1) remove your threading tool from the toolpost.

2) take some tape and cover over the numbers that indicate angle markings for the compound.

3) unlock the compound swivel and swing the compound so it is pointing straight out at you.

4) now, grasp the compound and turn it 30 degrees to the right. Do this by eye or by guess or using
a protractor roughly.

5) now uncover the numbers. Suprise! the index is at 60 degrees. For the time being just imagine
that it's simply wrong. If you have the compound straight out and move it 30 to the right it will read
60 on the numbers. If you move it smidge less than 30 to the right, it'll read 61 degrees. Good enough for
gummint work.

6) put the threading tool in place. Get it on center, and also use your center gage to get it perpendicular
to the workpiece.

7) speed: as slow as you can go. Slowest pulley, back gears. If you have a two speed countershaft, go on the
lowest speed.

8) put the compound dial to zero. Then bring the crossfeed in to touch the work, if it's turning till it just sings and
makes a mark. Stop things and set the crossfeed to zero then. Back it out to clear.

9) double check the tumbler settings. Set it going and take a tiny scratch cut, stop and double check the TPI
by measuring.

10) I tend to take about 5 divisions on the compound for the first one or two cuts. After than, about two divisions.
For a coarse thread like 13 tpi, you want to be down to one division on the compound dial per cut, maybe one
division every two cuts (it'll spring, you'll see the second cut at the same setting will still generate a chip) by the
time you are near to depth.
 
Hopefully, I don't take this too far off topic, but i was watching the "How to run your lathe" video. https://www.youtube.com/watch?v=9O-9_3rc6VE and also considering my "first" thread cutting operation when I get my lathe completed.

Anyway, at about 13:50, he is cutting threads. And when he gets to the end of the cut, he stops the lathe, and backs the tool out, then reverses the lathe and the carriage travels back towards the tailstock. Then he advances the cutter back to the work and makes another pass.

I understand why he would do it that way - I presume it keeps the half nut engaged and in time with the threads previously cut. Using this method, one would not need a thread dial? Correct? I can see were that method might not always work.


It has been a very long time, but when I last cut threads(early 90's), I remember using a thread dial and believe I kept the lathe running at the end of the cut when I quickly backed the tool away and disengaged the half nuts. Then I manually moved the carriage back to the right and then got it back into position and waited for the thread dial to get back on my number, then engaged the half nuts.

That sound about right?


And this may be really off topic, but I saw the threads back from 2009 where one of the users here was offering a thread dial kit that could be retrofitted to different lathes. I do not have a thread dial on either of my lathes and would be interested if someone could PM me.


Thanks
 
That's the way you would cut a thread if you had no thread dial on the lathe. My favorite job on the lathe is cutting threads. We do a lot of body fit bolts where I work. I usually use a carbide insert tool. I have found that the faster I can turn the part the less likely the too will break. We usually machine a relief at the end of the thread. I set the compound to 29 1/2 degrees. Divide the depth of thread by the cosine of the compound setting to get the distance to feed the compound in. Truncate the tool to a width of 1/8th the pitch. Line everything up as previously stated. I take a skim cut to double check the pitch. My first cut is usually about half depth. The next is about half of the remaining. I repeat until I'm within .005 to .010 thousands and get out the thread wires. I always take a second cut at the last setting before measuring.
 
Jim - thanks so much for the step by step - I knew most of what you suggested but it is very helpful to have them in an organized manner. The first 5 steps initially were confusing until I stood in front of the lathe and actually set the compound, Putting the compound on its index of 60 actually gives you thirty degrees to the horizontal axis (axis from headstock to tail stock). Somewhere I remember hearing that the compound angle was related to a horizontal versus vertical axis and that the compound scale was giving you a vertical axis reading (I think).

Loomis - thanks for the calculation for total compound advancement. I dicovered tht the fish til gage I have displays the compound total advance for specific TPI and that number matched up with your calculation (cosine of 61.5 degrees X depth of cut (.0496)).

I am not in a production environment so I plan to take it slow and easy with very light cuts at slow spindle rpm. I'll post back when I have attrmpted my first threading. Oh yeah - I do realize that I could accomplish the threading using a standard threading die but then I wouldn't learn anything new :)
 
I prefer the KISS method (Keep It Simple Silly).

As the 60° thread form is an equilateral triangle using a sharply pointed tool and compound set to 30° in feed would equal pitch which for 13TPI is 0.069".

Of course setting the compound at 29° increases the in feed required very slightly and using a rounded point tool decreases the in feed required.

As always stop short of the calculated feed then measure.
 
Take small cuts... you're learning... go slow 50 rpm... if you don't want a groove at the end shut off early and coast in, turn chuck by hand to get last thread, use oil.
 
Take a piece of round, any size in a similar material as the work. Set the crossfeed handle so in cutting position it is at the 6:00 position. mark the work as it turns with a sharpie marker, now compound dial till the tool touches. an leaves a mark on the sharpie area, zero dials. 100 rpm max for starting. Mark with sharpie end of thread on the work, position tool there, with sharpie mark lathe bed, at the left side of the carriage.

For a 13 thread you can use any numbered mark to engage the nuts, practice cutting air, watch that mark on the lathe bed, with right hand on the threading lever, and left hand on the crossfeed, when you hit that mark on the bed, back out the crossfeed two turns, it will become quite easy after a few passes to back out in a snap, now at the same time disengage the threading lever, again practice the movement, backing out is the more important movement, the word is fast for both operations.

Keep you doc .010-,015, I use dark sulfurized oil. Keep track of your zero on the crossfeed, if you are not using the SB cutting stop, which is a good tool once you get use to to the setup. Before your last cut, try a nut of that size for fit, if it goes 1-2 threads you are almost on size, if it is hard all the way to thread then only a spring pass may be needed.
 
Ken - I'm not sure I get the math yet but its interesting that your answer is significantly different than other methods?

Rick
Well a little more study shows that the difference between the major and minor diameter of 13TPI is 0.1334" or 0.0667" of the radius.

How one would get there advancing a compound set to 29° .0496" I have no idea.

I do however retract my suggestion that there's a difference in compound feed with a rounded versus a sharp pointed tool as it would make no difference.

Ken from Canada.
 
Actually it does make a difference whether the tools truncated or not. The thread death of a properly truncated tool is equal to .866 * thread pitch - the inverse of the Percentage of thread. That is the inverse of a 75% thread Is 25%. However the thread Depth of the non-truncated shark point Tool Will be equal to .866 * thread pitch - 1/2 The inverse of the Percentage of thread, "12.5%". If the truncation of the tool is not correct you will have to Subtract That truncation from your results.

Note: .866 is the normal value used for 60° thread only.

To calculate the compound rest movement Use: A squared plus B squared = C squared . A = one half thread pitch in inches, B = Calculated depth, C = Compound rest travel.

Normally, a hobbyist will use a Non-truncated tool to cut threads. Unless your doing something that Has to be to a higher specification a non-truncated tool is acceptable. If however you are making something that has to have a high tolerance I recommend using a factory made threading tool, made for that thread.

Stay safe and have fun.
Joe.
 
So let me ask another "beginner" question. Somewhere along the line I've heard that cross feed advancement can be per side or per total diameter - in other words one division of the cross feed dial may represent .001" per side of the work (for a total of .002" material removal from the diameter) or .001" total diameter material removal (.0005" per side).

I'm wondering if the compound works the same way and if this impacts the amount of compound advancement in threading. My lathe has a small dial on the compound.

Thanks
Rick

It depends on the exact specifications of your machine. Mine has a crossfeed dial set in absolute units (1 mark on the dial moves it 1 thou which takes off 2 thou on the workpiece) but the compound is the other way 'round (1 mark on the compound advances it a half thou for a 1 thou cut on the workpiece [or less depending on the angle of the compound: y=x cos(theta)]).

A quick check with a dial indicator will tell you which setup you have.
 
So let me ask another "beginner" question. Somewhere along the line I've heard that cross feed advancement can be per side or per total diameter - in other words one division of the cross feed dial may represent .001" per side of the work (for a total of .002" material removal from the diameter) or .001" total diameter material removal (.0005" per side).

I'm wondering if the compound works the same way and if this impacts the amount of compound advancement in threading. My lathe has a small dial on the compound.

Thanks
Rick

Small dial would be radius reading(each grad is per side)
Ted
 
Gaaah,

Forget about calculating the compound infeed! It will drive you nuts. Your calculations will only be as close as your protractor and prone to error. I do it this way:

1) Find proper depth of cut for given thread from Machinery's handbook or other reliable source.
2) Set your compound dial at zero.
3) Move in with the cross-slide till you touch the workpiece OD.
4) Set Cross-slide dial to the target depth so that if it were move to zero you would be at target depth.
5) Now Back off your compound a couple of turns.
6) Set cross-slide at zero (target depth) and begin feeding with compound.
7) Back off a turn or two with the cross-slide at the end of each pass to return.
8) Reset cross-slide to zero, infeed with the compound and run next pass.

Do all infeed for each pass with the compound till you get close to zero (ex. 0.005"). Check size with PD wires or gauge of your choice.

This way you don't have to worry about the depth at the compound angle. Zero is the target depth on both compound and cross-slide. Remember to back out with the cross-slide a turn or two at the end of each pass to return to the start of the cut. Then just return the cross-slide to zero and feed in with compound.

I was taught to run the last 0.001"-0.002" using the cross-slide. So that's optional. If desired, subtract a couple thou from the desired depth when you set the cross-slide dial. Hope this helps.

BTW some lathes have a stop for the cross-slide that can be set for this purpose so you don't even have to use the cross-slide dial once set. I never use it though. I just use the dial on each pass.


Best Regards,

Bob
 
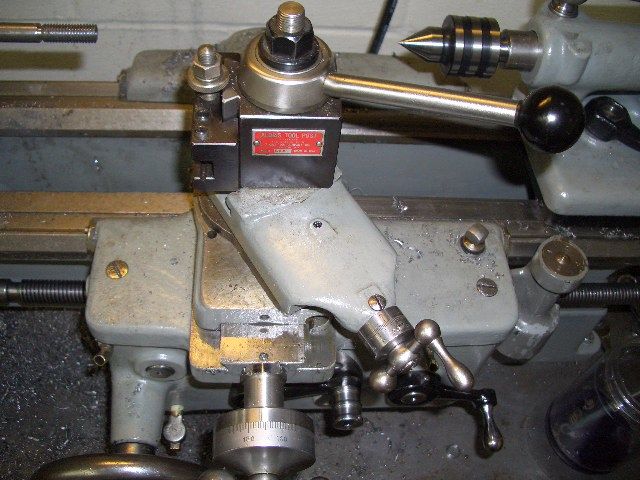
Well my first attempt was a miserable failure. I got something that looked like thread but the fit to a nut was EXTREMELY loose - wobbly loose. So I was thinking that with the backlash issues I had lost control of the depth and went to far. As I was contemplating what went wrong I thought the compound didn't look right so I looked at a picture I had from a machinists text book. I had initially set the compound to 61 degrees thinking the compound index should be reversed. The second time I set it by eye to 30 degrees and the compound index read thirty? That seems contrary to what I read above and in other places. I ran it this way and the htread came out pretty good. Unfortunately near the last pass I lost control of the compound in feed and didn't know where I was so I cheated and finished it off with a thread die. The nut fits with minimal slop so I think this is right? here's a picture of the compound set up


Does this look right or am I thirty degrees off.

Ted - thanks for the clarification on the small dial.

Thanks
Rick


Back
Top