What's new
What's new

Early South Bend 9C disassembly questions

Brian66

Plastic
Joined
Jan 14, 2020
Hi all,

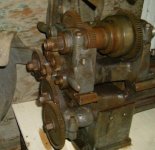
Purchased an old South Bend 9C underdrive unit as my first lathe. The lathe is an early model with the headstock cover extending down and thru the split ways. Before using it, if figured on making sure it was in fairly good working order so I purchased Ilion Industrial Services "A guide to Renovating the South Bend Lathe" book, felts, and oil kit but it appears that many of my disassembly questions aren't covered in the book so I'm turning to the collective knowledge of this forum for help.

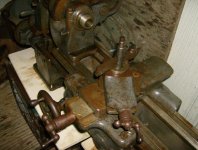
First, there is no 1/8" hole in the cross feed screw collar to install the pin spanner to remove it. Were these pressed in on early lathes? Not sure if I even need to remove it as I took the feed screw out the back.

Second, I'm missing the set screw and pin from the bronze feed nut. The set screw is easy to replace using a fine thread 5/16 screw but I'm not sure of were to find the pin. Alternatively does anyone know the dimensions that I could make one up? How does it work? Seems like the set screw would simple bear down on it but I'm sure it must press against the inside of the bore to lock the screw nut in place vertically, just can't picture how in my mind.

Third, I need to find a split retaining nut for the handle. Anyone willing to sell one or know where I can source it?

Finally, there seems to be excessive backlash in the cross feed screw. The screw itself looks good but the nut is chewed up pretty good and will be replaced, probably from not having the set screw and pin but I think that's only part of the problem. If I install a small washer on the screw shaft between the screw and the screw collar it takes up a lot of the slack. Is this an appropriate fix?
 
Having just gone thro my 1946 9"-A, I thought I'd respond to a few of your questions. But I am neither an expert nor the sharpest tool in the shed!

First and foremost, the renovation book by Steve Brooks is worth every penny, as is the felt kit. But if you read the introduction, you will see that he explains that there was NO possible way to include everything on every model of SB lathe, otherwise it would be 400 pages and cost much more. So going in, realize that your lathe is really the first point of reference in terms of originality for all practical purposes.

For example, on page 24, he writes to remove a straight pin with a 3/32" pin punch. However, the pin on my machine turned out to be a rollpin, and the correct punch was 7/32". So I got a spare 7/32 drill; cut off the flutes, and used the drill shaft as the exact size punch I needed to remove the roll pin. I made a note in the book and taped the drill bit to the page should I ever run into that again (see pic). So my book is virtually littered with notes about what I actually find on the lathe.

Another might be when he is explaining the felts that go into the reversing gear assembly. What he actually explains and illustrates is an assembly for a 10K machine, not the manual assembly that usually came on the 9". Why? Because the 10K version is much more complex and therefore requires better explanation. The little manual version is simple and only needs a couple of felts (bottom of page 21). This is where taking a shite-load of photos with your smart phone is a must...before, during, and after the assembly is finished. And write notes in the book!

On the cross feed screw collar, I didn't have a hole either. If you look on the compound just above, you'll see a small setscrew with words "oil". First make sure that setscrew isn't tightened down. Then use a piece of rubber hose or rubber sheet on the body while turning the body with a pair of pliers or vice-grips. Do not mar the steel in other words. The piece will unscrew. I wouldn't drill a hole afterwards either as thats an entry point for tiny chips. Just tighten it back up with some lock tight if need be. The setscrew can keep it from turning as well, but I wouldn't bear down on it.

Yes, the 5/16ths setscrew DOES press down on that very small piece of round called a "locking pin"; see page 61. The setscrew has a 45 degree end and the pin has a bevel of sorts. But yes, once everything is in place, the screw pushes the pin which presses against the main body. (Yes, this is kinda a screwy design). Be sure to use the exact kind of assembly to lock the brass nut into place, otherwise you will get lots of backlash! (I discovered this pin was stuck [in my lathe compound]; was NOT securing the brass nut, and hence, lots of play! I removed and cleaned it thoroughly and made sure it moved freely; I reduced backlash to a great extent).

Yes, I would replace the brass nut if I were you as they aren't too expensive. Of course, replacing both the nut and threaded rod is best, but not cheap.

You may also find some backlash under the handle after removing the retaining nut. There should be a round pin/key that solidly holds the handle and shaft together as one without any play. Also be VERY careful as there is a short piece of brass under the screw that serves as a "shoe" for lack of a better term. (Page 60) You can lose this small piece if not careful.

The split retaining nuts are hard to come by, tho you can find them on-line occasionally....very pricey. If you have a mill with a slitting saw, you can make one yourself.

YouTube

Spacer between screw and screw-collar? Don't know....maybe so, maybe no. I'd have to see it. I kinda doubt it.

Take your time; lots of photos; bag and label every small part (even include a note in the bag as to what page number in book you can find the item); always reuse original setscrews especially in compound gib. Do NOT chase threads with a tap if you can avoid it.

PMc

By the way, I don't recall the book going into any detail on under-drive units; you might need to be in "self-discovery mode" on it. I am certain that it has come up many times in PM, so do some thread searches. The answer awaits!

View attachment 288586 View attachment 288588 View attachment 288589
 
As mentioned the crossfeed bushing is NOT pressed in. Another way to unthread those is to hold the round end of the bushing in a collet or chuck and carefully use the
carriage itself as the handle to undo it. Under-drive 9Cs are prettty rare, this is the one that has the belt going down past where a gearbox could be, into the bench, yes?

The copper colored washer under the crossfeed screw is not standard, and an indication that things have been doctored up a bit. If there is any play under between the
micrometer dial and the bushing after asembly, that will show up directly as crossfeed slop.
 
Thanks for the replies. It's good to know that the cross feed collar is still screwed in despite not having the pin hole for the spanner. The copper washer was installed to see if it works to take up some of the play. In the book, its suggested to use a brass washer. The book is good but kind of lacking even on parts that are common between models such as the set screw and pin in the bronze cross feed screw nut. It doesn't even mention let alone have a picture of the pin but from what McLoad describes above it seems fairly simply to make one up. I'm assuming the screw presses down on the 45* angle portion of the pin to squeeze it against the bore hole. Kind of wedging it out the side of the bronze nut. Here is a few pictures of my lathe and it seems quite primitive compared to other 9C's as it has very minimal felts and seems to simply work by flooding oil into the holes for lubrication. It was missing the headstock cover so I attempted to make a similar looking one out of sheet metal. Everything still needs painted but It's a fun job but these little missing pieces is really going to be a treasure hunt. headstock cover1.jpgheadstock cover2.jpgheadstock cover closed.jpg
 
Yep that's the one - a buddy of mine had that lathe (minus the bench and underdrive) and I took a bunch of photos of it. I could try to hunt them up if you like.
 
Yep that's the one - a buddy of mine had that lathe (minus the bench and underdrive) and I took a bunch of photos of it. I could try to hunt them up if you like.

That would be great! I'd love to have the pics for reference. I purchased from a gentleman in Chatsworth I think or somewhere up near Northridge. He had all the pieces for the drive system but had it hooked up wrong and couldn't get the belt tightened up properly. I would love to be able to track down the head stock cover if I could identify the chain of owners.Do you know if your buddy has the original headstock cover? Here's a few more pics of the lathe and drive unit.The first pic is how I bought it.

lathe 2.jpgIMG_5715.jpgIMG_5713.jpgIMG_5714.jpg
 
The lathe sold a few years ago, so no joy on that. But I do still have the photos at work so tonight (working evenings in the time of corona...) and will post them.
 
Photos as promised.
 

Attachments

  • jack_SB_1.jpg
    jack_SB_1.jpg
    69 KB · Views: 40
  • jack_SB_2.jpg
    jack_SB_2.jpg
    70 KB · Views: 38
  • jack_SB_3.jpg
    jack_SB_3.jpg
    93.5 KB · Views: 37
  • jack_SB_4.jpg
    jack_SB_4.jpg
    34.3 KB · Views: 31
  • jack_SB_5.jpg
    jack_SB_5.jpg
    64.9 KB · Views: 31
And a couple more.

Thanks Jim for the photos! Really appreciate it. Certainly helps me with rebuilding my lathe. I don't think this is mine but I'd sure love to find it and purchase it as everything is there. Mine is a lot cleaner in some regards but not nearly as complete.
 
Thanks Jim for the photos! Really appreciate it. Certainly helps me with rebuilding my lathe. I don't think this is mine but I'd sure love to find it and purchase it as everything is there. Mine is a lot cleaner in some regards but not nearly as complete.

Looks like it was a real rust-bucket, eh? Truthfully it was in a lot better condition than the photos show. The owner had slathered it up with protective
oil has he had it in an unheated shed, and that really brought out the fox-brown effect! Even the crossfeed dial, which looks so horrible there, was quite
useable. Also the machine came with a lot of original-boxed SB accessories. So the buyer was happy.

The temptation to say "Oh, it's really only SURFACE rust..." is to be avoided here.


Back
Top