What's new
What's new

Enlarging a Blind Hole

Kevin T

Stainless
Joined
Jan 26, 2019
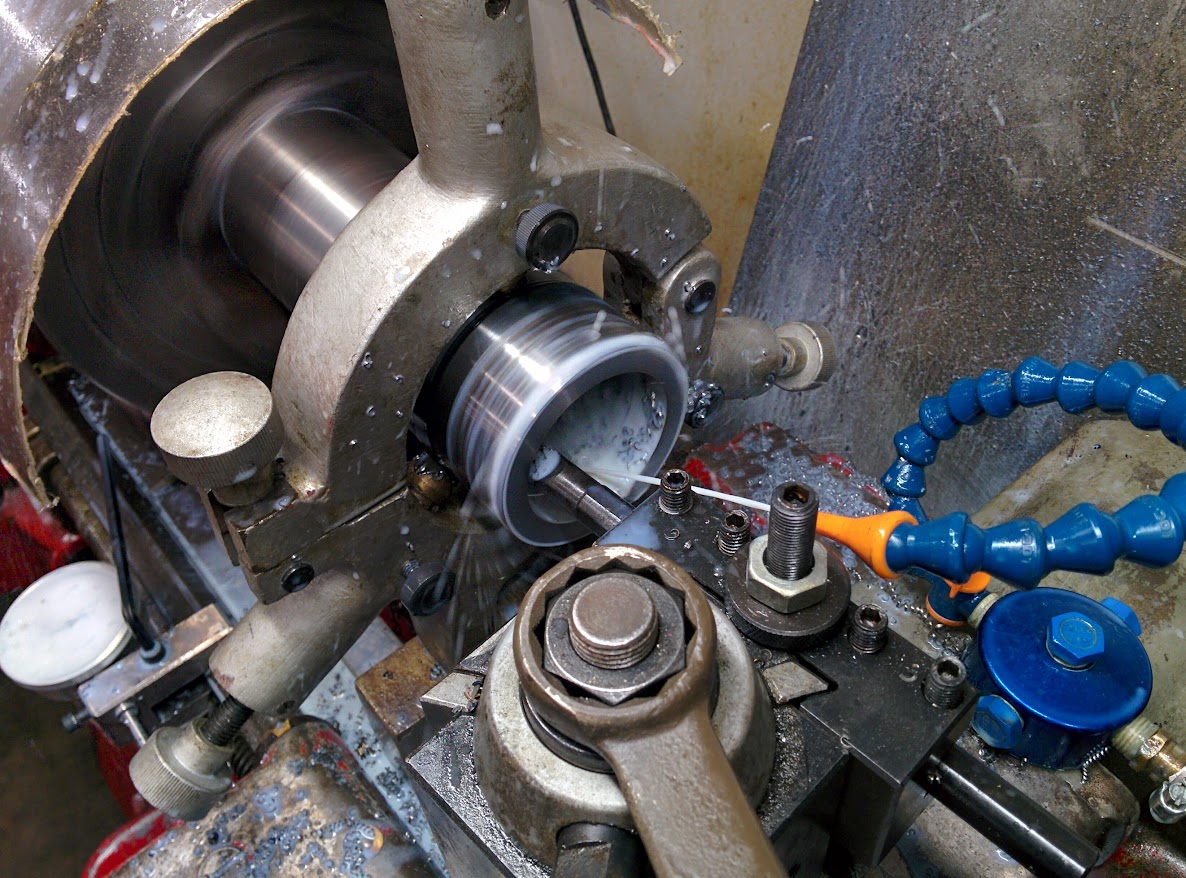
I was wondering how you guys handle this lathe operation. I had some 8620 I wanted to use as a precision holding fixture for some thin wall tube and needed to machine an ID of .75 and a depth of 2". I started with a 1/2" drill operation and went about 2 1/4 inches in. Then I started turning the ID larger but with the chips building up inside and out of sight I was looking for some "experience points" that I don't have. How do you guys handle this when encountered? the DOC was about .015 max and .010 usually.

P1060707.jpg

I ended up plunging about 1/2 way and retracting the cutter and cleaning out the hole, then plunging again to about .25 from final depth and retracting again..

P1060716.jpg

On the first few passes I could hear some crunching after a while and that was how I figured my depths but what do you guys do?

Oh and you know I enjoyed the heck out of my new functionality with the Z indicator!

P1060713.jpg
 
A heaver feed will help, also you could blow the hole with air to clear the chips, a 5/8 hole would be a better starting point. save the fine feed and light cuts for the finish, and watch out for spring in the boring bar...Phil
 
Hey!

Bore the hole out to diameter ,less about .030" in 1/2 inch depth "steps". Take whaterver DOC your set up allows.
That leaves LOTS of room for the chips!

.020 full depth to clean up, careful measure... then .010 +/- for a final pass.

Cheers!
 
Phil [B said:
and watch out for spring in the boring bar...Phil[/B]

Those boring bars are cheap and convenient, but if you're not cutting right you will physically see them flex, as Phil said.

You appear to be cutting fine. But if not, you may need to roll the tool a little and adjust height. On small bores the bottom side of tool can contact, instead of cutting edge. I also experiment with which angle the cutting point goes into hole, slightly rotating toolpost, till I get desired results, ie: not directly on the point, but partially on side of cutting face.

You are moving material though, if you want to not have spiral chips going, might cut a little chip breaker on top side with a dremel or something. If reduce spirals to chips, won't clog hole as much.

Love your gauge. Might consider adding a stop to it, like a micrometer stop. For cuts with continuous same depth into the hole, I let carriage touch micrometer stop. I pull spring loaded feed handle from apron as I approach the stop. As carriage touches stop, feed handle goes to neutral, by itself, real nice, no crash :D. But spring pin of handle needs to be out of apron hole as you touch, or it will crash.

The cut looks pretty doing it that way, because I didn't manually creep up on end of cut.

Also, I try not to bore that much material with a boring bar. Not sure your drill bit collection, but I might go to like 5/8" or 11/16 with a drill bit, then bore the rest.
 
I use a jet of coolant to flush the chips out, but it require manageable chips. I prefer an indexable insert. All the geometry and chip-break is pre-engineered for you.

This is 4140. Can't remember feeds and speeds:

ACtC-3fLQN_5qStnUZFL_CmcGmFJuyKi_uw1CFIJ9AM_7rCY6znmhpxHkoii4ge249r-EB2t-WHyaWRBrJ7FUHaYfgT4-3hpm8bfxWRiKZm5FESZNvgObau4GLpgeyyUlaPtlh4YsTQLaYY0Tu5zHQSv3I872g=w1187-h878-no


ACtC-3cBmwKJ5QfLc9HWeqb_lUVSVOKxI5y3JeZ13ha5-62kpur7VothMvnB1QV2XSS1IrzeqhMtYHzqbiOVnu99aNbCTRjDAJ8ub5pJlS75Y7styLIrq6CcEE6B_EqZ4icLY6aY6GWs8JM_tqWGUD5RsriiAQ=w1187-h878-no
 
..."I pull spring loaded feed handle from apron as I approach the stop. As carriage touches stop, feed handle goes to neutral, by itself, real nice, no crash :D. But spring pin of handle needs to be out of apron hole as you touch, or it will crash."...

Wait!! What are you saying? Will mine do this also?
 
Thanks for all the feedback fellas. I am slapping my forehead because I have too many dull drill bits that are large but I didn't follow through with sending the big ones out for sharpening yet! I think I got caught up with how can I get there with what I have in front of me but every response I've read so far is what was needed. Thanks!
 
Wait!! What are you saying? Will mine do this also?

Yeah, it will. Leave clutch engaged. Be watching, no distractions, :D. Just pull and hold that spring pin handle, so that you're still feeding. When carriage hits the stop it forces the handle toward neutral.

The problem with disengaging a star handle clutch, is you actually speed up feed prior to it breaking loose. I pretty much leave clutch engaged all the time. I use the feed handle itself to sneak up. Just careful I don't let handle pin pop into hole.

And using a micrometer stop as a wall, the bottom edge of cut, like bottom of the hole you're cutting, will be real square and even too.

You can do a test run without cutting work, just to get a feel for it.

Wow! I had no idea this was possible! I picked up a beat up original stop last year and took it apart to see what was wrong. It was frozen with swarf and crud and messed up the threads. I put it in a small box until my lathe was operational so I could try and fix it and I CANNOT FIND IT IN THE SHOP!LOL
 
Thanks for all the feedback fellas. I am slapping my forehead because I have too many dull drill bits that are large but I didn't follow through with sending the big ones out for sharpening yet! I think I got caught up with how can I get there with what I have in front of me but every response I've read so far is what was needed. Thanks!

I don't have an endless range of drill bit sizes either. But after spending a lot of time turning lots and lots of material off. . . :D I'm getting better at preparation. If I know a particular project is coming, or can pause it to get supplies. . . I've been trying to buy my material closer in size to what I actually need. Then I'm cutting less.

Juggling projects can help, :D. That has it's own pitfalls, but allows me a little patience as I'm not feeling pressed to make due to bang one out, I can wait and get right material in, etc., and kill time on that other thing.
 
Wow! I had no idea this was possible! I picked up a beat up original stop last year and took it apart to see what was wrong. It was frozen with swarf and crud and messed up the threads. I put it in a small box until my lathe was operational so I could try and fix it and I CANNOT FIND IT IN THE SHOP!LOL

This tactic speeds up production, and relieves my personal stress too. I'm only watching as I approach the micrometer stop. Pull handle, and never slow feed.

I've been using a dial indicator on opposite side, but your indictor in conjunction with a stop is something I'd like to make.

I saw a pic of one, through I forget where, :D. But here's a parts breakdown, bottom right corner.

295.jpg

An accessory to a Monarch 61. It looks totally bad ass. the indicator is protected, and a sight glass is over it.

Now I don't see a stop portion to it, according to pic. But I'd like to make something similar. Where it has an adjustable stop, plus the cool enclosed dial indicator.

Edit: found the pic:

296.jpg
 
I don't have an endless range of drill bit sizes either. But after spending a lot of time turning lots and lots of material off. . . :D I'm getting better at preparation. If I know a particular project is coming, or can pause it to get supplies. . . I've been trying to buy my material closer in size to what I actually need. Then I'm cutting less.

Juggling projects can help, :D. That has it's own pitfalls, but allows me a little patience as I'm not feeling pressed to make due to bang one out, I can wait and get right material in, etc., and kill time on that other thing.

Oh yes, I am following suit with sizing of the needed materials. It's odd that when I first got my lathe ready to use there were very few choices of ebay places to buy small material lengths with good shipping choices but they are numerous now so that is great!
 
I would have fed the carriage by hand up to ~ 0.745", taking the biggest DOC that I could. Then I would switch to power feed until I hit my target diameter. I would also have a piece of my subject tubing to test my fit as I went along. Since the bar will flex during cuts, I would also use as many spring passes as needed. If I wanted the finish to look super, I also might throw the carriage into reverse, then START a cut at the 2" mark and let the cut go from inside to outside.

As for the clutches disengaging when the carriage hits the stop, they are NOT supposed to work that way.
 
..."I would also have a piece of my subject tubing to test my fit as I went along. Since the bar will flex during cuts, I would also use as many spring passes as needed. If I wanted the finish to look super, I also might throw the carriage into reverse, then START a cut at the 2" mark and let the cut go from inside to outside."...
I did all of this. I wasn't super sure of my tool angle, and the dial reading, since I started with it in whatever position I could get it to fit in the hole and never changed it so I did sneak up on the target.

As for the clutches disengaging when the carriage hits the stop, they are NOT supposed to work that way.
This is good to know, I read that HTRAL probably 5 times cover to cover in the last couple years and didn't recall that tip. I looked at a lot of lathes over the same time period and a lot of them have wear on that surface which might seem to indicate that this is something that a lot of folks do. I was pretty excited to hear of this functionality but not sure I will try it now. :-(
 
lot of them have wear on that surface which might seem to indicate that this is something that a lot of folks do. I was pretty excited to hear of this functionality but not sure I will try it now. :-(

When you say wear on surface, do you mean the clutch disks ?

If so, think of a car's brake pads and disks, or its clutch disks. They wear from engage and disengage, the sliding motion when partially applied.

Couldn't say if the apron was designed this way or not, but this trick won't wear clutches at all. The clutch is continuously locked, no sliding of plates.

Also no grinding of gears, or anything odd in operation. Its real clean and smooth.

The greatest drawback is crashing the machine if you're not paying attention, but you'll crash into chuck regardless if not paying attention. :D

This is a greater advantage to those with star handle clutch, because twisting star momentarily speeds feed. Though i suspect it has advantage for lever type as well.

When i get a chance, I'll make a short vid on it, you can judge for yourself.

The wear I have noticed was on aprons where the lock gets engaged on that flat land near the 3 position holes.
 
The wear I have noticed was on aprons where the lock gets engaged on that flat land near the 3 position holes.

Oh, i gotcha. Couldn't say for certain, but my guess was that happens regardless which clutch/feed tactic. I think most people don't keep handle pulled when switching positions.

I think either tactic you can hold pin out, or let it slide on surface. Years of sliding on surface leaves that trail though.


Back
Top