What's new
What's new

Heavy 10 with cabinet mounting legs / feet

bikesandcars

Plastic
Joined
Mar 14, 2021
I'd like to keep my lathe up higher at the moment so I can move it around until my shop is done.

I'd like to get it set, leveled, then when it comes time to drywall pull it off the wall.

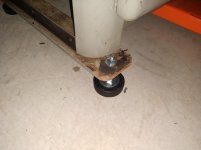
I picked up these leveling feet but didn't think much about the rubber puck bottom allowing a bit too much rocking. Can I assume that's really bad for keeping everything aligned during machining?

I need it about 3" up to get the pallet jack under it.

Any ideas? Wood blocks? 3x4" steel tube ($$ at moment)

I still need to mount motor, belt, etc to make chips.

16355944134331.jpg16355944133890.jpg
 
I imagine that the Durometer on those feet is 65 or higher. That should keep rocking down to near zero. Once you get the lathe in its final location, you can lower the height down to just off the pucks, thus keeping rocking down even more. The final test will be to turn a shaft and see if you get any harmonic markings on it. If you don't see any, you will be fine.
 
Bikesandcars,
I think your just fine with what you have.. Get your motor mounted and quit over thinking things.
Make chips !
Stay safe
Calvin B
 
Bikesandcars,
I think your just fine with what you have.. Get your motor mounted and quit over thinking things.
Make chips !
Stay safe
Calvin B

Love it! It's easy for me to over-think things when I don't have experience in them yet. I'll get it going and report back
 
Seems to me your question is how to temporarily elevate the lathe for a pallet jack, not about the rubber feet.
I'd go ahead and cut a 4x4 into small lengths to put under the lathe for the time being. And you might as well
move it out by 5-6 feet for access to the wall. I'd concentrate on getting the drywall finished, THEN move the lathe
back into its final place before mounting the motor and everything else. Drywall takes very little time to do.
You've got time before making chips...one thing at a time.

Have you thought about epoxy paint for your floor? That would be a great idea. Now is the time to do it before you
start getting oil everywhere. Go at your own timetable, not what is said on a forum.

Not that this will work for you, but I put Delrin pucks under the cabinet of my 9". Now I can easily slide the lathe anywhere it needs to go on my epoxied floor. You won't be able to do that with rubber. But since you don't yet have a lathe to make the Delrin pucks, then I guess that's out off the question for now. Just a suggestion.

PMc

View attachment 333406


Just an fyi. More or less leveling that cabinet, and machine leveling your lathe bed I expect to be two different things.

I'm not a South Bend Lathe cabinet expert, but I'd highly doubt you'll either correct or change bed alignment with adjustments to the cabinet.

You'll most likely want to get cabinet or maybe cabinet/lathe bed mostly there with leveling. But bed straightening/aligning/leveling will be done after, to lathe bed itself, topside of cabinet.

I'd put more time into that when it reaches its final planted spot, where you can get a little more ocd on it.
 
I have my Heavy 10 resting on levelers I made out of hockey pucks that look identical to what you have. Been using it for couple years that way with no problems if you need more height temporarily I would put a 2x4 under the feet. That should give you plenty of room for the pallet jack.

I second what was mentioned above about leveling. I leveled the cabinet front to back with a carpenters level and cut a test bar the check the bed. It was out by half a thousandth in about 8”. I went to adjust the bed screws in the foot at the tailstock end of the bed and found both sides backed off. I snugged them up and a couple tweaks got me to 2 tenths. I repeated the test the other day and it’s still at 2 tenths after 18ish months so I think the feet are fine.

Make sure you cover your lathe while working drywall. That dust gets everywhere and isn’t machine friendly.

Hope this helps.

Ben
 
I'm not a South Bend Lathe cabinet expert, but I'd highly doubt you'll either correct or change bed alignment with adjustments to the cabinet.

You'd think that what you said is the right answer, but you'd be surprised at how fluid the whole structure really is. I level up my 10L using the adjusters on the feet, then take out some slight twist using the tailstock end adjuster.
 
You'd think that what you said is the right answer, but you'd be surprised at how fluid the whole structure really is. I level up my 10L using the adjusters on the feet, then take out some slight twist using the tailstock end adjuster.

Can someone describe how the tail end adjuster works, I found a label and some set screws under many layers of paint but not sure what is inside. (1940s 10L) I have a ways to go before reassembly of apron so have not dug into it.
 
The tailstock end of the bed sits on a T shaped platform. The leg of the T sits down into the bed foot and is pinned into the foot by a pin running parallel to the ways. The set screws engage the end of the T leg.

By loosening one screw and tightening the other it pivots the T platform around the pivot pin. This pivoting motion translates to twisting the bed in relation to the headstock that is fixed.

When cutting your two collar test bar unsupported by a tailstock center, if the tail stock collar is larger, you tighten the set screw on the back side of the bed. If it is smaller, tighten the screw on the front of the bed.

I thought I saw a diagram somewhere that shows everything clearly but I can’t find it now.

BlondiHacks on YouTube has a good video on lathe alignment and cutting the test bar. Where the bed is shimmed in the video for twisting, you would adjust the set screws to achieve the same results.

Hope this helps.

Ben
 
T...if the tail stock collar is larger, you tighten the set screw on the back side of the bed. If it is smaller, tighten the screw on the front of the bed.
...

You're better than me, I can *never* remember which way it goes. I always have to just try it one way and test cut again.....
 
Here's an easy way to get the tailstock adjusted on small lathes after you get the twist out of the bed with the precision level routine.
You can use the leveling screws on the end of the bed or tweak the feet under the cabinet for that.

Measure the tailstock quill diameter. Say it's 1.126
Machine a short bar to 1.126 diameter.
Zero a dial indicator on that machined piece.
Run the indicator over the tailstock quill at the far end and adjust the tailstock side screws to zero the indicator. The whole thing takes ten minutes.
 
What I see almost never mentioned when the subject of bed leveling comes up is why you see the effect on the work piece under cutting conditions. Anyone with a lathe needs to visualize what's actually happening. Because of the height of the cutting tool above the bed ways and the C/L of the work, a non parallel or twisted bed is multiplying that bed twist in a partial rolling motion of the tool point either towards or away from the work piece depending on which way the bed twist runs as the carriage moves along the lathe bed.

Once you have that visualization of the tool point making a short partial arc it's easy to then remember which way to turn any adjustment screws. If the work piece is larger at the tail stock end you need to go up on the front screw or down on the rear screw so the bed then counter rolls the tool point more towards the work piece. Rear screw up or front screw down if the work piece is smaller at the TS end so it then rolls the tool point away from the work. Because of that multiplication effect, a bed say .0002" out of true will have the tool point moving much more than that so you'll see a larger change than that .0002" in the diameter the lathe is producing along the work piece. And leveling a lathe bed even with the very best and most accurate level ever made is still only a static condition. Yes it will get you very close to correct, but I've always had to make further minor compensating adjustments due to how the machine parts distort and deflect under the physical loads while it's cutting. With the bed correct you then adjust the tail stock C/L to match where the bed and head stock C/L now is. With a seriously worn machine those final bed adjustments might still be too subtle to make any real difference though. At that point you need to address the root cause of the real issue with a proper rebuild. And that means a whole lot more than new paint, polish some parts and a few repairs.

There would also be a whole lot less well meant but still misinformation posted in threads about basic machine tool alignment if anyone interested would just do a simple Google search for a free online PDF of the book written by a Dr. Georg Schlesinger titled Testing Machine Tools. Print the whole thing off and then READ it enough times until the concepts of what's being tested, why and how it's done in the way he shows, and the reasons behind why some machine tool parts are purposely and very subtly misaligned for real world cutting conditions. His work in that book is recognized world wide by machine tool manufacturer's and still form the basics of any proper test certificate a half decent machine tool comes with today including the very best cnc's.


Back
Top