What's new
What's new

Heavy 10 restoration

RobbyWeeds

Aluminum
Joined
Dec 4, 2017
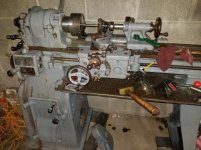
Just wanted to share a project I'm working on. I am probably doing it all wrong but I really enjoy the restoration process. The lathe is in rough shape but the ways, gears and spindle are pretty good. Let me know any ideas. Just be kind because I have very little money and I am a beginner.

Thanks for looking.
 
Pictures of the resoration
 

Attachments

  • 20181030_180647.jpg
    20181030_180647.jpg
    99.3 KB · Views: 225
  • 20181031_193620.jpg
    20181031_193620.jpg
    96.7 KB · Views: 184
  • 20181101_215936.jpg
    20181101_215936.jpg
    92.8 KB · Views: 196
I would really recommend taking everything apart so you can inspect it, then you can paint without having to tape everything off. At least take the major assemblies off.
 
I have everything off except gearbox and spindle head. Would you recommend doing that as well? It seems those 2 would be very difficult to get off
 
At least remove the paint from the face of the gear box, where all the holes are.

That surface is supposed to be bare metal. Painting surfaces that were originally bare just says a rank amateur has been turned loose on the machine.
 
I have everything off except gearbox and spindle head. Would you recommend doing that as well? It seems those 2 would be very difficult to get off

Neither are particularly difficult. Judging by the "before" pictures, that machine needs new wicks at the very least. If you don't replace the wicks it may not get lubrication where it needs to be and you may end up ruining an otherwise okay machine. I couldn't bring myself to turn that on until I knew oil was going everyone it should, and that doesn't mean just seeing oil in the oil cups. I'd remove and strip that spindle and apply a film of lube directly to the inside of the bearings, after cleaning everything. It is possible that any oil in there has hardened and is worthless. Your forward/reverse tumbler has wicks, your gear box has wicks, the apron has wicks. They all need replaced.

Pick up this kit at the very least, before you spend another dime on anything else.

South Bend Lathe Heavy 1 - Rebuild Parts Kit & Illustrated Guide: Model 1L 1R | eBay

It comes with the book which shows you how things come apart. In certain instances, like with the headstock bearing expanders, you need to remove things in a certain order. It is not complicated, just essential that it is done in sequence.
 
Thanks for the replies. I will definitely get the kit. All paint has been stripped off with a crazy strong stripper then wire wheeled, then a metal prep cleaner, then a black primer, and finally the grey. The gearbox and everything else were stripped all the way down to nothing everywhere on the outside could get to. Apron, saddle, tail stock, taper attachment and others are all disassembled on their respective bins right now being cleaned and stripped to then be prepared for paint. I will order the wick kit as I have a lot of wicks that I can access now and I will remove the headstock as suggested and get to even more.

Thanks again.

Don't take this the wrong way but none of that will make the lathe function any better and will actually make it harder to maintain down the line. Painting over bolts, set screws and taper pins as you have done will make it much harder for you or someone else to fix or maintain the lathe down the line. Painting handles and other surfaces that are not meant to be painted is like painting the tires on a car. It just looks and feels wrong.

I'd suggest buying the book suggested above and taking your lathe apart into it's component parts. It will allow you to fix any broken and worn parts you find as well as paint the lathe parts individually without covering fasteners and surfaces that shouldn't be painted. In addition it will teach how the lathe functions so that you can use and maintain it better.

Teryk
 
You do not need to remove the entire headstock. You should remove the spindle and back gear assemblies for cleaning. You can clean the oil reservoirs and install the new spindle felts while the headstock is mounted to the machine. If your headstock has bronze spindle bearings you must follow the proper dis-assembly instructions or you will damage the bearings....There may be a plate attached on the underside of the spindle "cone" cover with removal instructions. If you get the felt kit and the refurbish book, the instructions are in there also. Good luck with your project. PB
 
PB, thanks for the great advice. I just finished that and the other paint. I did the felts in the headstock and carriage but not the gearbox. I was worried I would lose something before I ever even got to make chips. I wish I had the time to do a lot of the suggestions to strip it all the way down but I simply do not have it. I saved this machine from the scrap yard and hopefully its next owner will do a better job than me. Until then tho, I love this thing. It is sturdier than any other 10 in lathe I have used. I am very happy with it. I could possibly do a correct and complete overhaul in some time but as of now, I keep it well oiled and use if plenty.

Thanks for everyone who checked it out. Some of the covers are still being painted.

The carriage stop that came with it appears to be for a 9in. I'm not especially looking for the right one or any of the rests as of now. I did enjoy stripping it down to as far as I had it though.

Robby
 

Attachments

  • 20181118_150036.jpg
    20181118_150036.jpg
    96.5 KB · Views: 114
  • 20181117_234127.jpg
    20181117_234127.jpg
    92.8 KB · Views: 89


Back
Top