What's new
What's new

Help: Tailstock 0.050" high. How do I align headstock to tailstock: bearings, shims?

SB27A

Plastic
Joined
May 27, 2020
Help: Tailstock 0.050" high. How do I align headstock to tailstock: bearings, shims?

Hi fellow SB Lathists,

After leveling the lathe and getting the fabri-cobbled motor bracket bolted to the floor, I spun up my 1921 SB 27-A 11" lathe, (probably its first time in 30 years), and everything seemed as expected. Took a few light passes, then went to drill and put a dead center in a 5" work-piece, and the tailstock isn't centered with the work; it's 0.050" high. I drilled and ran it anyway, and ended up with a ~0.010" diameter taper on the part (expected, but not acceptable).

I confirmed the tailstock is 0.050" higher than headstock center with a digital indicator+mag-base on the chuck, confirmed in all 4 quarters of the chuck, spinning the chuck around, with a 0.100" delta top-to-bottom, measured from a dead-center in tailstock (even changing and re-orienting dead-centers). I tore down the tailstock, cleaning all of the contact areas, to confirm there was no build-up or misassembly. (Note that there was actually ~0.010-0.015" wear on the tailstock-to-ways contact surface of the tailstock.) Reassembled, and the result is the same. There is no vertical adjustment on the tailstock.

On the headstock side, it looks like I have about 0.012" runout on the large bronze bearing, and 0.008" runout on the small bronze bearing, (per testing procedure with 12" bar). I've not yet removed the bearing caps, but, while assembled, it doesn't look there are many/any shims remaining, to take up the runout. That said, 0.012" runout on the large bronze bearing doesn't account for 0.050" misalignment.

From looking at it all, I'm not sure how to move the headstock back into alignment with the tailstock. Is there a way to shim the bearings vertically upward? With the bearings' concentric mating surface to the headstock, I have doubts they can be shifted vertically upward. There is the headstock-to-bed joint, that could possibly be shimmed, but that brings it's own issues, and may not fix the root cause of the problem.

Do I need new bearings to move the spindle upward? Is there somewhere I can shim? Any help would be appreciated! I'm stuck scratching my head, unsure of what to do from here.

Thank you!
-SB27A

*As an aside, I'd like to crack the bearing caps, to inspect, but does anyone know if there is a good bearing cap torque spec, considering this lathe was made before torque wrenches? SB's "Keep Your Lathe In Trim" bulletin only says "Tighten the cap bolts carefully, drawing them down with a uniform tension."

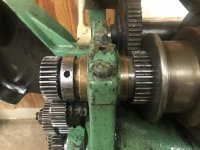
IMG_8260.jpg
IMG_8259.jpg
IMG_8275.jpg
IMG_8276.jpg
IMG_8277.jpg
 
You might inspect TS for TILT before doing any "fixing" - in other words is the tail stock spindle / ram PARALLEL to flat way?

If actually that high....

Raise ALL the head stock, not the bearings

That would be .050 on the flat way shims and .035 on the vee way pair.

These can be maybe 2" long and only in the vicinity of the front and rear clamps

As to slop on bronze bearings, that is just loose, not "run out". They can be fixed in several ways - like

line them and rebore
replace them (no doubt have to be shop made)
build up and refinish spindle journals over size

New made ones (or relined) need to be C932 bearing bronze

ON EDIT - other wore out bronze get lined and "shoed"

https://www.practicalmachinist.com/...ory/shoeing-shifting-forks-159832/#post911532
 
Last edited:
Not to be nit picky but, the indicator arm is sticking way out there. Everything has flex and is subject to gravity. If the arm is drooping the readings will point to a high tailstock. If you shorten up the indicator reach does it get better?

As for bearing cap torque just use the box end of the correct normal length combination wrench and snug it down. Remember you are tightening a bolt that is in cast iron.
 
How are you checking spindle run out ?

I might put that mag base on bearing cap. Put indicator at 12 oclock on chuck. Take a pry bar and try to lift chuck from bottom side. See what the up/down reading is.

Looking at bearing caps. Those holes in the middle for oil ? Due due the age, I think there are no expanders or adjusters. If thats the case, I would not be scared to raise the caps to have a peak. The bronze bearings are probably just half shells. Again, if that's right, Could probably take caps to a surface grinder, take .010 or .020" or whatever you need off flat side of caps. Then add shims to get adjust room for future adjustment.

Like johnoder said, I'd probably raise all of headstock with shims, to above tailstock. Then shim tailstock. That'll give you options for adjustments later.
 
From looking at it all, I'm not sure how to move the headstock back into alignment with the tailstock.

Have you taken the tailstock top off the tailstock base yet? If not do so. Report back with what you find.

1) Do NOT shim the headstock higher,
2) Do NOT attempt to shim the headstock bearings higher.
3) do you think this is the original tailstock that shipped with this machine.
 
I guess I would take a 2x2 and give a lift on the front and rear of the headstock spindle and write down the numbers. Looking for a quick move that suggest some slop on the bearings .002 good .003 Ok (for now) ....and come back to tell the guys here what you found.
If you pull the caps write down what shims are where. Draw a map so you don’t forget.
You might figure a way to check that the tail stock is square horizontally with the bed.
Might also check to see the head stock is square with the bed.
Don't change anything until you know where you are.

Qt [~0.010-0.015" wear on the tailstock-to-ways contact surface of the tailstock.)]
The tail would wear with the bed ways...it would not wear to miss contact, so I dont get what you are saying ...at tha very end of the bed the ways should look very good with having little wear...how does the tail fit there?
 
It is easy to lower a tailstock, just pull the tailstock off its base and have at it with your mill. That said it would be good to know for sure it is .050 high. Very unusual for a tailstock to wear UP! Normally they go down with wear.
 
I suspect something else going on, like trash between the tailstock halves. Try a different test- turn a short bar of material down to the same OD as the tailstock quill. Bring the tailstock up to it, and run your fingers over the joint, place a short straight edge along the top, etc. Try again with the tailstock slid backward, and the quill extended.

allan
 
has anyone mentioned "indicator sag"??
with that kind set up its almost a sure bet its happening.

i doubt the tail is .050" HIGH in reality....unless as mentioned someone put shims in there

stranger things have happened tho.:)
 
has anyone mentioned "indicator sag"??
with that kind set up its almost a sure bet its happening.

i doubt the tail is .050" HIGH in reality....unless as mentioned someone put shims in there

stranger things have happened tho.:)

Just about every southbend lathe I've ever owned came complete with a compliment of assorted
shims between the base and upper section.
 
QT the op: [I tore down the tailstock, cleaning all of the contact areas, to confirm there was no build-up or misassembly. (Note that there was actually ~0.010-0.015" wear on the tailstock-to-ways contact surface of the tailstock.) Reassembled, and the result is the same. There is no vertical adjustment on the tailstock.]

*This has to be explained better before and modifications are considered,

and the machine has to be cleaned before measurements are trusted.

.050 is so much you can turn a point on the head stock chuck , put a center in the tail and the measurer .05 with a scale at places along bed travel.
bring the tail and headstock center to center and see (eyeball) the error at close to head stock.

Could straight edge the bed and see if it straight or washed out.

and thinking about the OPs quote ( actually ~0.010-0.015" wear)...why does the tail not fit the bed-> tailstock-to-ways contact surface???

Possible side line business to advertise on craigslist. Machine repairman ..will being inspection tools and inspect your machine (or be specific and say lathe/grinder/mill.
 
QT the OP: {On the headstock side, it looks like I have about 0.012" runout on the large bronze bearing, and 0.008" runout on the small bronze bearing, (per testing procedure with 12" bar).}

What is this? the 12" bar indicated in near the chuck and showing chuck jaw wobble 12" out...or free slop in the bearings..

I think the op should pick and oil rag clean the machine very well, then invite another lathe guy to come take a look.
 
I'm sorry to say that I do not believe your measurements. Please understand your numbers are so unusual that something else is happening. Personally, I'm a test bar guy. If the bed is straight, using a test bar in the spindle and the tail stock with a dial indicator on the carriage. All things will be revealed. The bed is the machine reference. spindle parallelism to the bed can only be measured with a test bar mounted in the spindle taper which eliminates any confusion caused by a chuck. Once that parallelism is attained, only then can the tail stock alignment be measured relative to the spindle and bed with a test bar mounted in the TS quill.
 
You might take a name brand flat file and flat file check all the internal and external machined surfaces of the tail stock to assure there are no bugs or bruises. Set it on the bed ways and with a .002 or so shim to feel the fit. Or blue check it.
Re:: Run the file like a hone to not take any stock but to see if surfaces are flat and true.

Use a .002 shim to check that the head stock is down tight to bed ways.

You can set the tail stock on your round test bar on a flat such as a surface plate with shim stack the flat side to horizontal and see if the quill is horizontal to the base/bottom .
 
Might not be the original tailstock for this machine. If he really believes his numbers, easy to machine 50 thou off the top of the base. If the measurements
are a lie, he can always shim it back up again.

Really the best check to see if a tailstock is set up right, is to use a tiny center drill on a piece of stock in the headstock. It it produces an oversize hole,
something's up.
 
I suspect something else going on, like trash between the tailstock halves. Try a different test- turn a short bar of material down to the same OD as the tailstock quill. Bring the tailstock up to it, and run your fingers over the joint, place a short straight edge along the top, etc. Try again with the tailstock slid backward, and the quill extended.

allan

Never trust an indicator arm in the horizontal position, it will always sag. Allan has the correct way to test, only rather than comparing with a scale you mount an indicator on the carriage and move from the spindle test diameter to the tailstock diameter.

Before performing this test you want to indicate the tailstock spindle to make certain it is true with the bed in both axis.
 
The quick and simple test is to bring the tail center point to the head stock center point....eyeballing will show .002 error. Yes that only tells at the one place..It may be differnt 20" away from the head stock if the bead is way wore out. .and does not tell if the tail is square/level.. just a rough look at center-center.,

The tail V way and flat way should set full down on the bed V and flat.. any day ligkt between may mean a bug or bruse some place on tha tails important areas.. Bugs and bruses in the tail at tear down another problem search..
If it is another lathes tail you have to prove that before hacking away .050.


Back
Top