What's new
What's new

How to adjust cutting height?

CVRIV

Aluminum
Joined
Feb 19, 2021
Im pretty sure i have the original tool holder, that came with my 9A, setup correctly, but the toitionol is way to low for cutting. Do i just shim the tool up into position? That doesnt seem right. My lathe came with a lot of stuff, but nothing to do that. How is the cutting height appropriately adjusted?

Eventually ill get a quick change, but not right now because this 9A came with a bunch of tooling id hate to just throw to the side.

0426211608_HDR.jpg
 
Put a pointed center in the tailstock. Rock the tool holder with the tip of the tool up to that point, lock er down and you should be good to go.
 
I can't see a 100% clear, but it appears you need to raise quite a bit. Simply using the rocker to tilt may put the face of tool toward work, you need some angle on cutting tool so that just the point touches work.

Already mentioned was adding a spacer between rocker and tool holder, which is what I would do. then fine tune using rocker.
 
Thanks for the help everyone. So using the rocker wont help because the tool is very low as another member had already mentioned. Plus i assumed that the rocker was merely for changing thw rake of the cutting surface. If i raised the cutting tip up as far as it can go, the rake would be insane. The cutting edge would gouge the work to death.

I thought to use a space but it seemed like there had to be a better way. Anyways. Thanks.
 
Actually... I take it back. It seemed worae this morning than i does now. I tilted the tool up and the rake isnt that bad. Im going roll with this for now but i dont like how the rake changes with height.
 
so that just the point touches work

See the bit about "tilted" and NOT tilted (shaper) tool holders

That's a shaper tool holder - it does not have the built-in tilt up that a lathe tool holder has

And that brings up why braised carbide can suck - you can literally run out of front clearance on the tool bit (assuming one neglected to grind in more front clearance). Such situations are hardly very good at nicely cutting metal

One of the reasons folks invest in such things as Aloris tool post systems - no tilting is involved
 
Fwiw the tool holders that have that built in upward angle as already mentioned would be the correct one's. What you have can be made to work of course. Those rocker tool posts are meant as something to make fairly fine adjustments to the tool tips height adjustment. Large height adjustments just using that rocker will drastically change the front and top clearance or rake angles. The major adjustment is and was always meant to be done with a spacer block under the tool holder. Measure how low the tool point currently is and use a decent length of key stock or similar under that tool holder to bring the tool point almost to the correct elevation. That tool holder slot is over sized for that reason. The last final correction is then made using the curved rocker piece. Other than gaining some better access on some part shapes, there's almost no other advantage to these types of tool posts and a fair number of disadvantages. While I've got and do use a qctp, if I want the best and most rigid tool holder for hogging or high accuracy cuts, no qctp design made by any manufacturer is as good as what most more modern lathes already come with as a stock tool holder, that standard 4 position tool holder block. The reality's are that in a home shop doing non commercial volume parts, any qctp is more of a handy convenience and a slight time saver rather than an absolute necessity. Keeping a set of the correct shims for each tool speeds up and vastly reduces the time and frustration during any tool change with the 4 position types of non adjustable tool posts when or if you need more than 4 tools. Anyone who's bothered to run an indicator check on there qctp's as there entering a cut will see just how flexible they and the top slide there mounted to really are. Tool holding and what the machine itself has for rigidity is everything when machining metal. I'll admit that once you add a decent dro to any lathe, then having a good repeatable (expensive) qctp does then make much more sense.
 
Actually... I take it back. It seemed worae this morning than i does now. I tilted the tool up and the rake isnt that bad. Im going roll with this for now but i dont like how the rake changes with height.

You need two things:

A - More tool holders, back-rake built-in, left and right as well as straight-ahead.

WHEN used wisely, it is NOT required to grind the top of a blank at all. Just the front and side(s). The blanks can be touched-up faster. They last waay longer.

B - heavy "shims" that go between the top of the rocker, and the underside of the Armstrong/Williams holder. That divorces gross height from gross tilt.

- WITH those shims AND built-in back rake? You may then also pull the rocker crescent out, flip the ring flat-side up, shim to height, stand heavier cuts with less vibration or having the tool move.

BE AWARE..

- that the rocker serves as a form of safety. Too heavy a cut, it is MEANT to be able to slip down and move the tool OUT of the heavy load zone.

BE AWARE..

- that the "safe" way to align the toolholder ALSO means IF too heavy a cut, it will swing... and swing AWAY from engagement, NOT dig-in deeper ... if the force is so high as to rotate the toolpost at all. One of the several reasons they make left, right, and straight ahead toolholders for the lantern (and double-post) style toolposts.

A "lantern" TP is not as "dumb" as first appears ... or they'd not have remained in use for more than a hundred years.

It can be positioned very creatively. And re-positioned as required. Rapidly,even.

It can serve as a "fuse" to reduce the risk of damage from crashes.

Good thing to do, learning the lantern FIRST. Stick with it!

It can break you of picking up bad habits, early. THEN you can "graduate" to the 4-Way.

A 4-Way is almost NEVER "populated" all sides. One, two, often. Three? Only sometimes. Keep a side open for "whatever" might become needful in the moment. Drill or boring-bar holder, pressure or cut knurls, for example..

A 4-Way needs but the most modest collection of shims and/or wedges. Not as if there was an infinite range of blanks in your stash, is it? Make some wedges. They can set back-rake as well as control tip height.

It needs No expensive, extensive "toolholder" collection.

Carbides are optional, not required. I can't really be bothered.

No longer running a "factory", after all. HSS/Cobalt & Tantung-G are cheaper.

What do you expect to turn that a Crucible CPM Rex 95 or a Tantung-G Stellite CANNOT cut, anyway?

:)

Annnnnd .. as to consumables?

I'd far rather buy fresh veg, steak, & seafood than toolholders and consumable inserts.

Cheap Iyam. Lazy as well.

:D
 
Further to the comments from Thermite the basic lantern toolholder can be made more rigid and more repeatable when switching tools by using a flat washer of suitable thickness instead of the standard curved rocker and dished washer. Best way is to use one with deep groove across it of the same width as the tool shank or holder body. This groove ensures that the tool cannot wiggle from side to side when adjusted. Although a milling machine or shaper is the best way to make the groove simply screwing a pair of plates to the washer at the appropriate spacing works well enough. Make the groove 1/4" (or more) deep. You may need more than one washer to suit different tools.

Carbide insert tooling is inherently fixed height so you just need to make the washer the right thickness.

Basic Armstrong and equivalent holders from other makes such as Williams, Denford, Andycraft, J&S all commonly found in the UK come in three varieties. Angled left for normal turning and facing with right hand tools, straight for grooving and threading, angled right for turning and facing with left hand tools. Right hand tool have the cutting edge towards the chuck side of the saddle, left hand tools towards the tailstock side.

You can also get boring bar holders, parting blade holders and threading tools. Threading tools carry a rotatable, part circular blade, with a flat top having the right angle, 55° for British or 60° for American and Metric, ground onto the periphery. Much easier to sharpen as only the top needs to be ground. The tool is rotated to set the tip on centre. Andycraft and Denford are the common UK breeds of these.

Parting blade holders tend to be the least satisfactory as they all suffer from more projection than desirable and use simple plain top blades needing a bit of practice to get the best out of them.

The modern T-type blade with hollow ground top is much better but only seem to come with holders having a side ledge to bolt into quick change or block type tool post. An adequate block type carrier can easily be fabricated by screwing and gluing together 3 standard steel bar sections. Similarly the Tee nut can be made form two more sections screwed and grooved together. Such a block post will work fine with the even better carbide insert parting tools. I'd make the block post with two grooves. The second side will be handy when branching out into the carbide insert world.

All much cheaper, but more work, than clicking "buy it now" on a QTP system.

If you do decide to stick with with an improved lantern it would be worth expending a bit of creativity on figuring out a way of preventing inadvertent rotation or sideways slide when loosening the bolt to change tools. I imagine a large belleville washer (basically a domed shape spring) underneath pushing against the bottom of the Tee slot would hold it nicely yet still permit movment when needed.

Although what Themite says about the safety aspect of a lantern allowing tooling to move when overloaded rather than jamming or breaking stuff is true that really only applies to much heavier duty machines than yours. Blet slip on the typical SouthBend or other one man lift (just!) bench mount machines is plenty good enough at the safety bit. I've seen similar size Armstrong holders and lanterns so badly distorted by over tightening in an attempt to stop things moving that the tool could not be removed. Lantern slow pulled in by around 1/16", the tool shank top mushroomed out to half again it's standard width and the bolt end distorted so much that less than 45° rotation was possible. Extracting to fix was "challenging". Not a bat idea to use an alloy push plate between bolt and shank for protection. Consumable item needing periodic replacement of course. Better grip from alloy on steel than steel on steel to.

Clive
 
You have a 9A lathe, which generally should NOT require any shimming of the toolholder. Read Chapter IV of HTRAL on toolholders and the grinding of bits to get an idea of what you need to do to prepare to start turning. Your setup looks worse than it actually is due to the camera angle.
 
A "lantern" TP is not as "dumb" as first appears ... or they'd not have remained in use for more than a hundred years.
...

Agree - but he should set aside the tool holder part. Best way to use a lantern toolpost is to shim your tool up in slot - larger unground hss tools work well for this - and top the stack with the actual hss tool ground to do the cutting. When I had a 9" lathe, the riser shims were 1/2 inch square HSS blanks, and the cutter was a 3/8 " square tool. Thinner half inch wide shims can be made of anything - steel, aluminum, etc

Advantage of this approach is, it permits good control of all the cutting geometry, and the use of a larger cutting tool than the 1/4 inch one that fits the toolholder. It's really a more rigid setup overall.
 
Once you figure out a spacer thickness that works, you can make a large washer as a spacer in that thickness to go between the curved washer and the compound.
 
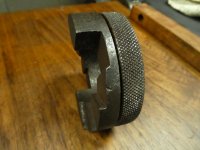
The washer/spacer thing is easy to do, once you figure out what size makes sense for your usual cutter blanks. I had one that was cutout so I could just slip it on when needed so it resembled a "C" shape. I got this gadget with my lathe and although I never used it I suspected it was for adjusting the tool height in the lantern post. Have any of you guys used something like this? It's nice to look at and the knurled ring on the bottom is I guess for fine height adjustments? If it's for something else do tell.

adjuster00004.jpg

adjuster00005.jpg

adjuster00006.jpg

adjuster00007.jpg
 
Wow. A lot of cool information. I actaully like the lantern post. Im going to continue using it. I have a whole bunch of tool holders to use with it. This is why im not so quick to use something else. I already did some very light cutting with the machine just to make sure the machine is in correct running condition. I actually had to adjust my forward and reverse gear meshing distance because they were meshing to tighly. There was a significant difference in temperature on that side of the head stock near the main bearing compared to the other side. After adjusting, shes running beautifully.

I mistakenly bought a cutoff/ parting tool with a 1/2" width. The tool holder i have is 5/8". I found that 5/8" isnt all that widely available? I got the 1/2" think thats what i had, because i didnt measure. I was at work when i ordered. I got that parting bit because its stupid thin at 0.04". I really wanted to use it. I want to find a way to use 1/2" in my 5/8". Anyone do this?
 
Heres the tooling that came with the machine. Tooling, tool holders, etc...

How do i open up to clean and grease/ oil the live centers? How about the drill chucks? I have several live centers that are in poor operating condition and one drill chuck that hard to open and close.

0502210833.jpg0502210833_HDR.jpg0502210833a.jpg0502210834_HDR.jpg
 
Heres the tooling that came with the machine. Tooling, tool holders, etc...

How do i open up to clean and grease/ oil the live centers? How about the drill chucks? I have several live centers that are in poor operating condition and one drill chuck that hard to open and close.

That's not much in tooling.

The live centers are probably pressed together, so they will have to be pressed apart. The drill chucks are the same way. Get the proper procedure online and use those instructions. The Jacobs chucks are pressed together - open the chuck about 1/3 of the way, support the knurled outer ring and press down on the the jaws until they pop out. Be sure to number your jaws, because they go in in a specific order.

Thanks. Ill do that. I think this is enough tooling for me for now. I dont have much to cut on this machine yet, although i have this insatiable desire to use the machine.


Back
Top