What's new
What's new

Inspecting an older 10L?

Cheetah

Aluminum
Joined
Nov 26, 2013
Location
Montana
Hey folks,

Been lurking a long time, I genuinely appreciate the wealth and breadth of information available here. I've been "casually browsing" machines for 6-8 years now, and just stumbled across a deal that seems too good to be true (I know, I know...).

I'm heading out the day after tomorrow to inspect a 10L and have a couple minor points I haven't yet uncovered in my research/reading.

The best approximation of date I can find based on S/N is 1918 manufacture, and doesn't appear to have hardened ways, which I don't believe were even offered that early.

The carriage lock appears to be missing from photos, and a bit of searching shows that's not an uncommon part to break or vanish on these machines. I have the ILION book, which suggests using this lock as a rough gauge of wear. Is there any analog to this test that can be done in lieu of the carriage lock?

I haven't seen Tubalcain's video series specific to South Bends yet, but plan to watch it before heading out.

Since I've never been deep enough into this process to have to separate hardened or non-hardened ways, is there anything in particular I should be looking out for? I plan to take along an indicator and straight edge to do the topical inspection stuff. The machine is currently under power, but it appears to already be on skids for movement, so I doubt it's leveled and worth taking any cuts, even assuming the seller would allow me to. Obvious things like checking gears for missing teeth, running it in as many speeds as possible to listen for expensive-sounding noises, etc. will happen.

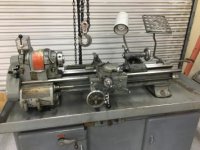
It's a 48" bed, D1-4 spindle, standard range two tumbler gearbox, large dials, taper attachment, comes with a collet draw bar (is it safe to assume 5C on this? The listing says it's not original, and no photo), a couple 6" 3-jaws, an 8" 4-jaw, a face plate, extra backing plate, and some other misc accessories. Doesn't appear to come with a tool post or any tooling, or steady/follow rests, etc. Currently set up on 3ph 220, with a 3ph coolant pump for the flood setup as well. I guess a few parts (tailstock and apron, I believe) have been restored already.

I plan to tear into it and continue/complete the restoration, assuming the machine is worth the effort.

Thanks!

Edit: Re-reading this, I didn't really clearly ask my question; is there anything specific to the non-hardened beds I should look at/inspect and consider a deal breaker? What are the limitations to re-scraping?
 
That spindle is not 1918...

As seller to allow you to make a few cuts and run it in every speed both directions.

Run all of the change gears as well.

Try back gear...

Lots depends on price.

If $200.00 just pay the man and load it up.

The more expensive it is the more you look.

Sent from my SAMSUNG-SGH-I337Z using Tapatalk
 
First you need to re-check your serial#. There was nothing called a 10L in 1918. Your serial # should read numbers, followed by letters, IF it's a 10R or 10L it will have R as the first letter. The serial# is located on right end of bed,between front v-way and flat-way (don't get confused with a previous owners inventory number). If the lathe IS a 10L, with hardened ways, The early hardened beds had "HNG" stamped between the rear v-ways on the right end of bed (this I learned from Southbend Latheman). Later models had a tag installed on FRONT of right end of bed that indicated "hardened bed". A hard bed will not have scraping marks anywhere on the ways ("seagulling" or "frosting"). In any case, check all gears for broken teeth, and check the v-ways for a ridge at the top of the vee (front v-way is most often the worst. If you have a "precision" straight edge, or know a machinist who has one, take it with you and check the front v-way for a belly in the face of the v-way. Wear is usually the worst in the first 12" from chuck to tailstock. Hope this helps and that you find a "keeper". PB
 
Thanks folks. Serial number reads 15700RKX16, photo attached. I was basing the date on this list, and having read numbers were more or less sequential, but was skeptical at that. I can't seem to turn up a better source online, but admit my Google-fu is weak.

Without a carriage lock, is there any other reasonably accessible method to checking wear? I've got feelers out for a good straight edge, but I'm not hopeful to source one in time.

00j0j_3Uq1uyMByeL_600x450.jpg
00F0F_jOQjUcC0mq7_600x450.jpg
 
Looks like 4' bed, newer lever clutch ,D1-4 camlock spindle is a HUGE plus compared to the threaded spindle. Steady rest should be included for that price. Looks to be soft bed- look for a ridge below the top of the outer v-way forward of the chuck. With the carriage at the chuck, lightly snug the carriage lock with your fingers and back off just a smidge. Then run it down to the far end of the bed. If it begins to bind as you move away from the chuck it's evidence of wear...if it really binds up hard, there's a lot of wear up front. Check spindle play with a soft bar and indicator, clean up the taper and run a tenths indicator inside under power to check t.i.r.
 
The D1-4 easily adds about $400-500 to the value. I'm assuming there isn't a taper attachment. Hopefully the thread dial is in the cabinet.

If everything is in good order it is easily worth $2,200. If it were local I'd buy it.
 
Thanks, everyone! One question still remains though: is there any reasonably accessible way to assess bed wear without a carriage lock? The lock appears to be missing in the photos, so I'm hoping to be prepared with a decent analog to this method. I'm going to bring the appropriate 3/8-16 bolt, for the extremely unlikely case the brake "cleat" is rattling around inside the carriage and only the bolt is missing. I feel like I'm well-enough prepared to easily verify whether the machine was abused or not, but if there's a simple substitute for the carriage lock test, there's no harm in checking one more thing.
 
If you've seen a few beds you can assess bed wear with your eye to a point. If it is beyond its useful life it will have a horrible groove in the front way. Even then, I had a 13" with a deep groove that still made usable parts.

Chances are it is still plenty useful.
 
Using the carriage lock as a "gauge" would be measuring (gauging) the wear between the front V way and the underside of the V way (where the bottom piece of the carriage lock rides. So how about putting a dial indicator base on the top of your carriage approximately above the front V way and the indicator stylus on the surface where the clamping block of the carriage lock would ride??? Run the carriage up and down the ways as see what it reads. Seems like this technique might even give you a better way to see any where there???

Just food for thought.

Good luck,
Ted
 
If it runs at 2200 for your area grab it....these things will make good parts all the way to the point the carriage is dragging on the tailstock flat way.

The carriage lock test is bogus....its a sloppy little part in a sloppier clearance hole running on a NON precision surface with likely a bunch of dings in it.

Only relevant test is how it turns.....so chuck up aide of mild steel and have at it.....always a good idea to take a piece of 1.5" x 8" with you to check out any running machine...simple "two collar" test tells the tale nearly every time....Abom79 has a good video explaining it...and everyone should familiarize themselves with how to apply it....can be used to evaluate and set up a machine...it the only test you need! :)

Ps- if you really MUST a mag base stuck to the left front saddle wing with an indicator on the tailstock flat way is a much better test to check out a non-running machine although even this is not conclusive.
 
Ted, thanks for the explanation. I'm not sure I've ever even seen any SB lathes in person - good to know how the lock assembly goes together, now I don't feel at all bad about not checking that out.

I'm dragging along some stock, but it doesn't sound like I'm going to be able to make any cuts with it due to no tool post. As any kind of deal, just have to feel it out when I get there. Thanks again to all for the input, I'll post any updates.
 
Given the relatively modern vintage of this machine, AND
Given that the serial number has some 'specials' in it, AND
Given the photo of the bed area around the serial number (low wear area, shows no hand scraping marks), THEN
my personal guess is this is a flame hard bed.

Missing in action is the black metal tag with those words on it, mounted near the
pedestal by the tailstock side of the bed.

HOWEVER it also seems to be missing the round metal tag around the bed
adjust screws, which could imply a re-paint where those items were removed
and never put back on. Check for rivet holes under the paint in that area.
 
Jim, good point! More details to come, it's late and I've got an early and exceptionally long day tomorrow, but I'm now the proud owner of this Heavy 10 :D
 
This link is the new serial number database with more information in it:
http://www.wswells.com/sn/sn_db.htm
The old DB is still listed because I have not completed moving all the entries yet. I'm about half way.

1966 or 67 is correct. to check for a flame hardened bed, the unit code is stamped on the right rear flat way. The X braced bed was introduced on 12-12-1957 as DDB-200R,(the prior bed unit code was DDB-107R) the optional Flame hardened bed DDB-200RG was also listed in the same SBL internal General Notice(GN)3114 at the same date. In GN 3636 dated 10-16-1967 the Flame Hardened bed was made a "Standard" on all 10L's. The unit code being revised to DDB-201R.
As stated the most common wear is on the front V-way towards the head stock, a straight edge and feeler gauges will show this dip if there. If the dip is 8/10 thous or more, the saddle lock, if tightened while in this area and then slightly loosened, the saddle will bind as it is cranked towards the tail stock.
Visually, the lathe looks in pretty good shape.

Steve
 
Good info, Steve, thank you!

Looks like flame hardened bed for sure then, unit code DDB200RG is clearly stamped in the rear flat way. That's an excellent (unexpected) bonus!

I'll shuffle some photos over from my phone and get them posted tonight.

Wired for 3 phase 220, including a 3 phase coolant pump. I haven't dug into the coolant system at all, since it's mounted in the center of the cabinet and I have to remove some screws...just haven't had the time to open it up yet. Debating building a phase converter, or swapping the drive motor for a single phase unit, or trying to buy a phase converter/VFD.

Spindle runout barely registered on my 0.0005" DTI - the most accurate I have at the moment. Definitely under that. The ways are clean and smooth, aside from a couple small nicks. Everything runs smooth and tight. No missing teeth on any gears, everything shifts smoothly and easily.

The only shortfalls are no toolpost, no threading dial, no steady or follower rest, no carriage lock, and no tailstock lock wrench. I wouldn't expect them to be included, but also no carriage or cross slide stop.

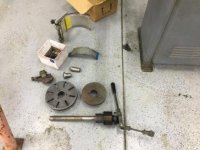
Bonuses: Two 3J chucks (seller said one runs out something like 1/8" and he never dug into it to figure out the problem), one 4J, a spindle taper adapter, a D1-4 blank plate and a drive plate, a home made ball turner, and a drawbar type collet closer (which I'm not sure is made for the machine as I can't figure out how on earth it would mount..)

If anybody knows of anyone trying to part with a carriage lock, an original threading dial or telescoping rests, please let me know!
 
Here we go:

file1-2.jpg
file-3.jpg
file1-3.jpg
file1.jpg
The 3J on the left is the one that's apparently out. Only markings I can find are "1736" stamped in the face, and a scribe mark aligning it to the backing plate.
file-4.jpg
Any input on the drawbar would be greatly appreciated! In the box are some new jaws for one of the 3J's and a couple chuck wrenches.


Back
Top