millwrong74
Plastic
- Joined
- Jun 9, 2018
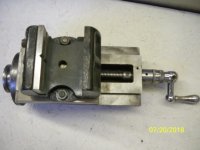
In my box of misc parts, I acquired when I bought the 9" South Bend, were 2 milling attachments. One was a genuine 9" South Bend in great shape. The other was some sort of taller heavier version, pretty close to an Atlas/Craftsman style, but not quite, first photo.
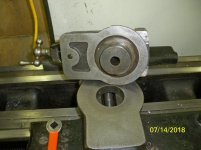
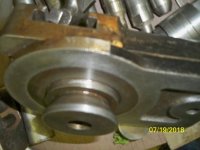
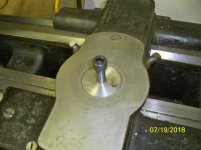
It came with an adaptor plate for use on the 9", but since I already had the real deal for the 9", I thought I would modify it for use on the 13". I ditched the adaptor plate and made a new cylindrical stud about 2.224" diameter to fit in the 13" cross feed hole. The first attempt was as close to the original shape and dimensions as I could make it using the 9". See photo no. 3. There are hardened steel slugs with wedged ends that are driven into the 60 degree shoulder on the stud by the two set screws, photo no. 4. BUT, when I tightened the set screws, the whole unit raised up off the cross feed and was NOT stable... HUH? I was a few thou short on the diameter, and I wasn't going to make another stud, so I made a flat bottom groove instead. Then a had a big problem!
Using the wedged shaped slugs that were part of the original cross feed table, I inserted my new 2.224" stud, and tightened them down. See photo no. 4. I succeeded in in wedging them into the blind holes with no way to remove them!

I tried small rare earth in the holes, but they were not strong enough. I could rotate the stud, but that only meant they weren't totally jammed in the flat bottom groove. I tried tapping on the table, but no luck. The only thing I could come up with was to remove the cross feed table from the carriage, and turn it vertically, and try tapping some more, hoping that gravity would make them fall out. No Luck. I tried compressed air blowing into the holes. No Luck. I guess I'm really screwed now!
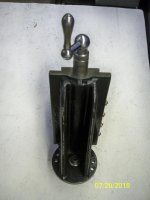
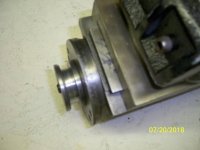
I remembered I had an air chisel with a hammer tool... perfect! I hooked it up and gave the table about 10 bursts while it was secured vertically in the vise, and it finally loosened up the stud enough so I could wiggle it free. WHEW! To prevent this bone headed mistake from happening again, I made two new shouldered, long set crews 1/2" X 13 thread, that would secure against the flat bottom groove I made in the stud. See photo no. 5. This way I can remove them or back them out enough to get the stud out when it's mounted on the milling attachment. No more "stuck" slugs. I set aside the wedged shaped slugs for use only with the original cross feed table. Here's the story in blurry photos, sorry:
It came with an adaptor plate for use on the 9", but since I already had the real deal for the 9", I thought I would modify it for use on the 13". I ditched the adaptor plate and made a new cylindrical stud about 2.224" diameter to fit in the 13" cross feed hole. The first attempt was as close to the original shape and dimensions as I could make it using the 9". See photo no. 3. There are hardened steel slugs with wedged ends that are driven into the 60 degree shoulder on the stud by the two set screws, photo no. 4. BUT, when I tightened the set screws, the whole unit raised up off the cross feed and was NOT stable... HUH? I was a few thou short on the diameter, and I wasn't going to make another stud, so I made a flat bottom groove instead. Then a had a big problem!
Using the wedged shaped slugs that were part of the original cross feed table, I inserted my new 2.224" stud, and tightened them down. See photo no. 4. I succeeded in in wedging them into the blind holes with no way to remove them!
I tried small rare earth in the holes, but they were not strong enough. I could rotate the stud, but that only meant they weren't totally jammed in the flat bottom groove. I tried tapping on the table, but no luck. The only thing I could come up with was to remove the cross feed table from the carriage, and turn it vertically, and try tapping some more, hoping that gravity would make them fall out. No Luck. I tried compressed air blowing into the holes. No Luck. I guess I'm really screwed now!
I remembered I had an air chisel with a hammer tool... perfect! I hooked it up and gave the table about 10 bursts while it was secured vertically in the vise, and it finally loosened up the stud enough so I could wiggle it free. WHEW! To prevent this bone headed mistake from happening again, I made two new shouldered, long set crews 1/2" X 13 thread, that would secure against the flat bottom groove I made in the stud. See photo no. 5. This way I can remove them or back them out enough to get the stud out when it's mounted on the milling attachment. No more "stuck" slugs. I set aside the wedged shaped slugs for use only with the original cross feed table. Here's the story in blurry photos, sorry:
Attachments
Last edited: