What's new
What's new

New To Me Southbend Heavy 10 Rebuild (Picture Heavy)

cl5man

Aluminum
Joined
Sep 6, 2004
Location
AZ
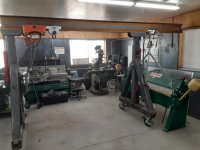
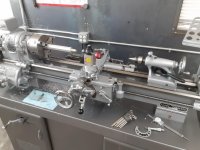
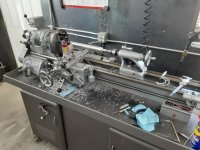
Long time member here. Recently purchased a 79' Southbend Heavy 10. Been looking for about 6 months, was being picky on what I wanted. Had to have the D1-4 and hardened ways. Not my first Southbend, had a 13" when i first started my small gun building business. Sold (now regretting it) the 13 and went to an import about 7 years ago. Always wanted to get another Southbend just never really found anything in Southern AZ worth a look. This little Heavy 10 is a 1979, has the long bed, D1-4 spindle, hardened ways, JFK collet closer and also came with a steady. I purchased the Dorian toolpost set and the taper attachment afterwards. Bed has about 2 thou wear in a 6" area in front of the chuck, both nuts were well worn but got some replacements off of Ebay. Overall the wear really wasn't that bad. I decided to take the plunge and give it a complete overhaul. No machine work or scraping, just a teardown and inspection. All bearings and bushings in gearbox were replaced (the most worn piece of the whole lathe). During the process I enjoyed reading all the threads on lathe rebuilds, figured I share mine with the group.

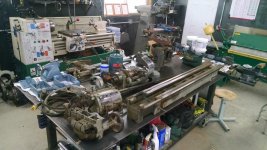
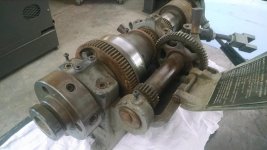
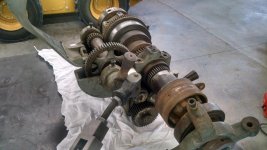
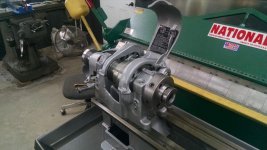
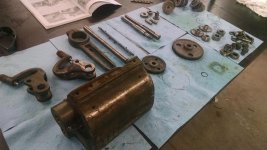
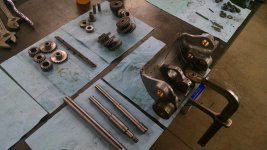
The first set of pics is how I received it. The seller purchased the lathe with intentions to rebuild it. He got it taken apart somewhat and started on the cabinet. For whatever reason he never really got into it. It came to my shop in lots of parts and pieces.
 

Attachments

  • 2018122695154542.jpg
    2018122695154542.jpg
    95.5 KB · Views: 206
  • 2018122695154641.jpg
    2018122695154641.jpg
    96.2 KB · Views: 189
  • IMG_20191016_165105536.jpg
    IMG_20191016_165105536.jpg
    99.5 KB · Views: 177
  • IMG_20191016_165128760.jpg
    IMG_20191016_165128760.jpg
    101.5 KB · Views: 175
  • IMG_20191016_165203594.jpg
    IMG_20191016_165203594.jpg
    99.6 KB · Views: 187
After inspecting what he had and doing an inventory (amazingly it was all there!!), I decided to start on the cabinet and underdrive.
 

Attachments

  • IMG_20191029_101314007_HDR.jpg
    IMG_20191029_101314007_HDR.jpg
    90.5 KB · Views: 106
  • IMG_20191029_101327588.jpg
    IMG_20191029_101327588.jpg
    93.8 KB · Views: 104
  • IMG_20191102_163548135_HDR.jpg
    IMG_20191102_163548135_HDR.jpg
    96.5 KB · Views: 105
  • IMG_20191102_163556466.jpg
    IMG_20191102_163556466.jpg
    95.6 KB · Views: 98
  • IMG_20191102_184956701.jpg
    IMG_20191102_184956701.jpg
    95.6 KB · Views: 107
Cabinet and underdrive completed.
 

Attachments

  • IMG_20191106_151419936.jpg
    IMG_20191106_151419936.jpg
    97 KB · Views: 99
  • IMG_20191106_151433351.jpg
    IMG_20191106_151433351.jpg
    96.7 KB · Views: 103
Next was the bed and legs. I used the Rustoleum Hammered series of paint. I like the way the texture hides some of the flaws in the casting. I sprayed it with my standard primer gun and I'll have to admit, it turned out pretty nice. The adjusting screw on the tailstock side is a pretty nifty little setup. Made dialing in the bed a snap. Its amazing that a 5/16 allen screw can twist 150Lb of cast iron so easily.
 

Attachments

  • IMG_20191112_110851051.jpg
    IMG_20191112_110851051.jpg
    95.2 KB · Views: 124
  • IMG_20191112_110905687.jpg
    IMG_20191112_110905687.jpg
    95.2 KB · Views: 113
  • IMG_20191114_145847185.jpg
    IMG_20191114_145847185.jpg
    96.2 KB · Views: 129
  • IMG_20191114_145905961.jpg
    IMG_20191114_145905961.jpg
    96.1 KB · Views: 121
  • IMG_20191114_155831093.jpg
    IMG_20191114_155831093.jpg
    97.7 KB · Views: 126
It's starting to take shape!! Headstock was next. Unfortunately didn't get any pics of assembly during the teardown. The spindle bearings were in near new shape, no gouges or discoloration to speak of. It was obvious someone had the spindle out at one time. They didn't loosen the screws holding the bearing spreaders and caused a little bit of damage on the tapered areas. I can only assume the D1-4 spindle was original but the seller couldn't explain the threaded dog driver he had sitting in the cabinet. I installed the new wipers and adjusted the shims following the southbend published procedure. Had right at 1 thou of clearance on front and back when done. I also replaced the fiber thrust washer with a bearing style. Not sure if it was needed but just didn't like the setup as I often turn left and right while working on my lathe.
 

Attachments

  • IMG_20191114_164530119.jpg
    IMG_20191114_164530119.jpg
    96.7 KB · Views: 123
  • IMG_20191114_164543925_HDR.jpg
    IMG_20191114_164543925_HDR.jpg
    95 KB · Views: 125
  • IMG_20191114_164555717_HDR.jpg
    IMG_20191114_164555717_HDR.jpg
    96.1 KB · Views: 125
  • IMG_20191121_124328247.jpg
    IMG_20191121_124328247.jpg
    96.9 KB · Views: 140
  • IMG_20191122_172321879_HDR.jpg
    IMG_20191122_172321879_HDR.jpg
    94.2 KB · Views: 150
Excellent thread! Thanks for sharing the beautiful work.

I just started a restoration on a Heavy 10L as well and may ping you for advice...if that’s ok.

Mine is moving slowly as I’m a novice at all this.


Sent from my iPhone using Tapatalk
 
It's looking very nice. Why didn't you remove the collet closer? What is the serial number? It will tell what the original spindle was.

Collet closer mentioned above is the collet sleeve that's still in the working end of the spindle. You need a knock-out bar to pop it out. If you can find a
piece of round stock (brass, aluminum) that is slightly under 1-3/8 inch diamter that goes in first, then a bar on top of that and sharp rap with a mallet
will probably extract it. Put a rag over it so it doesn't shoot across the room.

It may be in tight if it's been in there a long time.
 
Collet closer mentioned above is the collet sleeve that's still in the working end of the spindle.

So true. I see that the draw tube is out, but the rest of the collet closer assembly appears to have been "upgraded in place". I was wondering if the OP had problems removing the entire assy.
 
As an FYI, by 1979 the D1-4" spindle nose was standard on the Heavy 10 (as well as the 13 and 16 inch flat belt drive South Bends). Likewise for flame hardened bed ways. My literature show that both the L-00 and the threaded spindle noses were available as an option.

That's cleaning up nicely.

David
 
Looks like you found a nice lathe after looking for 1/2 year or so, it makes my 1950s heavy 10 look bad....
 
Looks like Team New Paint is getting some top draft pics! Nice Job!

When I first saw the pics, I thought, wow it really looks amazing. Did a quick search of op's paint, I was seeing Rustoleum Hammered as a spray paint, but he said he shot it with his primer gun, so I searched more and you can get it by the can.

Not sure if its lacquer, enamel, or what. But the site for it is here:
Stops Rust(R) Hammered Product Page

Paint technical data here:
https://www.rustoleum.com/~/media/D...ust/SRT-06_Stops_Rust_Hammered_Brush_TDS.ashx
 
When I first saw the pics, I thought, wow it really looks amazing. Did a quick search of op's paint, I was seeing Rustoleum Hammered as a spray paint, but he said he shot it with his primer gun, so I searched more and you can get it by the can.

Not sure if its lacquer, enamel, or what. But the site for it is here:

Also available at your local HomeDepot.
 
I disassembled all components down to the last nut and bolt. Collet adapter was indeed stuck in the spindle, took some effort to get it out. The lathe rebuild has been completed for a couple months now, I just haven't had time to share the progress. Later this evening I'll attach the rest of the pics.

I also completed a couple other rebuilds on a Clausing drill and an ironworker. I'll post some pics of those rebuilds over the next few days once I figure out where to post them.
 
Gearbox was next. Several of the bushings were toast. Had to machine all the new bushings as I couldn't find any exact matches. New bearings on the lead screw and on the upper shaft. Once it was all assembled it was a tad tight, but I think it'll loosen up after a little use. It was obvious that the gear box wasn't taken care of very well as far as daily lubrication. Should last another 40yrs now.
 

Attachments

  • IMG_20191123_144727546_HDR.jpg
    IMG_20191123_144727546_HDR.jpg
    98.7 KB · Views: 93
  • IMG_20191125_161401247.jpg
    IMG_20191125_161401247.jpg
    97.1 KB · Views: 91
  • IMG_20191207_101630749.jpg
    IMG_20191207_101630749.jpg
    98.1 KB · Views: 95
  • 20191216_093812.jpg
    20191216_093812.jpg
    95.5 KB · Views: 104
  • IMG_20191204_113204451_HDR.jpg
    IMG_20191204_113204451_HDR.jpg
    97.1 KB · Views: 92
Apron, cross slide and compound were up next. Scraping was still visible on both compound and cross slide. After assembly the center of the travel is a tad looser than both extrems, not bad though. The new screw nuts took all excess backlash out. I have about 10 thou on both. Did a couple modifications to the carriage wheel oiling system by adding an oil cup. Modified a couple 90 degree Gits oil cups for the apron also since I couldn't find any of the simple bent tube styles that were on it from the factory.
 

Attachments

  • 20191216_113104.jpg
    20191216_113104.jpg
    90 KB · Views: 78
  • 20191216_113051.jpg
    20191216_113051.jpg
    88.1 KB · Views: 80
  • 20191216_124904.jpg
    20191216_124904.jpg
    90 KB · Views: 86
  • 20191224_121514.jpg
    20191224_121514.jpg
    91 KB · Views: 108
  • 20191216_113126.jpg
    20191216_113126.jpg
    90.7 KB · Views: 78
Unfortunately I didn't get pictures of the taper attachment, tailstock and collet rack refurb. After completion I really had to decide how I wanted to re-arrange the shop. I've got a fork lift but it was easier just using the hoist to do the machine shuffle boogie. I purchased this lathe to have set up for collets to help speed up some of my more frequent jobs. I did however purchase a 3 jaw and 4 jaw. Also made a spider for barrel work and a dog-driver/faceplate from a couple blanks. Won't use them often but hey, you cant use a collet for everything.
 

Attachments

  • 20200108_110707.jpg
    20200108_110707.jpg
    90.4 KB · Views: 91
  • 20200108_110730.jpg
    20200108_110730.jpg
    89.3 KB · Views: 90
  • 20200108_120419.jpg
    20200108_120419.jpg
    93.2 KB · Views: 89
  • 20191224_115057.jpg
    20191224_115057.jpg
    89 KB · Views: 88
Finally got it in place, wired, leveled and adjusted. The new Dorian tool post and tooling is a perfect match for this little guy. Went with the DCMT tooling to give me some tool clearance and versatility. Decided to go with a leather drive belt. Seems to work good enough for what i'm gonna do with it. I got the bed dialed in to a less than a half thou over 12". Very easy to dial this thing in!! Wish my other lathe was this easy. Overall, i'm impressed with the lathe. Definetely not gonna hog off the metal but thats not really what its made for. I'm using high positive rake inserts in my tool holders, and I think i'm gonna stick with this setup. In the higher range the gear train is a bit noisy, but in low range I can go almost to 1000rpm. Slow for carbide but it works. Of course with gears disconnected its quiet as a mouse in high or low.
 

Attachments

  • 20200110_130439.jpg
    20200110_130439.jpg
    93 KB · Views: 101
  • 20200112_104140.jpg
    20200112_104140.jpg
    94 KB · Views: 100
  • 20200112_104150.jpg
    20200112_104150.jpg
    96.5 KB · Views: 118


Back
Top