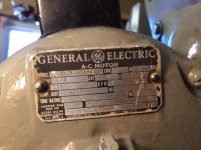
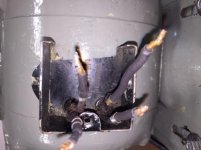
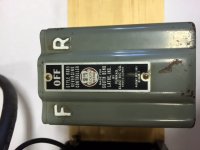
What's new
What's new

Newbie needs help in wiring drum switch to old GE motor

willy1

Plastic
Joined
Oct 13, 2014
Hey Guys,

I'm totally frustrated in trying to wire this drum switch to my "new" South Bend 9A lathe, circa 1945 serial number 160210. The previous owner turned the motor on, and I should have paid more attention to the wiring, but I was so excited with my "find" that I didn't . After having stripped, painted, and started to reassemble the lathe I find that the motor only runs in reverse in spite of switching the wires to the point that I am totally confused. I hope I have provided enough pictures to allow someone to aid me in wiring this up correctly. Most of the diagrams I have found online refer to motors that have more than 4 wires and the ones that do reference 4 wires haven't worked for me up to this point. When the motor does run it starts right up at speed. Thanks for any help.

Larry
 

Attachments

  • IMG_4257.jpg
    IMG_4257.jpg
    38.6 KB · Views: 1,461
  • IMG_4264.jpg
    IMG_4264.jpg
    35 KB · Views: 424
  • IMG_4263.JPG
    IMG_4263.JPG
    92.6 KB · Views: 541
  • IMG_4262.JPG
    IMG_4262.JPG
    85.6 KB · Views: 358
  • IMG_4258.JPG
    IMG_4258.JPG
    75.6 KB · Views: 567
Thanks for the reply.It's a Furnas RSB5 drum Switch with a South Bend logo on the cover.IMG_4271.JPGIMG_4269.JPGIMG_4270.JPG. I hope this works.New to posting images.
 
The attached image should do it. If it turns backwards from what you want, switch T1 and T3. You will also want to ground the switch body and the motor housing. This should be good for all 4 wire GE instant reversing motors with this type of switch.

furnas-ge-ir4.jpg

allan
 
Thanks, Allan, for the diagram. With my VO meter I determined that in the "Forward" position contacts 3,1 and 2 are in common, and contacts 5 and 6 are in common. In the "Reverse" position contacts 4, 2, and 1 are in common, and contacts 3 and 5 are in common. I have seen references to a jumper on the inside of the switch cover and wonder how that might play into the connections. I should have provided that information earlier. Also motor wires tagged T2 and T4 have a higher resistance than wires tagged T1 and T3 if that has any bearing on the issue. T2 and T4 exit the motor through the top hole in image and T1 and T3 exit from the bottom hole. Thanks for all your help.
IMG_4264.jpg
Larry
 
Paula, an extremely helpful contributor to PM who is now MIA and greatly missed, sent me this diagram. The wire colors are for my new wiring. The description is mine and is believed to be correct, but no guarantee. :)

Note: This is for the instant reverse motor on my 1948 SB 9A.
 

Attachments

  • Motor Wiring Annotated.jpg
    Motor Wiring Annotated.jpg
    11.2 KB · Views: 417
  • Motor-Wiring-Annotated-2.jpg
    Motor-Wiring-Annotated-2.jpg
    69.1 KB · Views: 8,753
Last edited:
Sorry, I misunderstood the layout of your switch. I'll work up a new diagram. In your photos, it looks like T1/T3 have higher resistance?

allan
 
Well, Allan, that is another example of "don't try this at home" I'm afraid. I know enough to test whether there is continuity in a circuit, but not enough to know the difference between higher or lower resistance. Thanks, again.
 
Heh- well, it does not matter which of them is the start winding from the perspective of the switch. The motor will take care of disconnecting it.

Try this diagram. I added a jumper between 4 and 6, and switched the location of the input lines.

furnas2-ge-ir4.jpg

Note, this diagram has an error- T4 should be connected to switch terminal 5, not 6.

allan
 
Last edited:
Hey, Allan.
I made the connections the way you provided in the last diagram. I am thrilled that the motors runs in Forward. All I could get it to do was run in reverse before you started helping.However, when I throw the switch to Reverse the motor hums and appears to be struggling to run but it doesn't. Does that sound like put the lathe back together and make some chips until I can get a replacement motor, or is there some other possible explanation for not operating in Reverse. I can't tell you how much you have helped lift my spirits about this whole project. I have read that many hardly ever use Reverse so I guess I could live with this. Again, thank you for all your help.

Larry
 
larry- if you swap T1 and T3 at the switch, and put it in forward, does the motor run reliably in reverse? If so, we still need to change something about the switch wiring. Can you take another stab and measuring the continuity in the different positions?

allan
 
Yes, Allan, that is exactly what happens. Runs fine in reverse with the switch set at forward. I traced out the diagram and it works fine in forward because T1 and T2 are connected to the hot line and T3 and T4 are connected to the neutral line. When I throw it in reverse it connects T2,T3 and T4 To the hot side and leaves T1 connected to the neutral. I guess that's why it didn't work. I have been trying to come up with all the possible connections to make to achieve the same type of connections in reverse as exists in your diagram for forward, but I'm not coming up with anything.
 
Resistance across wires tagged T1 and T3 measures .5 Ohms, and the resistance across wires tagged T2 and T4 measures 1.75 Ohms.
 
When I throw it in reverse it connects T2,T3 and T4 To the hot side and leaves T1 connected to the neutral.

Then please take another stab at describing the internal connections of the switch- we must be miss communicating. Try making a little drawing of the switch like I have at the top of my diagrams.

allan
 
Hey Allan. Thanks for all your help. When you suggested that I switch the leads to see if the motor actually ran in reverse you helped me arrive at the solution. Attached is the wiring diagram I used to allow the motor to function in forward and reverse. I can't tell you how much I appreciate your staying with me during the process. Maybe this diagram will help someone else with a similar problem.IMG_4277.jpg

Larry
 
Ah yes, I see it now. When I transposed my pencil drawing to the computer, I forgot to move 4 from terminal 6 to terminal 5. Sorry about that. Glad you found it. Have fun making chips.

allan


Back
Top