What's new
What's new

Reclocking an AXA tool post handle

millwrong74

Plastic
Joined
Jun 9, 2018
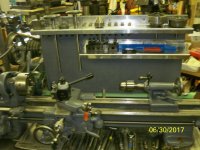
My used AXA tool post handle needs to be reclocked from 1:00 o'clock position to 4:00 o'clock. Currently it is aimed smack into the chuck key when it's in it's holder on the tail stock and swings over into the ways to loosen the tools, which is not good and not safe. I asked this same question in this thread, but no response, so I started a this one with a proper title.
http://www.practicalmachinist.com/vb/south-bend-lathes/south-bend-model-other-351285/#post3188267

I took the Allen screw out of the pistons, and found out they spin and would not restart in their respective holes. I fiddled with it enough to get them back in place, but that's a as far as I was able to dissassemble the dang thing. The conical cam block would raise up about 1/16", but that was all. I'm stumped. I can drill a new hole at the 4:00 o'clock position in the conical top portion, but there must be a better way ....? :(
 
Just looked at my 10 inch SBL with the AXA holder and it is at about 2:00 o'clock and works O.K for me..
Sorry not much help with how to fix it.
 
Pull the entire tool post off the compound and rotate 90 degrees, if your compound nut is not square either cut it to be square or rotate 180 degrees.
That is the easy way or you could add thin washers either under the lever or the stud to compound nut joint.
 
Pull the entire tool post off the compound and rotate 90 degrees, if your compound nut is not square either cut it to be square or rotate 180 degrees.
That is the easy way or you could add thin washers either under the lever or the stud to compound nut joint.

This is worth a try. I fussed with it until I got brain freeze and gave up, and bout a nice new one off Ebay which works great. But I'm a sucker for a challenge and may try your idea. But rethinking how it works, elevating it won't change the hole to cam relationship. I have a feeling this one couldn't be corrected and that's why it was up on Ebay in the first place. After using the old style tool holders it's nice to be able to change them out so easily. I was going to just drill a new hole 90 degrees from the original, but the whole cam is hardened, so that won't work. It could be that this one was a manufacturing fluke and got the hole in the wrong relationship to the cam? I may never know.I could take them both apart and compare them side by side ....
 
I've not pulled one completely apart, so this may be completely off base, but I'll take a swing anyway. With the assembly off the machine, if you keep spinning the handle, the wedges keep driving down. It may be possible to unscrew them right off the post, then rotate whichever direction you need to before reinstalling them? Assuming there's a multi-start thread inside, this might buy you some rotation. Like I said though, I've never actually done this, so the wedges may be retained somehow. Probably more holes in this idea than merit, but can't hurt to try I guess.
 
That sounds like it is worth a try. I took apart my cxa post some time back and don't remember any problems. Maybe you can slowly unscrew the handle untill it jumps one thread on the wedges.
 
I can drill a new hole at the 4:00 o'clock position in the conical top portion, but there must be a better way ....? :(

Without seeing the inner workings of the toolpost, I can't be certain, but I think that drilling/tapping a new hole may be the easiest solution.

The only other thing I can think of would be milling (or surface grinding) off a bit of the face of the piston, as that would make the handle rotate more before engagement, but you would have to be pretty precise as to how much to mill. You would also have to pull them out again, as milling /grinding them in the toolpost might not work well.

You might be able to estimate by using thin shims between the piston and toolholder (start with 0.001) to see how much each thou of distance translates to angle of rotation.

Steve
 
Make a reference mark with a holder locked in....remove holder, clock handle to the reference mark, place indicator on the pad, pull handle to desired position, note how much movement showed on indicator.....then you can take off the pad and thin it down by like amount.....you can even do it on the lathe with carbide.
 
Make a reference mark with a holder locked in....remove holder, clock handle to the reference mark, place indicator on the pad, pull handle to desired position, note how much movement showed on indicator.....then you can take off the pad and thin it down by like amount.....you can even do it on the lathe with carbide....the pads are not that hard, good HSS may even be fine, the piston however is hard(or it should be)
 
Sorry for the double post, can't seem to edit replies.

Anther good way to thin the pads down a bit, became it won't take much....this is where one of those cheap 12x12 surface plates is great....just wet it down and slap a piece of wet/dry paper on it, then just rub the face of the pad to take off the needed amount....very easy, those pads have no real precision about them, they just need a flat face
 
I gave up and bought a new AXA tool holder!

I appreciate all the advice and tips, but I just figured it was easier to get a new one... hoping that it would be clocked correctly! And by golly, it was! I also added a tool storage back on the lathe cabinet with some bent 1/8" aluminum racks for collets and tool bits:
 

Attachments

  • 100_1185.jpg
    100_1185.jpg
    91.9 KB · Views: 108
  • 100_1192.jpg
    100_1192.jpg
    85.6 KB · Views: 121
  • 100_1264.jpg
    100_1264.jpg
    91.6 KB · Views: 105
  • 100_1267.jpg
    100_1267.jpg
    92.9 KB · Views: 109
  • 100_1261.jpg
    100_1261.jpg
    87.6 KB · Views: 97


Back
Top