What's new
What's new

Scraped 1941 SB10L

jwearing

Hot Rolled
Joined
Aug 26, 2017
Everyone says that South Bends are not valuable enough to scrape. They're not worth the time, it's cheaper to buy another lathe. They're probably right.

This project wasn't a labor of love, I didn't have some daydream about owning the nicest SB10L in the world or anything. Even now I don't intend to own the machine forever. My goal was solely learning how to scrape a lathe.

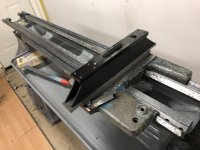
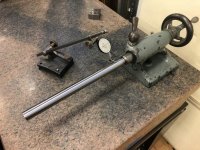
Leading up to this project, I had some experience scraping straight edges and surface plates. I had read the Connelly book. But I still didn't feel ready for a lathe. I never really had the intention of scraping the SB, but I realized it would be a perfect project for practice. If I screwed something up, replacement parts would be readily available.

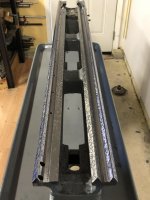
In the end, I didn't have any big screw ups. The process went almost exactly as I had expected, from the Connelly book, youtube videos, and about a thousand threads on this forum. The lathe came out great. It's weird, this lathe I had regarded as worn-out junk for so many years is suddenly a really nice machine. I can't wait to make some chips.
 

Attachments

  • 4Y7A0338.jpg
    4Y7A0338.jpg
    89.6 KB · Views: 237
  • 4Y7A0339.jpg
    4Y7A0339.jpg
    89.2 KB · Views: 218
  • 4Y7A0341.jpg
    4Y7A0341.jpg
    87.8 KB · Views: 215
  • 4Y7A0337.jpg
    4Y7A0337.jpg
    83.7 KB · Views: 216
  • 4Y7A0334.jpg
    4Y7A0334.jpg
    93.6 KB · Views: 209
And here are a few pics of the process.

I took hundreds of photos, so if anyone wants to see more details of something, let me know.
 

Attachments

  • IMG_1955.jpg
    IMG_1955.jpg
    94.4 KB · Views: 155
  • IMG_1942.jpg
    IMG_1942.jpg
    93.1 KB · Views: 158
  • IMG_1216.jpg
    IMG_1216.jpg
    97.2 KB · Views: 170
  • IMG_1190.jpg
    IMG_1190.jpg
    94.9 KB · Views: 153
  • IMG_1926.jpg
    IMG_1926.jpg
    90 KB · Views: 167
A few more...
 

Attachments

  • IMG_2062.jpg
    IMG_2062.jpg
    90.2 KB · Views: 116
  • IMG_2061.jpg
    IMG_2061.jpg
    98.5 KB · Views: 113
  • IMG_2057.jpg
    IMG_2057.jpg
    91.2 KB · Views: 109
  • IMG_2026.jpg
    IMG_2026.jpg
    90.6 KB · Views: 116
  • IMG_1982.jpg
    IMG_1982.jpg
    95.4 KB · Views: 109
Final alignment and flaking...
 

Attachments

  • IMG_2065.jpg
    IMG_2065.jpg
    95.4 KB · Views: 123
  • IMG_2079.jpg
    IMG_2079.jpg
    88 KB · Views: 116
  • IMG_2031.jpg
    IMG_2031.jpg
    82.5 KB · Views: 115
  • IMG_2097.jpg
    IMG_2097.jpg
    92.5 KB · Views: 116
  • IMG_2098.jpg
    IMG_2098.jpg
    87.7 KB · Views: 114
Thanks. I estimate the scraping took about 120 hours. That doesn’t include the mechanical overhaul or cleaning, repainting, etc.

For the final photos I used my nice camera with a wide aperture lens. It has a thin depth of field and gives a bit of that miniature effect. I like it because the background is a lot less distracting when it’s a bit blurry.
 
How much did they have to grind off the bed? What did you use on the carriage and the tailstock, Turcite?

I didn't have anything ground, I scraped everything including the bed. I removed about .012" from the carriage ways and .003" from the tailstock ways. The carriage ways took a long time, it was tedious.

No turcite. I followed Connelly's procedure which does not call for building up the slides.

For the tailstock: the headstock gets scraped lower to match the height of the tailstock. In my case, I had to replace my tailstock base anyways, because it had been modified. I still had to scrape the headstock for alignment, but the tailstock (with the new base) was sitting higher, and that's where I had to remove material.

For the carriage: the lead screw and rack are lowered by shimming. On a South Bend this is trivial.

I measured the drop by installing the apron and leadscrew, and engaging the halfnuts. Then measured the leadscrew drop with an indicator on the tailstock base. I confirmed the measurement with feeler gages under the gear box and leadscrew support. Then I installed the rack, and measured the vertical play with an indicator. I ended up going with .040" shims (there was a lot more wear on the underside of the saddle than on the bed). I also milled down the rear gib mounting points by the same amount.
 

Attachments

  • IMG_2110.jpg
    IMG_2110.jpg
    92.4 KB · Views: 85
  • IMG_2119.jpg
    IMG_2119.jpg
    84.5 KB · Views: 86
  • IMG_2104.jpg
    IMG_2104.jpg
    93 KB · Views: 87
  • IMG_2103.jpg
    IMG_2103.jpg
    91.6 KB · Views: 97
  • IMG_2101.jpg
    IMG_2101.jpg
    90.5 KB · Views: 95
I didn't have anything ground, I scraped everything including the bed. I removed about .012" from the carriage ways and .003" from the tailstock ways. The carriage ways took a long time, it was tedious.

No turcite. I followed Connelly's procedure which does not call for building up the slides.

For the tailstock: the headstock gets scraped lower to match the height of the tailstock. In my case, I had to replace my tailstock base anyways, because it had been modified. I still had to scrape the headstock for alignment, but the tailstock (with the new base) was sitting higher, and that's where I had to remove material.

For the carriage: the lead screw and rack are lowered by shimming. On a South Bend this is trivial.

I measured the drop by installing the apron and leadscrew, and engaging the halfnuts. Then measured the leadscrew drop with an indicator on the tailstock base. I confirmed the measurement with feeler gages under the gear box and leadscrew support. Then I installed the rack, and measured the vertical play with an indicator. I ended up going with .040" shims (there was a lot more wear on the underside of the saddle than on the bed). I also milled down the rear gib mounting points by the same amount.

I was going to ask about the wear under the saddle. I bet it was twice the wear on the ways, at the ends anyway.

Cracking good job anyway :cheers:
 
I didn't have anything ground, I scraped everything including the bed. I removed about .012" from the carriage ways and .003" from the tailstock ways. The carriage ways took a long time, it was tedious.

You removed 0.012" by hand? That's some effort! What did you use to keep the faces of the prisms parallel?
 
You removed 0.012" by hand? That's some effort! What did you use to keep the faces of the prisms parallel?

Effort, yeah that's for sure. It was slow going and tedious. Otherwise the project was fun and interesting, but the bed was monotonous.

For parallelism, I scraped the saddle first and used it as a master. I alternated cycles with a 48" camelback (for straightness). Twist is measured with a precision level riding on the carriage or on v-blocks. And I measured parallelism with the tailstock ways with an indicator mounted on the carriage (or vice versa).

The saddle has to be scraped in first to use it as a master. After milling, I scraped it using an 18" straightedge. I measured vertical alignment on the surface plate, and parallelism with a micrometer and some precision ground rods in the slides.
 

Attachments

  • IMG_1654.jpg
    IMG_1654.jpg
    96.6 KB · Views: 92
  • IMG_1667.jpg
    IMG_1667.jpg
    95.7 KB · Views: 88
  • IMG_1913.jpg
    IMG_1913.jpg
    90.6 KB · Views: 87
  • IMG_1934.jpg
    IMG_1934.jpg
    91.2 KB · Views: 86
Your spotting marks are amazingly dark and well-defined - what marking medium do you use?

Dykem High Spot Blue.

Lighting makes a big difference. Sometimes less light is better. I have a gooseneck work lamp on my bench, when spotting I like to flip it up towards the ceiling and turn off all the other lights.
 
I have been researching scraping a little bit lately. I was thinking of giving it a shot on a machine I'm working on. Any recommendations on hand scraping tools ? I've seen the Biax scraper ends, I didn't know if people are using those, and making their own longer attachment for holding it and pressing with their body.

And do you use yellow high lighter in conjunction with the blue ?
 
Very nice work.

What's your most important takeaway from this project?

Lessons learned?

One thing is that it’s really important to cut a relief on the inside corner of the dovetails. There were a couple times I was chasing my tail, the surface wasn’t coming in after many cycles, and it was caused by interference in the corner.

The only mistakes I really regretted were cuts I had made on the mill. Once, the part had distorted a few thou from clamping pressure, I had to scrape a lot to straighten it out. Another time, I had reduced clamping pressure, and the part shifted. Not a huge deal but both times I ended up removing more material than necessary.

This is kind of trivial, but painting the lathe before scraping was a mistake. Everything gets stained blue, and it’s hard to clean off of painted surfaces. I had to respray the chip pan.
 
I have been researching scraping a little bit lately. I was thinking of giving it a shot on a machine I'm working on. Any recommendations on hand scraping tools ? I've seen the Biax scraper ends, I didn't know if people are using those, and making their own longer attachment for holding it and pressing with their body.

And do you use yellow high lighter in conjunction with the blue ?

I’m using a Sandvik, I got it cheap from MSC (the first time those words have ever been written!) You’ll need a few blades and a way to sharpen them. Everyone here loves their Accu-finishes but I’m really happy with my Baldor carbide grinder. I set it up to run those cheap 1200 grit discs and it works great.

No, I haven’t tried the highlighter.


Back
Top