What's new
What's new

South Bend Heavy 10 UK restoration

Peter.

Titanium
Joined
Mar 28, 2007
Location
England UK
Back in May this year I saw this advertised locally so I went along and had a look. The seller Clive and his brother was clearing out their father's workshop after he had passed away. I got talking to him and told him I was looking for a lathe to restore, not to break up for parts like so many have done to them. I assured him that despite the dilapidated look of the machine it seemed to be fundamentally sound and perfect for a restoration.

It;s a few months down the line now and I had meant to start a proper thread on it. I have a couple of hours spare so I'll record what I've done to date.

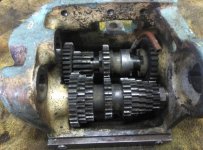
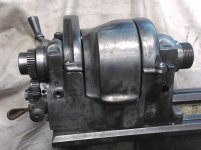
Here's the machine as I found it. Pretty sorry-looking but 99% complete. The serial number dates it to 1943 and the flaming bomb motif is the mark of the US army ordnance corps (thanks to S Wells for the info)
 

Attachments

  • sb h10 as found.jpg
    sb h10 as found.jpg
    94 KB · Views: 375
  • heavy 10 sn.jpg
    heavy 10 sn.jpg
    40.3 KB · Views: 222
  • heavy10warboard.jpg
    heavy10warboard.jpg
    95.5 KB · Views: 214
  • heavy10plate.jpg
    heavy10plate.jpg
    80.8 KB · Views: 223
First job is to check the mechanicals. Off with the headstock and gearbox. All looks perfectly fine in the gearbox but the spindle was a real surprise. It's in fantastic condition.
 

Attachments

  • sb10headstockbearing.jpg
    sb10headstockbearing.jpg
    51.1 KB · Views: 167
  • sb10heastockspindle.jpg
    sb10heastockspindle.jpg
    69 KB · Views: 183
  • sb10headstock.jpg
    sb10headstock.jpg
    60.4 KB · Views: 194
  • sb10gearbox.jpg
    sb10gearbox.jpg
    78 KB · Views: 198
So buoyed up by the good news on the internals I set to stripping off that horrible paint. First to get the treatment is the gearbox. Stripped down to the last nut and all the paint (and rust) removed. The gears look to be in cracking condition. Hardly any evidence of use let alone wear. Then the main bedway and the stands get stripped. THis was all a whole weekend's work.
 

Attachments

  • heavy10stripped2.jpg
    heavy10stripped2.jpg
    87.9 KB · Views: 149
  • 10Lgearbox gears.jpg
    10Lgearbox gears.jpg
    89.5 KB · Views: 149
  • heavy10stripped1.jpg
    heavy10stripped1.jpg
    71.5 KB · Views: 158
Finally the headstock gets stripped, serviced and re-assembled. It'll get torn down again for painting.
 

Attachments

  • sb10headstock1.jpg
    sb10headstock1.jpg
    56.2 KB · Views: 146
Now for a bit of re-painting. I painted the legs and cabinet first. I did all the covers except one which has a busted lug. That's got to be repaired before the paint goes on.
All my painting is roller and brush. I know it doesn't yield such a good finish as spray painting but I don't have the room (or in truth, the knack) for spray-painting. I can only stand in awe of the guys who get car-showroom finishes on their paint jobs.
 

Attachments

  • Heavy10paint1.jpg
    Heavy10paint1.jpg
    80.4 KB · Views: 154
  • Heavy10 broken lug.jpg
    Heavy10 broken lug.jpg
    53.6 KB · Views: 131
So, into September and the machine looks like this. The headstock and tailstock have now been repainted, along with the bed. I've re-assembled it all which just leaves the motor & drive components to do, and the biggest chunk of work, the apron and saddle. Everything so far has been strip, service, clean and paint. Now there's scraping work to get on with.
 

Attachments

  • heavy10rebuild1.jpg
    heavy10rebuild1.jpg
    91.5 KB · Views: 225
  • heavy10carriage.jpg
    heavy10carriage.jpg
    71.6 KB · Views: 170
A weekend spent on the apron got it a long way down the road. The slide ways and underside vees look in fairly nice condition but everything's getting scraped anyway. I got to stripping all the paint off and cleaning it down ready for scraping.

Apron gears etc all look in fine condition. All the wicks are intact.
 

Attachments

  • heavy10 saddle stripped.jpg
    heavy10 saddle stripped.jpg
    43.9 KB · Views: 137
  • heavy10 saddle ways.jpg
    heavy10 saddle ways.jpg
    71 KB · Views: 143
  • heavy10 cross slide ways.jpg
    heavy10 cross slide ways.jpg
    52.4 KB · Views: 130
  • heavy10 carriage assembly.jpg
    heavy10 carriage assembly.jpg
    47.6 KB · Views: 128
  • heavy10 apron gears.jpg
    heavy10 apron gears.jpg
    66.5 KB · Views: 154
Doing a quick appraisal of the ways show them to be only very slightly worn. Easy enough scraping job. I took a very small skim off the top flat of the cross slide to clean it up and leave the compound swivel a couple of thou raised to make it easy to get a print for scraping.
 

Attachments

  • sb heavy 10 cross slide skim.jpg
    sb heavy 10 cross slide skim.jpg
    51.8 KB · Views: 149
  • sb heavy 10 compound ways measure.jpg
    sb heavy 10 compound ways measure.jpg
    62.4 KB · Views: 146
  • sb heavy 10 cross slide ways measure.jpg
    sb heavy 10 cross slide ways measure.jpg
    55.2 KB · Views: 172
Scraping work done on the ways and the compound swivel.
 

Attachments

  • sbheavy10scraping05.jpg
    sbheavy10scraping05.jpg
    77.7 KB · Views: 170
  • sbheavy10scraping07.jpg
    sbheavy10scraping07.jpg
    59.7 KB · Views: 163
  • sbheavy10scraping04.jpg
    sbheavy10scraping04.jpg
    83 KB · Views: 162
  • sbheavy10scrapedparts.jpg
    sbheavy10scrapedparts.jpg
    73.9 KB · Views: 183
The cross slide screw was pretty worn in the middle so I decided to make a new one. First I drilled the worn out nut out and re-tapped it to 1/2" 10TPI LH ACME. The original is 7/16" but 1/2" fits just fine and has much greater surface area on the threads.
 

Attachments

  • sbheavy10csnut2.jpg
    sbheavy10csnut2.jpg
    56 KB · Views: 136
  • sbheavy10csnut1.jpg
    sbheavy10csnut1.jpg
    47.5 KB · Views: 131
Then I made a whole new screw. Turned a blank, cut the left Hand 10TPI ACME thread, finished the thread with a new die.

I left the boss for the gear to be cut deliberately over-length so I could turn a taper in it and fit the screw into the spindle taper on my gear hobber. I also made the handle end over-length to allow for a big dial conversion.
 

Attachments

  • sbheavy10csscrew1.jpg
    sbheavy10csscrew1.jpg
    72 KB · Views: 158
  • sbheavy10csscrew2.jpg
    sbheavy10csscrew2.jpg
    55.6 KB · Views: 151
  • sbheavy10csscrew3.jpg
    sbheavy10csscrew3.jpg
    67.9 KB · Views: 152
  • sbheavy10csscrew4.jpg
    sbheavy10csscrew4.jpg
    52.8 KB · Views: 148
  • sbheavy10csscrew5.jpg
    sbheavy10csscrew5.jpg
    46.8 KB · Views: 145
Old screw and new screw. Better, longer, fatter....
 

Attachments

  • sbheavy10csscrew7.jpg
    sbheavy10csscrew7.jpg
    51.4 KB · Views: 135
  • sbheavy10csscrew6.jpg
    sbheavy10csscrew6.jpg
    52.6 KB · Views: 140
Turning a large dial and extended mount. I put a temporary register in the dial to index it for cutting the graduations. Taped up my division plate to use 5 holes of 20 which would allow for 200 divisions. The red mark is for the 5's and 10's, green are for the four marks in between each.
 

Attachments

  • sbheavy10bigdial7.jpg
    sbheavy10bigdial7.jpg
    45.5 KB · Views: 143
  • sbheavy10bigdial5.jpg
    sbheavy10bigdial5.jpg
    52.1 KB · Views: 142
  • sbheavy10bigdial4.jpg
    sbheavy10bigdial4.jpg
    44.1 KB · Views: 148
  • sbheavy10bigdial2.jpg
    sbheavy10bigdial2.jpg
    39 KB · Views: 145
  • sbheavy10bigdial1.jpg
    sbheavy10bigdial1.jpg
    69 KB · Views: 165
Here's the dial nearing completion. I have stamped the digits on it but they didn't come out too great, so I got some better stamps and have to do the whole job over, cutting the marks and stamping the numbers. If I can't get it right I'll enrol the assistance of someone with a 4-axis engraver.
 

Attachments

  • sbheavy10bigdial8.jpg
    sbheavy10bigdial8.jpg
    42.3 KB · Views: 139
  • sbheavy10bigdial9.jpg
    sbheavy10bigdial9.jpg
    57.5 KB · Views: 137
  • sbheavy10dialcompare.jpg
    sbheavy10dialcompare.jpg
    66.5 KB · Views: 139
And that's it, about up to date. The only other two things to note are that 1. I have decided to send the bed for grinding. There wasn't any serious wear but plenty of marks up by the headstock from clumsy use. Given the amount of work put in and the scraping it seemed a shame to have a scruffy bed. Now when I get the bed back it'll be guaranteed with no wear and that should do the rest of the work justice.
The other thing I have done is ordered a whole set of new plates and tags from Jim Kull. I had thought to refurbish the old ones but they were worn too thin in places to recover even with very careful work.
 
Got my tags from in the post today. Big thanks to J Kull for producing them. Very nice.

Old tags and new tags, what a difference!

Also got word that the grinding on the bed and saddle is done. Total of 24 thou removed, most of it from the underside of the saddle.
 

Attachments

  • old sb tags.jpg
    old sb tags.jpg
    96.5 KB · Views: 115
  • new sb tags.jpg
    new sb tags.jpg
    82.1 KB · Views: 117
Very nice work
I can’t make out what type of cutter you used for engraving the dial lines?


Sent from my iPhone using Tapatalk Pro
 
It's just a carbide end mill which I ground a very fine cutter onto. It was ground like a very tiny parting tool only a few thou in height, but it still snapped half way round the job, I had a little bit of eccentricity in he dial.

I've since made a vee-pointed HSS tool which cuts just as well and leaves a deeper mark to allow for a de-burring skim on the OD.


Back
Top