What's new
What's new

Changing a NEMA motor mount from F1 to F2 or F3

Jarrod

Aluminum
Joined
Jul 18, 2011
Location
Toronto, ON
I got a new motor for my Standard Modern lathe and the conduit box is on the bottom side with the shaft on the right (F1 mounting), adjacent to the drip tray. I tried to shorten the box on the mill, got it a little higher off the tray, but just don't like the direction that's going.

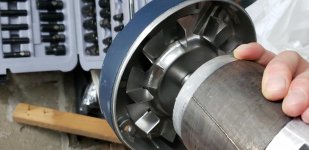
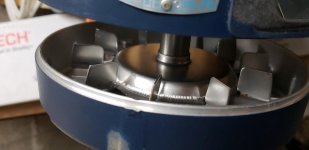
Has anyone flipped their motor mount from F1 to another orientation? I was hoping it was just a matter of taking the rotor out of the stator are flipping it 180 degrees, but there is an internal fan blade that interferes with the stator coils, so now I'm thinking I have to pull off the base and weld it where I want it. Does anyone have any other experience? Am I missing something?

Thanks,


Jarrod
 
It really is manufacturer specific (what brand is it?). However, most 3 phase smaller motors (under 250 hp) are symmetrical so you can take the motor apart and flip the stator to get F2 mount.

Remember that you flip the stator not the rotor - meaning the end bells stay with the rotor. Got pics of the interference? What are the motor specs?

If you take the motor apart and the distances from the end bell rabbet fit to the coils is the same on both sides, then you should be fine. To be sure I would call the motor manufacturer and ask them. I don't understand the fan interference.

Thanks for the response, Mark. You gotta tell me why you need to flip the stator and not the rotor? I spoke with a motor repair shop this morning and they said you can do either as long a the symmetry is roughly the same. They wouldn't touch it, but told me I could press the stator in a little then flip the rotor. I don't see how flipping either is essentially the same.

My solution was to rearrange the wires to sit lower down and bend in the fan blades a little, to make more clearance. Since the motor isn't going to be running 8 hours a day I think the loss in efficiency will be marginal.

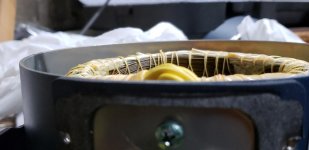
Here are some photos of the internal fan blade and the wires that were interfering. I've never seen a TEFC motor with an internal fan, pretty clever...

20180920_192942.jpg20180920_193110.jpg20180920_193712.jpg20180916_124105.jpg
 
I got a new motor for my Standard Modern lathe and the conduit box is on the bottom side with the shaft on the right (F1 mounting), adjacent to the drip tray. I tried to shorten the box on the mill, got it a little higher off the tray, but just don't like the direction that's going.

Has anyone flipped their motor mount from F1 to another orientation? I was hoping it was just a matter of taking the rotor out of the stator are flipping it 180 degrees, but there is an internal fan blade that interferes with the stator coils, so now I'm thinking I have to pull off the base and weld it where I want it. Does anyone have any other experience? Am I missing something?

Thanks,


Jarrod

I plead guilty to removing the peckerhead box entirely, (Monarch 10EE ""large frame" Reliance DC motor) drilling some holes, sleeving them, and re-routing the wires to a much smaller "feature" (Conduit Ell, thence Hubbell male Twist-lock).

That bought me a good deal of formerly wasted space, and was far less hassle than changing the mounts about.

Done carefully, sleeved, etc, the wires don't much give a damn how or where they are routed.

My Cazeneuve HBX motor never even HAD a peckerhead when it left the factory - just an elastomer Ell into conduit.

Another "trick" we have seen was to add a plate and mount a motor upside-down or off the side from it.

There should be NO need to mess with the insides, stator, fan, nor anything else BUT the leads.

Ex: Having a motor shop provide for moving the wire to a new hole and/or extending it if not long enough.

One can DIY that with a bit of care that it not get into the moving bits.
 
Think about it.... you flip one and you have done a 180 degree change of orientation. Call it what you like. flip both and you have done nothing....Semantics.
 
That's not what I mean. I'm saying if you flip the stator and leave the rotor OR flip the rotor and leave the stator, the result is the same, provided the symmetry is intact.
 
So, gave Leeson a call today. The tech said for 3-phase motors you can just flip the rotor for most models. However, in my case it would need a bit more work to push the stator in for clearance... said it wasn't a great idea to bend the internal fan blades, since that could throw the rotor out of balance, so I'll fire it up and see how bad I made it. Worst case I try to balance it worse than that I take it in for balancing. For the amount of use it will get I'm not too concerned.
 
That's not what I mean. I'm saying if you flip the stator and leave the rotor OR flip the rotor and leave the stator, the result is the same, provided the symmetry is intact.

And the angle of dangle is proportional to the heat of the meat, providing the mass of the ass remains constant?

Easier to just move the wires....

https://images-na.ssl-images-amazon.com/images/I/51maTjEtc-L._SX425_.jpg

...and wait 12 hours for rotation of the Earth to take care of the orientation reversal. Don't even have to pull the endbells, let alone munge the fan.
 
I plead guilty to removing the peckerhead box entirely...
Another "trick" we have seen was to add a plate and mount a motor upside-down or off the side from it.

There should be NO need to mess with the insides, stator, fan, nor anything else BUT the leads.

Ex: Having a motor shop provide for moving the wire to a new hole and/or extending it if not long enough.

One can DIY that with a bit of care that it not get into the moving bits.

Very interesting! I really appreciate the peckerhead box.... the original 56 frame motor had the wiring box integrated into the rear bell. Completely out of the way! Hindsight's a real pain in the ass! If the stupid thing didn't have the fan on the inside, it would have been easy-peasy!

Appreciate your insight/experience thermite!

If you had never pulled the endbell you wuddna had to CARE how the fan was arranged.

EX: Say I need to pull the terminations out a hole 60 degrees off where OEM hole under the just-removed peckerhead had been.

Bundle up the motor so it is near-as-dammit air-tight.

Put it on the drillpress, mark the hole.

Plumb shop air off one of the pressure-regulators into it.

Make the hole with an annular cutter, shop air blowing chips OUT as I go.

Add lead-length to the OEM wires, "fish" them out the NEW hole. Protect sharp edges. New peckerhead optional.

Even my chips didn't have to go inside the case.

Most of the time, you don't need to do even this much. Attach extension wire to the leads. Sleeve it nicely, put the lot of it into a flat protective tube and run it along the outside of the motor, tight to the case..

The peckerhead that goes to can be ten feet down-bed, other end of the machine.

It's just electricity. Not a lathe's leadscrew nor Sikorsky H19 radial-engined helicopter's angled driveshaft that can only exist exactly one way.

Why.. electricity even goes around corners!

Go figure..
 
So, gave Leeson a call today. The tech said for 3-phase motors you can just flip the rotor for most models. However, in my case it would need a bit more work to push the stator in for clearance... said it wasn't a great idea to bend the internal fan blades, since that could throw the rotor out of balance, so I'll fire it up and see how bad I made it. Worst case I try to balance it worse than that I take it in for balancing. For the amount of use it will get I'm not too concerned.

Well I wrote a nice response the other day and before I could save it my computer restarted and I lost it all!!!! AAARRRGGHH!

One thing I wanted to clarify - as one bearing is held and the other is floating, the endbells need to stay with the bearing if you swap the shaft.

You need to move the core if they said you need to. The reason is the following; Its really the end of the laminations to the rabbet fit that define if the stator is symmetrical. The rotor iron and the stator iron must line up (the motor needs to be on magnetic center and magnetic and mechanical center are the same - if the stator is not symmetrical then you are no longer on magnetic center when the rotor is swapped)! The motor will never be anywhere right (including potential vibration issues and lack of torque/power) if the laminations don't line up.
 
If you had never pulled the endbell you wuddna had to CARE how the fan was arranged.

EX: Say I need to pull the terminations out a hole 60 degrees off where OEM hole under the just-removed peckerhead had been.

Bundle up the motor so it is near-as-dammit air-tight.

Put it on the drillpress, mark the hole.

Plumb shop air off one of the pressure-regulators into it.

Make the hole with an annular cutter, shop air blowing chips OUT as I go.

Add lead-length to the OEM wires, "fish" them out the NEW hole. Protect sharp edges. New peckerhead optional.

Even my chips didn't have to go inside the case.

Most of the time, you don't need to do even this much. Attach extension wire to the leads. Sleeve it nicely, put the lot of it into a flat protective tube and run it along the outside of the motor, tight to the case..

The peckerhead that goes to can be ten feet down-bed, other end of the machine.

It's just electricity. Not a lathe's leadscrew nor Sikorsky H19 radial-engined helicopter's angled driveshaft that can only exist exactly one way.

Why.. electricity even goes around corners!

Go figure..

And I agree with this option but in my world its a "motor termination box". LOL!
 
Well I wrote a nice response the other day and before I could save it my computer restarted and I lost it all!!!! AAARRRGGHH!

One thing I wanted to clarify - as one bearing is held and the other is floating, the endbells need to stay with the bearing if you swap the shaft.

You need to move the core if they said you need to. The reason is the following; Its really the end of the laminations to the rabbet fit that define if the stator is symmetrical. The rotor iron and the stator iron must line up (the motor needs to be on magnetic center and magnetic and mechanical center are the same - if the stator is not symmetrical then you are no longer on magnetic center when the rotor is swapped)! The motor will never be anywhere right (including potential vibration issues and lack of torque/power) if the laminations don't line up.

What a drag!

The motor is most certainly F'ed right up. I got as far as mounting it on the lathe and noticed right off the bat the alignment on the outside was off (no longer NEMA 56 dimensions). Therefore the rotor is most definitely not centered anymore.

I threw in the towel, so when I get back to it I'm gonna flip the rotor back to the way it was and take thermite's advice and mount the peckerhead to the lathe and run a conduit or something right to the motor housing.

Regards,


J.
 
mount the peckerhead to the lathe and run a conduit or something right to the motor housing.

You may find one of these - or its cousins - handy to manage exit of wiring from the motor, especially if a new hole has to be placed. Big Box have them if there isn't one already in your own hell box:

"https://www.lowes.com/pd/Sigma-Electric-ProConnex-1-2-in-BX-MC-Flex-Connector/1090811"

The separate cover makes it a tad easier to route the wires, and if need be, you can even do a bit of "surgery" on the body to keep it tight where space is limited.

They don't seal well against oil or coolant, though, so RTV or such might also be in order.


Back
Top