Iv googled and googled and seen were 1 of the deltaweld 450 was switched from 3 phase to single using the haas-kamp conversion, but no documents or instructions was given.. and my machine does not have the wiring digram on the rear..this machine says it will run on many differnt voltsages.. what voltage do i set it up.for, what size capacitors do i use..how many, and witch wire do i do away with and change...any step by step will help a ton..not only for me, but for people like me trying to figure it out, im in ky also if it matters..please help
How to install the app on iOS
Follow along with the video below to see how to install our site as a web app on your home screen.
Note: This feature may not be available in some browsers.
Largest Manufacturing Technology Community on the Web
Stay Connected:
You are using an out of date browser. It may not display this or other websites correctly.
You should upgrade or use an alternative browser.
You should upgrade or use an alternative browser.
Miller deltaweld 450 converted to single phase
- Thread starter Troy25
- Start date
- Replies 30
- Views 11,558
DaveKamp
Titanium
- Joined
- Oct 3, 2004
- Location
- LeClaire, Ia
Hi Troy!
Sorry to hear that you're in KY... we'll find a way to work around that. ;-)
I can't begin to count how many people have asked assistance for doing a single-phase conversion on a three-phase welder, but there have been many, many, many who have, with success, and never bothered to post results, drawings, or instructions. There have been some, however, who HAVE posted excellent pictures, drawings, and tested to identify what they felt was the best capacitance.
The Deltaweld 450 is probably a viable conversion, but without wiring diagrams, one cannot tell. What you need to do, is go to Miller's document database (Miller - Welding Equipment - MIG/TIG/Stick Welders & Plasma Cutting, I believe it's under RESOURCES, and take your machine's model number and serial number, look up and download the appropriate document. Next, study your welder- look for wire number tags, and compare that to the numbers on your diagram, and make sure that your machine's wiring MATCHES the diagram. Once youv'e done that, identify your welder's model number, and post a picture of the diagram. Either I, or one of the myriad of others who've used the conversion process, will be able to identify which connections to address and how, what voltage to set it for, and give you a ballpark range of capacitor size to experiment with.
Fabworks
Hot Rolled
- Joined
- Jul 25, 2013
- Location
- California, USA
Here is a link for manuals and parts at Miller. Just type in the serial number of your welder.
Not sure why the link text shows "301 Moved Permanently" but it works.
301 Moved Permanently
Not sure why the link text shows "301 Moved Permanently" but it works.
301 Moved Permanently
DaveKamp
Titanium
- Joined
- Oct 3, 2004
- Location
- LeClaire, Ia
Hi Troy!
I've had that experience too. Most of the time, I've found that I just look at the listings for the serial number I'm dealing with, find the issue matching that serial range. I think their 'search' method has some dead spots in it somehow.
Your DeltaWeld is not likely 'too old' to show up in their doc listings, but I have had a few that were very prior to the doc library they had, and a kind request by email with the model and serial number resulted in a PDF in my inbox within a day or two.
Because of that, I'll certainly grant kudos to Miller AND Lincoln for providing excellent support for their past machines. I just tried it on two different machines, however, and it appears the search isn't working at all. Hmmmf....
Fabworks
Hot Rolled
- Joined
- Jul 25, 2013
- Location
- California, USA
The search for manuals at Miller seems to be working now.
The serial number you listed does not work, but if you type in "Deltaweld 450" into the search window on the right side of the page under "Have an Older Model or Don't Know Your Serial Number?", it should work.
The serial number you listed does not work, but if you type in "Deltaweld 450" into the search window on the right side of the page under "Have an Older Model or Don't Know Your Serial Number?", it should work.
Got the manual downloaded, wires seem the same as machine, but im doing all this off a smart phone , i dont even own a pc..and this sight wont let me.post photo from a phone..wont even give a option for thay...it wants you to go threw photobucket, but yet using a phone u cant left click and drag to the post..so anyone got a email..ill send u the photos?
DaveKamp
Titanium
- Joined
- Oct 3, 2004
- Location
- LeClaire, Ia
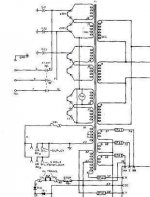
Here's what I found.
Power transformer is on the left hand side.
Three wires, from leg-to-leg (not one wire tying three legs) means this is a DELTA machine from the git-go.
Set the voltage jumpers to 230v.
Wire it up like I did with the SRH-333. More to follow...
Power transformer is on the left hand side.
Three wires, from leg-to-leg (not one wire tying three legs) means this is a DELTA machine from the git-go.
Set the voltage jumpers to 230v.
Wire it up like I did with the SRH-333. More to follow...
Attachments

DaveKamp
Titanium
- Joined
- Oct 3, 2004
- Location
- LeClaire, Ia

DaveKamp
Titanium
- Joined
- Oct 3, 2004
- Location
- LeClaire, Ia
DaveKamp
Titanium
- Joined
- Oct 3, 2004
- Location
- LeClaire, Ia

DaveKamp
Titanium
- Joined
- Oct 3, 2004
- Location
- LeClaire, Ia

DaveKamp
Titanium
- Joined
- Oct 3, 2004
- Location
- LeClaire, Ia
Now clean up the mess, connect L1 and L2 to the remaining left side points, add a ground wire, and plug it in for a test.
You'll need somewhere in the range of 110-180uf of OIL FILLED MOTOR RUN capacitors, 370vac rating. You'll need to experiment to see where it's most happy.
Bleeder resistors- put a 15k 5w wirewound across the terminals of EACH CAPACITOR...
If they're flat leads (push on) Wrap the leads THROUGH the terminal holes, then around the terminals, then Solder them on... THEN connect wires/busbars, etc.
If they're SCREW ON terminals, wrap through, crimp, and solder ring lugs onto the resistor leads, then place the ring lugs onto the capacitor terminals FIRST, then connect your connection wires.
Bleeder resistors are there to discharge the capacitors, hopefully before they blow your hand off, or kill you dead. Treat capacitors with respect, as they will show you absolutely no mercy if not properly discharged.
Attachments

Don Kinzer
Cast Iron
- Joined
- Mar 18, 2002
- Location
- Portland, OR USA
What factors does one observe or measure to determine "where it's most happy"?You'll need to experiment to see where it's most happy.
rj1939
Stainless
- Joined
- Jan 31, 2008
- Location
- southern il
Now wire up L1 and L2 feeds. This girl will be hungry, so use heavy wire... I'd suggest #8 or even #6 if you plan on working it hard...
So you anticipate a power usage in the range of 80-90 amps on single phase?
DaveKamp
Titanium
- Joined
- Oct 3, 2004
- Location
- LeClaire, Ia
It means you need to weld with it. It will be somewhat difficult for an inexperienced welder to know what 'most happy' looks, feels, and sounds like, but an experienced welder knows the disposition of each machine in his perview, and if handed the business end without knowing what supply is at the other, he will be able to tell YOU which one you've connected to him, AND wether or not you've used extension cables, or set it properly, or have insufficient gas flow, wrong wire tip, a bad connection in the ground terminal. It's like being blindfolded in a room and having a half-dozen teenagers talking to you- you know who's who by what they say, and how they sound... and you can tell by the smell, who showered after gym class, and who sat in the bleachers.
Set it to the lowest, mid-range, and highest point you think you'd spend the most time welding with it, and work with it a bit. Then work around the range and see if you can notice a difference in performance at upper or lower end. If so, remove or add a little capacitance, and try again, see how it affects performance. I've found that for the most part, welding transformers will be happy once you're in the general ballpark, and if any adjustment is required, it doesn't take more than two tries to get it where it's nice across the entire range with just one value.
For all that use my conversion- If you want to thank me, do it in a way that pays forward- Once you've figured out what it likes the most, please post the make and model, wiring diagram, and the capacitance you've found suits best overall, so that others faced with same question find your answers, rather than coming straight to me.
As much as I enjoy helping people, I dislike re-inventing the wheel, and my wife has lots of projects in my bucket-list... so I just can't get on here as much as I used to. My hope was that each time someone worked out the details of a new machine, they'd post a diagram, and the values, and a report of the results, somewhere that a web-search would quickly find it... because someday I won't be around to provide guidance. I lit a torch, and placed it up high enough to illuminate part of the world, with the intention that others would see, light their own from it, and carry it onward.
Don Kinzer
Cast Iron
- Joined
- Mar 18, 2002
- Location
- Portland, OR USA
I suspect that each of the two capacitors needs to be 110 to 180uF initially. Subsequent adjustment could be up or down.im gessing i need to split the 110 to 180uf..and use say like 2 capacitors of 80uf 370vac?
Similar threads
- Replies
- 2
- Views
- 2K
- Replies
- 3
- Views
- 968
- Replies
- 43
- Views
- 5K
- Replies
- 1
- Views
- 1K
- Replies
- 2
- Views
- 1K