Hi guys I’m new here and it seems like I’ve come to the right place for my inquiries. I have 2 slightly older cv power sources (miller, airco) that I would like to be able to use at home but I don’t have the 3ph power to run them. I’ve read over a couple of the conversions achieved here and it gave me hope. I am a fabricator/Welder and have been for a few years now but haven’t messed around to much with wiring and diagrams so that’s why I’m here I would appreciate any assistance I can get. Thanks for your time this site is awesome  pics of the machines in question soon to follow.
How to install the app on iOS
Follow along with the video below to see how to install our site as a web app on your home screen.
Note: This feature may not be available in some browsers.
You are using an out of date browser. It may not display this or other websites correctly.
You should upgrade or use an alternative browser.
You should upgrade or use an alternative browser.
New guy 3ph Welder to single conversion
- Thread starter Myst69
- Start date
- Replies 25
- Views 3,823
medsar
Cast Iron
- Joined
- Jan 13, 2017
- Location
- Washington, USA
Others will be able to comment more intelligently than me. If you have to change the internal wiring of one of those old welders to convert to 1ph....at first blush, I would say to stray away from doing that. Old Miller/Airco 330 A/BP or Dialarcs can be had from the dealer for $500 bucks here in the PNW. Also, mis-wired welders can be dangerous. If you don't know how to read a schematic to convert it from 3ph to 1ph, then it's best not to do it. Not being mean -- I follow that rule in my shop (If I'm not 100% sure, I don't do it).
I appreciate your concern, the only reason I’m asking about this is because these welders will be scrapped otherwise. I’m a firm believer in the saying: “they don’t make them like they used to” and I would hate to see them go to waste like that. I have some electrical knowledge but it’s geared more towards residential applications. Whenever dealing with electrical components I’ve always chosen to air on the side of caution, that’s what led me here, I’m just curious if it’s something I could attempt or not given my current understanding.
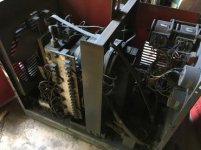
Well I’ve started tearing into the Airco today, I sure would like some input based on the pics I’ll be posting but I’ll manage until someone else can give me some info. Pretty dusty on the inside but everything looks to be in order, nothing melted or burnt lol


Code: 1555
Serial: R1008005
I don’t know if these have much significance on an Airco considering how many people have had a hand in manufacturing them in the past. Gonna run over to storage and grab my fluke and a 50A 230V plug and outlet. I have my lincoln squarewave tig-355 hardwired onto a 50A breaker on my service panel, I figured it would just be better to wire in a an outlet for ease of use.
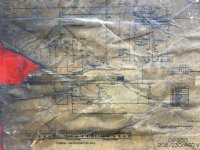
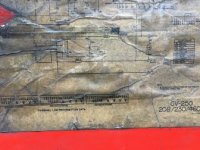
So my main question to begin with is since I’m wiring this 230V single phase which line do I cancel out on the plug end? Looks like L1 goes to the left point of the delta triangle L2 to center and L3 to the right. the abbreviation TI is for main primary and L2 goes to the primary terminal
I can’t locate a clear copy of this diagram anywhere on the net??? Kinda frustrating, it sure would make this process much easier. From looking it over it does appear to only have 2 windings and some booster circuits, I don’t even know where to begin with those.
cyanidekid
Titanium
- Joined
- Jun 4, 2016
- Location
- Brooklyn NYC
"a little knowledge can be a dangerous thing" comes to mind... it's a bit hard to read that diagram in your pictures, but I'm pretty sure that is not a delta wound transformer. (why are you trying to find it on line when you have it in the machine?)
the Miller is going to be far easier to get info on, contact them directly, and ask if it was available in single phase version. ask them if it can be switched without changing transformers. if so, get the diagrams for the single phase and three phase versions and compare the part numbers. If the transformer is the same you are in luck. wire it as in the single phase version, switch out any other differing parts, and you are good.
others with more knowledge of transformer design will chime in, I'm sure, but most of the info you see on this site regarding running machines built for three phase on single phase are for motor loads, and transformer loads (particularly in welders)are FAR, FAR different animals. please do use caution.
I was looking for something a little clearer, I might be a little confused about the delta and wye wound differences since this is the first machine I’ve considered converting. With that being said I’ve read somewhere that this machine can be run single phase by cancelling out one of the 3ph legs with major decreases in output, can running it this way be dangerous/detrimental to me, the equipment or the service panel powering it? I am aware these are all very green questions and that is why I chose to come here for input from people who have done it safely and successfully. Again any input is greatly appreciated and of course, before powering on any equipment I will be making absolutely sure that all necessary precautions are in place earth grounds, breakers and extinguishers just in case lol.
Ohh and the reason I decided to try the airco first is because the cp-250ts has the slope issue and is a little more involved, figured this would be a good one to educate myself with first. The other miller is a viable option but is currently buried in storage :-( although I am tempted to dig it out and have a closer look.
tjb836
Aluminum
- Joined
- Feb 18, 2012
- Location
- coldwater,oh USA
You probably want to take a look here:https://www.practicalmachinist.com/...-phase-conversion-269124/?highlight=haas-kamp
That’s actually the thread that I’ve been gathering most of my info from, it’s been a major help in defining the process to my level but now I just have to wait for the capacitors to arrive. I’ll probably start re-wiring it later this week or the weekend. I’ll take as many detailed pics as possible as I go and post them here.
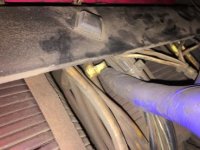
Okay so I’ve ordered my run capacitors and resistors and I decided to go ahead and start the re-wire process. When I removed the two bolts that hold the terminal block on I was quite surprised at the amount of dirt and dust that had gathered there but then I remembered this machine is 25 years old lol duh. I was able to remove a lot of wires that needed to be moved or removed, fan, jumpers etc but then I ran into in issue identifying wire #8 the one I’m supposed to label 2. Upon inspection of the 6 wires that come from the power switch I realized that they are not numbered like the rest have been so which one I am supposed to remove, I am not quite sure??? I did find one in a different location that appeared to be labeled #8 (pretty grimey hard to make out) but it was actually a bundle of smaller wires that went from the terminal board to the 2nd (middle) coil. I figured that can’t be right? I took a picture of the suspected wire hopefully someone will be along to point me in the right direction.


Similar threads
- Replies
- 10
- Views
- 751
- Replies
- 28
- Views
- 1K
- Replies
- 17
- Views
- 2K
- Replies
- 8
- Views
- 375


