Spud-
You are completely missing the point of a pin router.
They are essentially obsolete with cnc routers; except in occasional small shops like mine.
Until 10 or 15 years ago or so, they were a primary duplicating machine of multiple contoured parts in aircraft factories (aluminum); plastics fab shops, and woodworking plants. You make a pattern to hold the part, and the bottom of the pattern has the "program" for locating all the features and cut-outs on the part. This can include complex hole patterns on relatively precise locations.
On really complex parts, there may be several patterns, and a feature of the work is located to the pattern each time, then a new set of operations performed on the part, perhaps even in a different, or several different pin routers or pin drills, all set up with a different cutter to process different features of the part sequentially. (Instead of a tool changer on a cnc, the part was changed to a different pattern and sometimes different machine for second, third, etc operations)
The pin locates the work to the cutter. Sizing the pin allows a given pattern to make under or over-size parts from the same pattern. etc. You can use a RH pattern, and make a LH pattern by cutting through, then using that to generate a working pattern. Before cnc, that factor alone (mirror image parts from one initial pattern) was worth a lot.
On a "good" pin router, the pin will be easy to center, easy to raise or lower to position, and be absolutely positive in position once set. I don't know how common the feature is, but the pin in mine runs in ball bearings, and it does seem to make a difference.
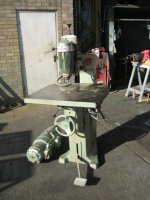
Perhaps the point of this picture in the previous post was not clear.
I'm making piles (couple hundred, eventually) of curved ribs for a modern looking shelf construction. They are rapidly bandsawn out of blanks, then held in the pattern shown with clamps, and run through the pin router so that all come out the same exact shape and curve. (There are shorter and longer versions, and then there are modified curve versions, but ignore that for now, and just consider making 200 or 300 identical curved parts.)
The pattern has a groove on the bottom with the correct curve. This rides the pin, to translate the shape to the work held in the clamps against a fence on the top of the pattern.
This is not the ideal example to convince someone who has not used a pin router because indeed the single side curve could be run on a shaper. But IME, it is often faster to set a pin in the router, than to make a fence for the shaper; or sort through sizes of cutters and collars on the shaper for a good match to the pattern. The router shines when the curves get tighter & more complex, or when there are internal cut-outs.
There is a bandsawn workpiece in the pattern, and 2 finished/routed parts in laying in front on the table.
The photo is not completely clear: the collet chuck is black, and can be made out behind the knurled knob above the bit. The knurled knob (which comes out looking like an offset chuck in the photo
")
) is to index the depth stop turret. Inside the door on the front of the machine, is a depth stop turret with 6 adjustable depth stops. That way deep cuts can be done in steps. Or different depth features cut at the same time if the same bit is used.
Like patternmaker, I can't imagine using an "overarm" router without a fence, pin, or pilot bearing. I did not even know such devices existed without screw operated X/Y tables (the English "elephant" router, e.g.) unless someone took the pins and just kept using it freehand, which sounds like insanity.
Well, having said that, I have on rare occasions used the pin router freehand with 3/16" bits and small DOC. But that does indeed seem more dangerous than a portable router used freehand, because there is more to grip and more inertia in the portable tool. But again, that is pretty far from the point of actual practical use of a pin router.
smt