I thought I had a couple around with dutchman repair by PO's for examples, but can't find any. It used to be fairly common to see them at fleamarkets. The typical old repair was triangular. They chiseled a mortise out from just past the width of the blade from each side to a point on the center line. This makes it relatively easy to fit the patch, & wedge it to the point from the back of the throat, before clamping it flat with a C-clamp and caul.
In the UK from the late 19th c through maybe the depression, you could get iron toe piece with a screw, to let into wooden coffin smoothers. They were then also somewhat adjustable. Such toepieces can be seen in reprints of Norris ("iron fronts for smoothing planes, #33") and maybe Spiers catalogs. Also described and shown in at least the 3rd ed (1908) of _Modern Practical Joinery_
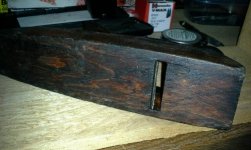
All that said, it is hard to tell from the photos, but yours looks like the sole is a bit thin and has been flattened quite a bit in its working life. A straight on side shot would show a little better, but my guess is it is already 1/4" thinner (height) than they were shipped from the factory. The wood appears to start out about 1-7/16" or even 1-1/2" thick from the factory on most of the smoothers depending on brand and model. So adding a new sole and bringing the total finish thickness within that range would make sense. Pretty much any woodglue will work, TB3 should be fine.
Note that most of those old transitionals and woodies in general wear more in the front than the back. So over time and use, the sole ends up thicker at the heel than at the toe. Take that into account whatever cutting or repair method you use.
smt


") ...If the mechanism is really good maybe making a whole new body is easier. I would not know till i took it apart.
...If the mechanism is really good maybe making a whole new body is easier. I would not know till i took it apart.