crystalltiice
Aluminum
- Joined
- Jul 31, 2015
Hi,
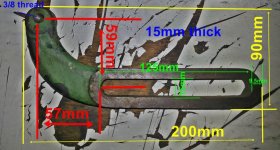
I have the cincinnati gear cutter grinding attachment but am missing a part. It is the bent arm that is used for setting the tip of the cutter on the center line.
The arm can be seen here in this picture on the top left, it is the one with the long slot:
Redirect Notice
and also this picture:
Redirect Notice
I'm planning on laser cutting something but need some starting dimensions. Some pictures with dimensions/outline traced on paper and scanned to jpg or CAD drawing would be nice! alternatively just a text explanation of the sizes can also work.
Also, what does the bolt and nut that hold it in place look like?
And, is the tip adjustable or just ground to the exact size and bolted in place?
Thanks a lot!! I'm busy cutting a gear and the cutter needs sharpening, I'm eyeballing the center but want to get the attachment fixed.
I have the cincinnati gear cutter grinding attachment but am missing a part. It is the bent arm that is used for setting the tip of the cutter on the center line.
The arm can be seen here in this picture on the top left, it is the one with the long slot:
Redirect Notice
and also this picture:
Redirect Notice
I'm planning on laser cutting something but need some starting dimensions. Some pictures with dimensions/outline traced on paper and scanned to jpg or CAD drawing
 would be nice! alternatively just a text explanation of the sizes can also work.
Also, what does the bolt and nut that hold it in place look like?
And, is the tip adjustable or just ground to the exact size and bolted in place?
Thanks a lot!! I'm busy cutting a gear and the cutter needs sharpening, I'm eyeballing the center but want to get the attachment fixed.


