What's new
What's new

need help with Wohlhaupter UPA 4s5/2418

jz79

Stainless
Joined
Mar 21, 2017
Location
Latvia
Hello,
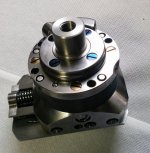
I was looking around for a larger boring head to add to my tools chest and snatched this one off the fleebay for 1/4 of what I see "normal" Wohlhaupters go for, but this one doesn't quite look like regular Wohlhaupters, also the ad said there are couple defects (a broken MT tang, and a stripped locking screw, which I'm not too worried about), and I was looking around for a parts list, or exploded view sort of an image for it, but couldn't find anything regarding this particular model.
So has anyone seen this sort of Wohlhaupter, what is the difference between this and the "regular" looking ones?
And another question, maybe someone can recognize from the pictures if the MT shank is the removable type on this one?

s-l1600 (a).jpgs-l1600 (b).jpgs-l1600 (c).jpgs-l1600 (d).jpg
 
"Wally" heads tell you if the shank is removable or not. Early versions the shank in not removable....
Pretty sure i can see Mo. 4x on the last photo you provided..and hence the answer. #4 Morse shank..not removable.
Cheers Ross
 
I have three UPA heads, a 2, a 3 and a 4. None of them look like this. Either a very early head or perhaps a plain (non-facing) head? That said, the general build details are very much Wohlhaupter. The cutout for the lube point in particular, as well as the adjustment screw and arrow. My manuals show the entire lineup, from the 1 to the 6-S7, and none of them are plain heads. Very interesting. I agree with Alfa, the early heads were not interchangeable, there is a red dot on the mount on the later ones which indicate that feature.
 
^^^^^^^

What's already been said,
Plus...
The removable shank versions have a differential metric socket screw inside the shank (looking straight down into the hole in the end of the shank). I had to make a 30MM taper for my UPA3, so once was familiar. But can't remember at the moment even whether it screws "in" or "out" to loosen. Anyway, yours looks fixed.

smt
 
thanks for the replies, the thing will arrive some time next week, I'll update the thread with more info then, and probably pics of internals, I'll take it apart anyway to check everything is ok, clean, relube etc
 
I have one just like that except that the cross hole in mine is square. The design of the vertical pushbuttons dates it to quite a ways back I think. Of all the Wohlhaupter B&F heads these are the most interesting of all. I collect them because of the beauty of the design and manufacturing they contain, and very seldom use them.
If you look straight down the shank at the push buttons you will see that one set of buttons is off symmetry from the other three sets. They had to do that to have the release hub where it is. That one set works backwards from the other three sets too I think.
 
As promised, here are the pictures of the thing. First thing - the quality of the craftsmanship, the fit and finish is quite disturbing... :D in the best way possible

When I got it in my hands, I immediately got worried that it will not fit my Russian Deckel FP1 clone (MT4 spindle), turned out that the head space is too small for a tool this large, and horizontal spindle has integral drive flange to run the vertical head, and that doesn't allow regular MT4 tooling to seat properly. So the plan was to fit an iso40 holder, so I can use it with my other mills.

First thing, as you can see in one of the pictures, I took a carbide drill and drilled a shallow hole, then took regular HSS drill and tried to drill further, and first success - the thing is case hardened, the core is relatively soft, MT4 shank got cut off, turned on a lathe to remove the hard case and then ground for smooth finish (~28,5mm), M14x1,5mm thread was cut to accept the capto draw bolt, either my tap was dull, or the soft core of the Wally wasn't that soft, but it took more effort than I expected it would.
Then a capto tool holder got sacrificed (I didn't have any blanks around, and didn't want to wait few days to order one), bored and ground to a very close size of the new boring head shank, then lapped both of them together for a tight fit, this particular capto was also case hardened (which is why I wouldn't recommend anyone doing this, use a blank... or get one with the proper taper to begin with), in the picture where you can see the iso40 mounted on the boring head, the plan is to later do away with that excess 15mm (marked by the faint yellow box), but that will be after I will be done with the job I bought the head for...

The condition of the tool itself seems remarkably good, there is basically no wear on the lead screw or the nut, all the internals are basically like new. The buttons function to select the travel direction and have a "neutral" position, there are 4 sets, each set adds 0,02mm of feed per revolution, I didn't recheck it if is so, afair that number got stuck in my head from one of the manuals I red. One thing I noticed when playing with it, was than one of the buttons popped out tiny bit above the surface where the auto-stop ring rides, which caused an unexpected surprise, when the autostop dog popped up, the rind hit that button and pulled the stop-rod out of my hand, good thing I was testing it, and holding it by hand, not having it press against something solid, would have ruined the evening for sure... will have to check why it happened, maybe I assembled it back together slightly wrong.
 

Attachments

  • IMG_20180326_143344.jpg
    IMG_20180326_143344.jpg
    95.2 KB · Views: 922
  • IMG_20180326_145425.jpg
    IMG_20180326_145425.jpg
    93.2 KB · Views: 322
  • IMG_20180326_160246.jpg
    IMG_20180326_160246.jpg
    92.8 KB · Views: 296
  • IMG_20180326_160523.jpg
    IMG_20180326_160523.jpg
    94.4 KB · Views: 320
  • IMG_20180326_160807.jpg
    IMG_20180326_160807.jpg
    93.5 KB · Views: 281
IMG_20180326_161054.jpgIMG_20180326_161604.jpg
 

Attachments

  • IMG_20180326_143344.jpg
    IMG_20180326_143344.jpg
    95.2 KB · Views: 211
  • IMG_20180326_160246.jpg
    IMG_20180326_160246.jpg
    92.8 KB · Views: 146
Last edited:
B&F heads are such well engineered and fitted products, I have a Mizoguchi copy of a Wholhaupter UPA3 that has jeweling on the fitted dovetail surfaces, either that or it's post HT hand fitting with careful abrasive use.
IMG_1677.jpg
 
Thanks!

As I said, the plan is to refine my current solution to something very similar to what the original looked like and what you replicated on yours, as it is right now, mine doesn't have any drive dogs and is relying just on the contact pressure supplied by the capto draw bolt, I did a few test cuts in steel, and it holds up just fine, I'll finish the rush job I needed it for, 35mm bores and few snap ring grooves in a very awkwardly shaped welded steel part, and then will pull the head apart again to mount it properly.

Because of the shape of the welded part, the job can't be done in a lathe, well, not in mines at least (would require a swing of ~350mm), I could do with a turn table on a mill, bet it would mean repositioning the part multiple times to cut the snap ring groove, so I decided to get a Wohlhaupter! :D always wanted one... now got the excuse to buy it
 
Well, we learn something new everyday don't we? Very interesting indeed, top activated feed buttons and a square tool Wohlhaupter!

Super cool guys.
 
Shoot us an email with these details to [email protected] please. We acquired the majority share of Wohlhaupter a while back & might be able to help connect the dots on this Wohlhaupter mystery piece!
 
That's ironic. I called Allied today looking for parts for my UPA 3 and the local rep said he wanted to stop by the shop next week and see my small collection. He also said they can date the head by the serial #
 
I found a link to a PDF about rebuilding Wohlhaupter boring and facing heads, PM me if interested as the instructions were well written and have lots of photos, easy to follow.


Back
Top