What's new
What's new

Show Us Your Homemade Tooling Pictures.

gary350

Hot Rolled
Joined
Aug 11, 2008
Location
Murfreesboro, TN. USA
I bet most of you guys have some homemade tooling for your lathe, mill or grinder that you invented because you can not buy it in any tool catalog or the tooling is just to expensive to buy. Lets see your pictures. Tell us what it is and what it does. Someone here might want to build one.

I need a radius cutter for my lathe. I hope someone shows a pic of one that I can build that does 1/4" to 1/2" radius. I saw a radius cutter in Home Shop Machinist Magazine many years ago but don't remember now how it was built.

From Left to Right.

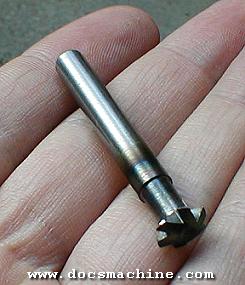
#1. Worlds smallest hydraulic jack. I used this 31 years ago when I built punch press dies and repaired dies. It is great for jacking apart a stuck die. It is only 3/4" bore diameter but with 40,000. psi from a grease gun it can produce several tons of power.

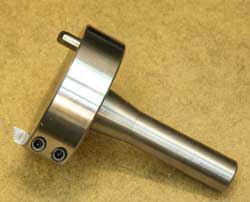
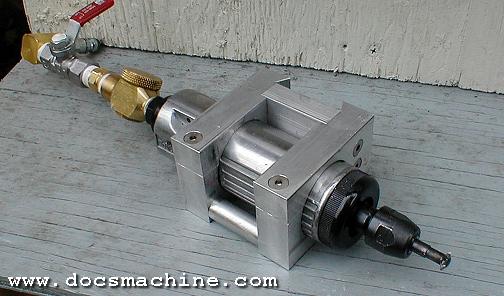
#2. I do not have a turret lathe but I needed a turret attachment for a special project so I built this. It has an index location on the bottom so I can spin it and it stops exactly on center. It has 6 pre drilled holes.

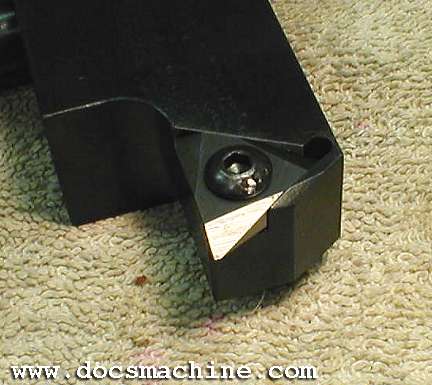
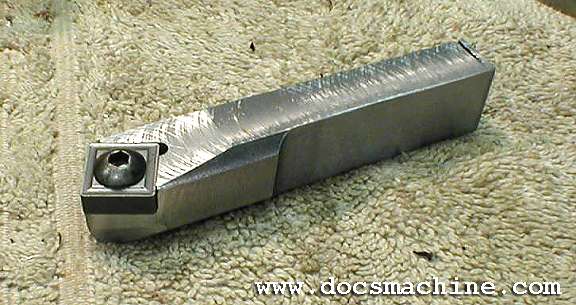
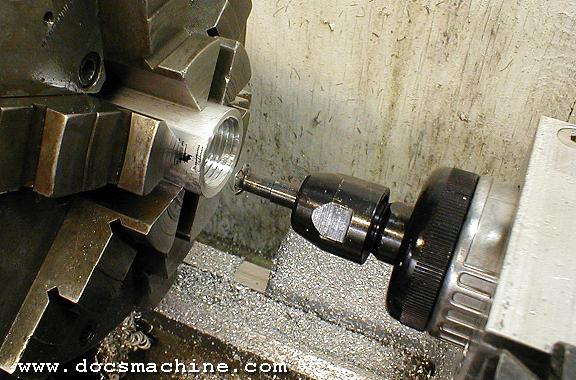
#3. I call this the force indicator. I put a piece of 3" diameter 16" long steel in the lathe chuck so it can be center drilled or put in the steady rest. This device I built is a piece of 1/2" square CRS with a roller bearing on the end. Mount it in the tool holder and crank it into the part as the part turns slow. It forces the part to center and it is very accurate and much faster than a dial indicator. I can center a part in less than 60 seconds.

#4. This is my magnetic mold indicator. It is a piece of metal with a 3/4" hole drilled through it and a 5/8" magnet glued in the hole with epoxy. I can stick it on the side of a mold and indicate the edge to .0001" it is extremely accurate. It is had to indicate that close with an edge finder. I use to use this 29 years ago when I was a mold maker. You have to make it in 2 pieces, surface grind each piece and bolt the 2 halves together. I use to have a dial indicator full dial rotation was something like .005" I have not done mold work in 10 years.

tool2.JPG
 
Not as snappy as a turret tool holder but here is a tool holder I made to extend the tool far to the left of the normal tool post.

The job at hand was 12" diameter and would not clear the cross slide of the lathe so moving the tool to the left was a way of getting around the problem.
 
Well, let's see...

I made some carbide-insert holders for my A-size QC toolpost. This one takes triangular positive-rake inserts:

carbideholder3.jpg


This one takes triangular threading inserts:

carbideholder5.jpg


And this one takes trapezoidal negative-rake inserts:

carbideholder6.jpg


Since all the carbide inserts stay at close to the same tool height, I fitted each of these with a fixed height adjustment, and they've worked quite well.

Then there's these softjaws:

softjaw2.jpg


... and this rough-and-tumble carbide holder:

carbideholder7.jpg


... that I used to turn down these transmission clutch rings:

softjaw3.jpg


There's also this airmotor holder:

mount2.jpg


... that uses this threading mill cut from O1:

threadmill.jpg


... to cut internal threads to a shoulder:

threadcutting.jpg


It worked okay, but the airmotor had very little torque at anything less than top speed, and top speed was 15,000 rpm or better. So I built this very rough but quite functional version using an old treadmill "can" motor, stepped down to give me about 3,000 rpm at the cutter head:

thread03.jpg


There's more, but apparently I'm limited to just ten pix per post...

Doc.
 
....oh man, where to start!

haha this same Q was justed posted on another forum so i'm fast on the draw today....just cut and paste

i did this as links, thought it too many pics for images, would kill a dial up guy

tube bender
http://i20.photobucket.com/albums/b201/michael0100/tube%20bender/tbsetup.jpg
http://i20.photobucket.com/albums/b201/michael0100/tube bender/tboverview.jpg
http://i20.photobucket.com/albums/b201/michael0100/tube bender/tb2ndbend.jpg

tube straightener
http://i20.photobucket.com/albums/b201/michael0100/tube straightener/tubestraightener.jpg
http://i20.photobucket.com/albums/b201/michael0100/tangentialradiuscutter.jpg

universal swivel vise and drill grinding v block
http://i20.photobucket.com/albums/b201/michael0100/universal swivel/pt2withlargerdrill.jpg
http://i20.photobucket.com/albums/b201/michael0100/universal swivel/pt2trvbloc.jpg
http://i20.photobucket.com/albums/b201/michael0100/universal swivel/pt2sharpeneddrills.jpg

nut drivers (this is ME, second set no shown is BA)
http://i20.photobucket.com/albums/b201/michael0100/sockets/finished.jpg

pinch roller
http://i20.photobucket.com/albums/b201/michael0100/Roller/gearend.jpg
http://i20.photobucket.com/albums/b201/michael0100/Roller/small.jpg
http://i20.photobucket.com/albums/b201/michael0100/Roller/sideview.jpg

UPT
http://i20.photobucket.com/albums/b201/michael0100/upt/uptstorage.jpg
http://i20.photobucket.com/albums/b201/michael0100/upt/uptwithstaking.jpg
http://i20.photobucket.com/albums/b201/michael0100/upt/uptwithsmalltappinghead.jpg
http://i20.photobucket.com/albums/b201/michael0100/upt/uptwithdriilheadcloseup.jpg

finger brake
http://i20.photobucket.com/albums/b201/michael0100/finished brake/brake1.jpg
http://i20.photobucket.com/albums/b201/michael0100/finished brake/DSCN8912.jpg

not shown or currently underway; forge, oven, finishing a spot welder, cnc mill, welding cart, dust collection for T&C grinder, cut knurling tool, , what else have i forgotten...... :D yeah i like making tools.
 
OK doc, spill the beans, what black oxide do you use, or do you sent out for "real" black oxide?

-Nope. Bottle o' "gun blue" from the local gun store. Wal-Mart carries the stuff too. Only works on steel (not stainless) and the piece has to be very, very clean, but it makes a fairly durable dark blue, almost black finish. Keep it oiled, or it'll rust in a humid environment through.

Doc.
 
Gary, just noticed you comment on needing to cut small radii - have a look at the last link under tube straightener in my above post. I had to do a lot of these for the straightener and the roller and came with this idea. you cut a cone in drill rod, harden it, then surface grind down to the desired dia. product approach? naw, but i got the job done i needed it to
 
From my blog:

MODULAR KNEE TOOL

TAP CHUCK

RADIUS CUTTER halfway down in my shop thread.

Not original ideas just too broke to buy it. I also use cold blueing just not as good of job as Doc. If you do multiple coats it will do a real nice job. POST 11 shows some pics of 10/22 I redid. I must have put on 8 coats of cold-blueing it came out pretty well. I've used the cold black sold in MSC, et al. but prefer the cold blue. Oil blackening works real well on small stuff you are willing to heat to red hot.

I like Doc's idea of making a indexable toolholder that doesn't have a adjustment for height to get out of adjustment. I'm going to steal that idea.:D
 
Mig gun holder

This is probably not what you had in mind but --------- Some of my welding processes require moving the part rather than the gun. I made this fixture some years ago to position the gun. It allows me to lay beautiful weld on pipe and driveshafts. The gun can also be advanced slowly to buildup worn bearing journals.

Although I don't weld "in the lathe", I do use the lathe to power some rotating fixtures via a driveshaft (insulated of course).

IM000962.jpg


IM000965.jpg


IM000956.jpg


SCOTTIE
 
Doc. are those insert holders knock offs or was that your idea? That makes alot of sense since it obviously adds ridgidity.

-Little of both. I started thinking about it when I started making my own set of toolblocks (which at the time cost $25 each.) Then somebody on the HSM board showed their 1-1/4" shank Kennemetal toolholder that they'd simply cut a dovetail in the side, and then I found out that Aloris sells one-piece blocks that take inserts directly.

So I can say I came up with the idea on my own, but it was an old idea when I did it. :D

Doc.
 
I thought we mill guys ought to get some "press" here as well. *s

Finish tapping after drilling on the home made subplate system. The subplate was hydraulically held from underneath to leave the whole table travel open to hold parts.

The parts are made in bar form and parted off in the sawing system in which different tooling alowed me to do it in the Hurco machine using a right angle attachment. The aluminum cross bar was attached to the back of the saddle as well.

The parts had three #4-40 tapped holes in them. I've probably done 15-20 thousand of them.

Tapping..

http://s375.photobucket.com/albums/oo196/Meta1cutter/Tooling/?action=view&current=MVC-241W.flv

Sawing..

http://s375.photobucket.com/albums/oo196/Meta1cutter/Tooling/?action=view&current=MVC-135W.flv

I hope you like...

Best regards,

Stanley Dornfeld


Back
Top