What's new
What's new

Drilling center holes on a lathe

Here is how I would do... Requires a little bit of work...

A: Get a weekend job...

B: Work for a few weekends

C: Buy chuck with pay from weekend job

D: Buy cast iron for backplate

E: Make backplate, fit chuck to backplate

D: Chuck up work and centre drill...

F: Profit...

This behavior is also known as being a Practical Machinist.
 
Here you go Eternal Tools' revolutionary watch repair tools - YouTube there will be many other about too.

Odd thing though water hardening carbon steel will hold a much sharper edge than carbide or hss. Some wont use anything else

John

Yes, thanks, I had seen a couple of similar videos prior to my post number 59. I think it was the last sentence in that post that was the most important. I want to see how the OP himself did it.

Denis
 
Last edited:
The earlier post with the picture showed you how to make the centre holes really. Say you drill them and they are a bit misaligned. If you use the centre to press the work up against a centre drill as shown and keep reversing the work you will soon correct any error.

Think you will need to discover the secrets of tallow to use a live centre though. When I was trained there were no running centres and if I had burnt a centre out I would have probably been made to eat it. It never ever happened but I had a tin of tallow for lubrication. I suspect it's part boiled off beef fat to refine it but don't really know. It could equally well be dodo fat. Tried at home and after burning 2 bought a running centre and didn't follow up on tallow. Another alternative is a carbide tipped centre.

You can probably make a cup chuck. I will need one shortly to recon a lathe spindle and it's the best way to get work perfectly aligned with the axis of the machine. You may get ideas from books by P N Hasluck on this link Internet Archive: Digital Library of Free Books, Movies, Music & Wayback Machine There will be other old lathe books there too.

I wont knock trying to do this sort of work with a graver - it's been done and that is how it used to be done too. A common dodge to get a high quality finish involved the use of lead laps. Other than for plain turned work it's hard to find out much about that. Another was to use a well polished ball ended spinning tool and run it along the surface of the work with some pressure behind it. It really does improve finish and also refine the material. Threads were cut by hand initially with single point tools but later filed up multi toothed hand chasers were used which tend to self feed and provide a perfectly pitched thread - not that difficult to do actually. ;) I've done it.

Not all on your question but may be of interest to you.

John

I hadn't thought of drilling the centers multipul times, but using the tailstock to keep it straight that should allow both ends to be concentric and on the same plain. Between that and the center punching and chalk method I should be able to drill the centers fairly accurately.

I have never heard of lead laps before, I'll have to google that. And as far as getting a nice polished finish that is done by having a very polished graver. I think the polished ball end tools that you refer to are for burnishing parts such as pivots in clocks and I think that it is done to harden the metal rather than to polish it, but it may do both. Although in metal spinning I know they polish with polished round end tools.
 
It does polish. We have a small hardened and polished steel roll with a radius on the outer circumference. It sits on a hardened pin in a piece of CRS. Looks like its some shop made item of a bygone era. It gives a nice finish and reduces diameter by perhaps.....a few tenth...depending on how much roughness is rolled flat to make the surface even.
 
I posted a picture of some of my work elsewhere and some one wondered if I had cheated by simply reversing the tool and running the blunt end along the work. Decided I hadn't - which I hadn't - but just goes to show what a common dodge this sort of thing is for final finishing of an already good surface. I made a ball ended tool to do it by hand out of silver steel but made the mistake of not tempering it to mid straw. Fine on m/s but the surface fractured on silver steel or drill rod as some on here will call it. Older books reckon that the process improves corrosion resistance presumably by closing up pores and even work hardening it some what as forging tends to by altering the grain structure.

As to laps those books I mentioned will give some info but I have always wondered just how they went about making morse style tapers. For a hell of a long time now they usual finish up on a grinder.

John
 
That is the 3ed or 4th time that using a grinder to make tapers has been mentioned. It gets me to thinking that I might be able to turn a rough taper like how I started theses but instead of finishing by test fitting like I did I could build a jig to hold the pieces at the proper angle in a slide in front of my bench grinder and if I chuck the rod up in a hand drill I should be able to get the final taper with much less trial and error.

Also I couldn't find the books you were referring to in that link but I did a search of the authors name and it came back with a pdf of a book on hand turning, I'll see if it mentions the lead laps in it. When I do a google search for lead laps it is all about NASCAR.
 
There seems to have been a lot of interest in the use of a graver for turning steel

I cut brass and steel rregularly by hand in both my little Lorch watchmakers lathe and the Stark #4 which has a 9" swing. The Stark came with both a cross slide and a hand graver rest and I find that there occasions, like making a curved surface, that the graver is indespensable. I am a clock restorer, so I'm usually making one-offs, often to match other things simply by eye.

I usally use 1144 stressproof which cuts like butter. Steel is actually easier to turn with a graver than brass because there is no tendency for the graver to dig in with steel. For saftely sake I try to avoid hand turning with anything other than collets.

I thing the thing we call a 'graver' in horology is a square high carbon steel engraver that has been ground at an angle (lozenge shape) leaving a point and 2 square cutting edges.

Best,
Rich
http://www.clockconservation.com
 
Last edited:
Curious. Since i have been giving woodturning a few tries since i built my lil wood lathe (which still has to be tried with harder materials, but should work fine too) profess to know a bit more than nothing about hand tools on a lathe. (But not much more than nothing)

Basically the graver looks like it works the same way the skew does. The most dangerous of the woodturning tools. No wonder it tries to dig in brass.

But on wood you use scrapers aswell. Any of those short flat scrapers which are no good for way scraping work just fine. They are used with negative rake and therefore can not dig. Cant you use one a those on brass ? Of course a much smaller version.

I don't know about using a graver that looks like a skew. The one (and only one so far) the I have is about 3/16 square with a 45 degree angle ground on the front so it looks like a diamond. To cut with it you pivot it on the toolrest like on the x/y axes but you also rotate on the z axis at the same time, I don't know why but without the rotating it on the z axis the tip of the graver likes to snap off. I have also seen pictures of gravers with much less than 45degree bevels on them which I might try, if it still cuts it should prevent the tip breaking so easy.
 
You should try entering the mystical world of fine turning with a graver, also scraper like tools. Work above centre with the tool sloping upwards. Needs more front clearance but the tool then has more of a shaving action. Some sources give a figure for over centre turning - cutting edge at the point on the work that forms a 20 degree angle with the centre of the work. Best to play around a little.

John
 
Regarding the skew....i seem to have completely misinterpreted the nature of those shiny surfaces in a 2D video. No skewing action there, nideed, i had to re watch it...

And yeah, i will try it out. But first i have to build a new drive unit for my microlathe (not chinese, mind ya, a lil woodwoorking and graver work lathe i built last christmas, size of a watchmakers lathe).

Got a nice 250W resistance start (no capacitor, but huge inrush current, only on small motors up to 1/3 hp or so) 1-phase induction motor from the 40s or 50s. Finally got around to pulling it apart a few days ago. Today i cleaned and regreased the bearings, not its time for reassembly and painting.
Gonna build a small tabletop line shaft. We have a watchmakers lathe too, which is in damn bad shape, but i guess it can be made to do some work. And id love to have a lapping wheel for gravers and gouges. And since low power motors are huge compared to multi hp ones....id rather build a set of shafts than deal with another 30lbs of completely unnecessary motors to run those lil things.


I found a nice catalog image somewhere of an antique lineshaft style set of counterhshafts meant for exactly this purpose.....time to build another one after maybe 70 years have passed....

Did i mention its gonna look cool? :D

I also hope that the capacitor start induction motor i shot for 11 bucks , shipping included, finally arrives. Boy, that guy is SLOW. Well ok not really. Its just that most ebayers take only 3-4 days to have the shit delivered to your door....and he already needed like 9 to not get it shipped.
Alas, perhaps he just aint got online banking and lives in the middle of nowhere....he has no bad stuff in his ratings...

Edit: Just checked, no, he had it shipped on the 22nd. Some unions are on strike currently....but i dont think postal and shipping guys are......
Weird...

Another motor ? Yeah, it was so cheap and its also vintage. Gonna build a second set of shafting if the first one works. Just because we have a lot of small stuff at the museum which could use one.....
 
I'm just about finished cutting an Acme thread in 8" in UHMW with only a butter knife and a jar of Vicks Vap-O-Rub. Anybody want to send me a chuck?
 
Drilling cenyre holes

To answer the original question.
Take 2 pieces of wood( preferably hardwood) about 1-2" thick, screw them together at right angles( like a angle plate), Locate and bolt this assy to the bed, bring up the tailstock and mark the centre height in the wood with a centre.
Drill a hole the size of the bar , push in the bar and bring it up to the faceplate.
Clamp a piece of wood on to the faceplate, drill a hole to fit the bar, fit a drive dog to the bar up against the wood, slide the wood angle up to the other end of the bar, as close to the end as possible and clamp.
Walla! you have a fixed steady!!
It is then a simple centering job.
You can also saw a horizontal slot into the hole and pinch it up with a wood screw to give a little ajustment to the hole.
I have done this many moons ago(when I was poor) and it works ok.
 
Last edited:
To answer the original question.
Take 2 pieces of wood( preferably hardwood) about 1-2" thick, screw them together at right angles( like a angle plate), Locate and bolt this assy to the bed, bring up the tailstock and mark the centre height in the wood with a centre.
Drill a hole the size of the bar , push in the bar and bring it up to the faceplate.
Clamp a piece of wood on to the faceplate, drill a hole to fit the bar, fit a drive dog to the bar up against the wood, slide the wood angle up to the other end of the bar, as close to the end as possible and clamp.
Walla! you have a fixed steady!!
It is then a simple centering job.
You can also saw a horizontal slot into the hole and pinch it up with a wood screw to give a little ajustment to the hole.
I have done this many moons ago(when I was poor) and it works ok.

Pictures Please - This made my head hurt - or was it the beer I just had when my wife and I went to dinner!!! Asian Bistro with Thai beer, really good!

And no, it's "center" unless of course you live on the other side of the pond. LOL

Bernard
 
Joe, cutting a standard Morse taper even on a lathe with a specialized taper attachment is not a trivial procedure.

If you plan to do it the way your describe, you really don't need any central holes. Holding a piece of metal in your hand and using the other one to carve a precise Morse taper will not me much harder. :)

MichaelP give the guy a break. If y'all are suggesting whittling, that how I done made all my morris taper centers 'n toolin. http://blalock.lancedean.com/pics/whittling.jpg
 
Drilling center holes

Hi. bernard,
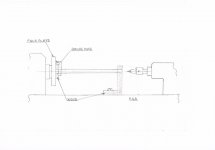
I have made a sketch of the set up, I hope I can manage to send it, not done it before.
The wood fastened to the faceplate is drilled from the taistock, the hole in the wood steady is marked with the a dead centre in the tailstock prior to drilling in a bench drill (or other).
Hope this is a little clearer.
Regards
Arthur
P.S. Watch that tai beer, you don't know whats in it.
 

Attachments

  • CCF01042012_00000.jpg
    CCF01042012_00000.jpg
    77.5 KB · Views: 682


Back
Top