What's new
What's new

Bridgeport lead nut design is just wrong

thouchin

Plastic
Joined
Jan 1, 2016
I just bought a Bridgeport J head, 2HP variable speed, made in 1980.

The table and saddle are off and Im cleaning the nuts. Two questions...

I understand that there are two versions of these nuts. The original is cut part way through and is expected to bend to adjust backlash. The new version is two nuts that slide along the keyway to adjust the back lash. I have the former. I do not know if these nuts are original, aftermarket or made by a previous owner but they seem wrong.

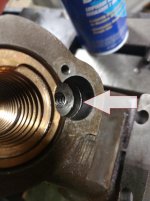
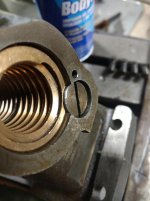
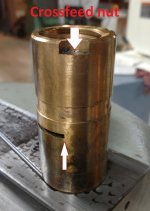
1) The crossfeed nut has its slot cut 90 degrees away from where I would expect it. The adjustment screw doesn't apply force in the middle of the cut to 'bend' the nut. It applied the force at the edge of the cut. This has to be defective as it cannot work. Am I missing something?

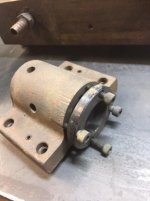
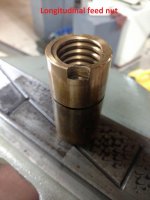
2) The longitudinal feed nut isn't long enough. The adjustment screw head goes all the way into the hole before it contacts the nut and therefore the small screw that should keep it from rotating... does nothing. Also the adjustment screw never contacts the nut because it is stopped by a ledge. Again, what am I missing? None of this seems right.
CrossfeedNut1.jpg
IMG_20181103_170937829.jpg
lip.jpg
IMG_20181103_172404620.jpg
 
Last edited:
It's a split nut design, so when you tighten the screw in the adjustment nut (the one with the end notch), it's pushed back along the leadscrew and towards the first nut. The slot in the first picture is for lubrication access to the nut assembly, not for any form of thread looseness.

Assemble the two nuts onto a leadscrew such that there's a gap. This gap must be present when the screw, nuts, and trunnion (yoke) are all properly assembled. Then when you adjust the "notch" screw, that drives the two nuts together, removing any slop that might exist. If you can't do this it means the two nuts are either so worn they're useless, or the assembly is incorrect and must be done again (correctly).

Don't make the mistake of over-tightening the adjustment screw, if the nuts are too close in the middle of the thread travel they'll likely be too tight at the (less worn) extents.
 
You are right, The design is just wrong.

The people that designed Bridgeport mills screwed up . They will never admit it to the tens of thousands of satisfied users however.

Perhaps you can redesign the nuts and mounts so they will actually work, You will make millions of bucks on the effort.

Let us know what you come up with in your second post.
 
..... Again, what am I missing?......

So many things grasshopper.
Think harder about the how and why.
There must have been a reason this was done this way. Wrapping your head around it may mean trying to understand a different thinking.
Normally I just toss my people back with "Why was it done this way" and won't talk to them until they have some ideas good or bad.
Answer that question first before you tell me the design sucks.
Bob
 
The early Bridgeport design was a single nut that was cut part way through to allow it to bend thereby allowing some backlash adjustment. This design didn’t allow much adjustment and maintenance staff would often simply complete the cut, separating the nut into two parts that would remain axial and give better adjustment. Bridgeport recognised the superiority of this fix and changed the design to a fixed drive nut plus separate adjustment nut.

When you are assembling the separate adjustment nut don’t put it too close to the drive nut. The pictures you show suggest this may be what has happened. Just reassemble the nut 1 thread pitch further away from the fixed nut. This should restore the ability to adjust and lock the screw.


Sent from my iPhone using Tapatalk
 
From your pictures, the threads look like they are in pretty good shape for an older mill. Maybe someone made new ones and didn't machine them to spec???

Anyways, when I got my new to me mill it had the one piece nuts with only the half split in them and I cut them completely in two (facing the cuts in my lathe) making a 2 piece nut that allows a lot more adjustment for backlash. Bridgeport switched to the 2 piece design some time ago and a lot of guys have modified theirs like the new design by doing this. It is suggested to put a 1/4" piece of felt in between the two pieces to help hold in lubrication and maintain the split during reassembly. This is covered in Ilion's book on rebuilding the Bridgeport Mill.

If it was my machine, I would split the nuts and adjust to minimize backlash. Works great and my nuts have a LOT more wear than yours.

Edit addition: The key way keeps the nuts from turning. The screw is only there for backlash adjustment.

Ted
 
I think maybe some assumptions have been made because I didnt fully explain what I knew. I have edited the post and clarified it.
 
It's a split nut design

Milland, I tried to show in the pictures that I have the older design... one nut for the crossfeed and one nut for the longitudinal feed. Both with a slot cut in them that is not all the way through. There is one pic showing each nut with a title describing which is which.
 
Milland, I tried to show in the pictures that I have the older design... one nut for the crossfeed and one nut for the longitudinal feed. Both with a slot cut in them that is not all the way through. There is one pic showing each nut with a title describing which is which.

Well heck, didn't know about the older, solid nut. Yeah, I'd split that. Or go to a ballscrew and find new things to go wrong...
 
Yeah, I'd split that.

That is for sure what I will do, but I feel like I need to understand this before I start modifying it. If these nuts are just made wrong then no big deal, it happens. If they are correct, then that means I dont understand something that I should.
 
In the current, solid nut, it looks like the adjustment screw also keeps the nut from spinning in the yoke. If there's no other mechanism for preventing spinning, you'll have to add something like a key or pin in the other section of the nut, otherwise it could spin in the housing and mess up whatever clearances and backlash adjustments are made.

That's about the only "gotcha" I can think of.
 
Those adjusting screws did not bottom out on my mill. I just couldn't tighten them any more with all the wear and being the old style one piece design. If they are bottoming out on your mill, something is off. Either the nut is wrong, the hole in the housing that holds the nut must be too deep or the adjusting screw hole isn't deep enough.

Whatever the case, I wouldn't worry about it and just split the nuts. It's the right way to go. It got my badly worn nuts down to ~0.010" backlash. I can't tighten them any more without their binding on the ends of travel where the screws are less worn.

Ted
 
I like the design of the adjusting screw as the head just pops off when you accidently rapid into a solid obstacle. That allows the brass nut to slide out of its cavity. This only works in one direction only and I cant recall which way it is.:D
 
Well heck, didn't know about the older, solid nut. Yeah, I'd split that. Or go to a ballscrew and find new things to go wrong...

Be careful with the ball screws. They work great with servos but don't have holding power by themselves. Put some force on the table without locks and it make take off on its own.

Tom
 
Ok, taking all this in, and adding a few PMs to the pot, has helped me to realize that these nuts were home made. The slot on the first nut is wrong for sure. And the ledge machined into the cast nut holder (in the third pic) seems to be from the guy mounting the nut and then machining the recess so that it is in the correct spot. I think he just plunged to deep and that is why the head of the adjusting screw (4th pic) goes so far in.

Now that I think I understand things i'll be splitting these.

Thanks to all those who helped.
 
HI
I'm going to do the split nut install on my Bridgeport clone. The yoke has a keyway machined the entire depth. I guess i'll need to key the front and back nuts to stop either one from turning.
The clone uses a collar for back lash adjustment, doesnt stop the nut from turningkent yoke collar.jpg


Back
Top