What's new
What's new

Replacing Clock Spring - BP

Kincardine

Aluminum
Joined
Dec 29, 2007
Location
Kincardine, Ontario, Canada
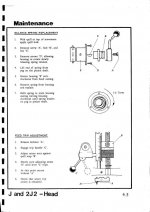
Hi folks, I need to replace mine in a 1969 Series 1 J head. I already have the new part from Hardinge.

What I wouldn't mind, is a bit of a walkthrough on this. Winding the spring, number of turns, etc. I would think this a common question.

If anyone can provide a link to this info, I will be very thankful!

Cheers, John
 
Number of turns to the spring?
Put the largest drill chuck you intend to use and the weigthiest commonly used drill in the spindle. Install spring and wind until the spindle retracts itself easily. Then go 1/2 turn more. Clock spring will have tension on it.
It has been quite a while since I was in this area of the Bridgeport. Take a small bar and put a #10 screw in it. The spring mount plate may be turned by inserting the #10 screw in one of the mounting holes and levering it against the handle shaft. When 1/2 turns are complete, reinstall the #10-24 screw in the other hole. Continue until desired tension is achieved.
A heavier boring head will balance neutral or drift slightly down, which is OK.
When using boring heads I keep a slight spindle lock on the ram to even out the feed and so it will not jump when coming through the work.
Ken Lively
 
I just remembered why I give the spring light upward pressure and little more.
If you tension the lever too much, if you lose your grip or release the lock; the handle may spin around and hit you in the head or perhaps knock a tooth or two out.
KL
 
1 1/2 turns as per book, no more or you will over stress the spring at full quill travel. Its a balance spring to take most, of not all, of the tooling weight not a return spring like a drill. Objectively speaking the spring is only just long enough for the job and installed into a slightly undersize housing so there is little tolerance for over tightening.

As its your first time I suggest you make up a little pin spanner affair engaging in two of the screw holes to help you put the tension on and hold it in place whilst you get a screw in. After the third time its easy without a spanner but the first go can be frustrating.

On an older machine I'd always plan to replace the locating pins. If they are worn the spring can slip under tension or can refuse to seat. With good pins it pretty much seats itself. Its worth the extra money just to be sure that you don't have to extract the spring and re-insert it without the wire keeper around it. As supplied, with the keeper in place its well behaved, once the keeper is off its seriously up for a fight. Had my new one in and out 4 times before I got it all working as per book!

Clive
 
Thank you all!

Thanks guys. It sure is great to be able to post a question and have 6 answers in a matter of hours!

I have the spring in, and clipped on the shaft. I will do the preload on it today.


Back
Top