What's new
What's new

Studer RHU 450 from the 1960s

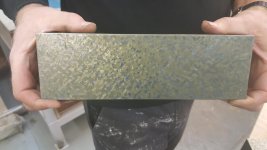
An analogy I can use is I was talking to my friend who is a Vet and he said "when a dog comes in and he was bitten by another dog and there is a cut" He stitches it up because the human owner wants it stitched up, but the dog will heel up without stitches. On ballens table that is scored it looks like the galls are on the bottom of the table and are not open to the air. I just went back and looked at the photo's and the galls are close to the ends but are not all the way out.

No one will see them under there...(like no one would see the cut in the dog under the hair). If the scores could let in more grit if they went all the way out to the edge I would fill them. If not all the way out then leave them and consider them as extra oil pocket or oil grove. You would stone the sharp edges off the scrores and put it back together after square cutting new oil pockets in the ways. As we discussed before the reason there is a score there is because oil did not reach that spot, right?

Now if they were on the bottom side and exposed to the air if the table moved out past them then I would fill them. In the old days when I was a kid working with my Dad we would use a mag base drill, center drill first and then drill holes and plug the scores with overlapping or stitched cast iron plugs. Or on some jobs we used a portable mill and milled out a slot and fit in a cast iron insert. Both were tedious as you had to sometimes drill air escape holes thru the casting so the plug would pound down into the hole, or file a small flat on the plug so the air would escape.

In later days we used metal fillers. I had a huge screw up when I used Belzona, had a Belzona rep help fill 1/4" galls in a BIG Giddings & Lewis Boring bar and it came out even with the bigger bottom ground holes or slots. But it was in a horrible contaminated with big chips area. So filling gals or scores all depends on what sort of machine and the place it is.

I started using the Devcon after having a failure also using Moglice Score EX and Multi-Fill..they have another name for it , but can't recall it's name now. I never had problems with the Devcon. I had experimented once with metal spraying scores after a rep swore it would work...another failure and Rep supervised us on it, so I would never recommend that either or welding.

For Ballen, no one will ever see under the table,so I would say leave them. If he was anal and wanted to fix it because it looks better when he see's it he could do it (like a stitch in the dog skin under the hair) :-) G-day Rich

PS: That same guy the Vet. His name is Lance and has become a heck of a good rebuilder. He assisted me at my last Keith Rucker Class and he bought a HKA-48 straight edge from me that had some voids in the flat. I had it down at Steve Watkins and he discovered they were to deep to plane out so I had to have another one made and sent to Steve. Anyway, Lance said he filled the pockets with solder. I have seen on some web-sites a new product that is a soft braze material. Must be like the solder I suppose.
 
Last edited:
What I do whith a score is make sure all loos metalparticals are removed
Especially at both ends you often find some metalparticals embedded in the other material
When a partical loosens the scoring goes on
I take a dremel and make the surfaces smooth so no particals can loosen

Peter
 
I can see the rationale behind Rich's thinking.

On the subject of filling gouges the best filler I ever found was a product " Devcon " made for use in cracker mills. These cracker mills were lined with cast " Ni-hard " tiles and the filler was to go between the tiles and the barrel to support the tiles. I'd got it to repair one of these cracker mills and there was a minimum ordering amount so I ended up with loads over, say roughly half of a 5 gallon drum.

It came with a tub of hardener and you mixed it at about 5 to 1 if I recall correctly. The only drawbacks were that it was lime green in colour and smelt like a urine soaked babies nappy ( diaper ) when you mixed it !

I first started using it repair holes in radial arm drill tables etc. Then one day I decided to use it to fill in a score on a Hor Bore column. It was great, it didn't shrink, didn't crack and it set as hard as Chinese Arithmatic.

I used it for years,even after I'd left the place. The containers sealed very well and it never went off. I'd go back and borrow the tubs. Then one day I called in at the old place to be told the Managing Director and come in one weekend and had a tidy up of the stores and thrown the " Devcon " out !

So I got in touch with " Devcon UK " only to be told that the line of product had been discontinued because of a lack of demand.

Regards Tyrone.
 
The Studer RHU 450 manual calls for Mobil Vactra 2, which is ISO 68 viscosity. FWIW, this is thicker than the oil used in my J&S 540 surface grinder, which is ISO 32 viscosity.

any idea why that would be? is the studer slower?

(did you get my pm?)
 
Hi Richard,

Yes Square Cutting means to break up the surface as Tyrone suggests it is a 1/"8 x 1/8" square oil pocket done with a hand scraper. The factory did them with a pull scraper it looks like. side by side with an un scraped area between each pocket.

I wanted to let you know that I am making progress. The main thing that has slowed me down has been assembling what is needed. I got a lump of cast iron to practice on and surface ground both sides flat, but my first attempts at square cutting were unsatisfactory. I was using a collection of scraping tools I had assembled some years ago (see below) but never used seriously. After doing some reading, I realised that the problem was that my Sandvik carbide blades are almost straight (radius at least 300mm = 12" or more, I could not measure it).

Here is the current state of things. I set up a jig to grind 40mm (1.5") and 60mm (2.5") radii on two separate 20 x 25mm blades (I did both sides). This used a diamond cup wheel on a Deckel S0-style grinder. I then mounted a cast iron disk on a little grinder which I was given some years ago, with a rest to hold blades at -5 degrees. The diamond lapping paste is green (8-12 microns, I think) and appears to come from Ukraine. The carrier is some kind of grease: it sticks well to the wheel. The other side of the grinder has nothing mounted on it now, but I also built a -5 degree rest for that side. I've ordered cheap 6" diamond grinding disks in 3 different grits and will mount one of them on the other side of the grinder and then mount a -5 degree angle rest on that side as well.

attachment.php


The indicator for measuring the depth of the scrapes has a ruby-ball tip and measures 100 microns (0.004") per rotation; the graduations are 1 micron (0.00004"). I'm only using the longer (20") handle, the shorter one seems too short. I have a box of 20x25mm (3/4x1") and a box of 25x30mm (1x 1 1/4") blades, but am only using the smaller ones.

Getting properly-honed blades with the correct radius makes all of the difference, and I am finally able to scrape pockets with the correct shape and depth. I'm going to spend some time this weekend practicing on the cast iron block, resurfacing it on the surface grinder a few times if needed. I'll post some of the results here for you to comment on.

A couple of questions for you. Should I focus on the 40mm or 60mm radius blade, or do you suggest grinding one to a different radius? Also, what do you suggest using as a lubricant for the greasy diamond paste on the cast iron wheel? I've read that one should use the diamond paste sparingly and instead lubricate it. But with what?

Cheers,
Bruce
 
Last edited:
if looking for a local source for diamond paste try zu jedelloh. 2 euros per 5g styringe. i find that the cheap diamond wheels in 1200 or 2000 grit are plenty for honing.
 
A couple of questions for you. Should I focus on the 40mm or 60mm radius blade, or do you suggest grinding one to a different radius? Also, what do you suggest using as a lubricant for the greasy diamond paste on the cast iron wheel? I've read that one should use the diamond paste sparingly and instead lubricate it. But with what?

----------------------------

I just wrote this in the Reconditioning forum when Sir Rage asked about HSS steel Blade vs. Carbide.

I agree with Bill and Warren. I used to lap HSS blades when I was a kid 50 years ago. We held the handle vertically and over about 5 deg and moved it back and forth on a longer sharpening stone mounted in a 2 x 4 that was routerred out to hold the 1 x 2 x 10" (approx size) medium grit Indian Stone. We also flipped it and lapped the flat sides to really polish the blade so we didn't get mini scratches in the cut. Chapter 5 in the Connelly Book shows this vintage method. I showed a student to do it in a class and that was the first time I did it that way in 45 years. In the late 1960's we advanced to using Anderson Carbide blades as we used Anderson Scraper back then too. Then we bought Sanvik Scrapers and blades and a 300 grit diamond face wheel we mounted on a double end Baldor tilt table grinder. We used this method until the late 1980's and when diamond wheels were a bit more affordable, we bought a 600 grit wheel.

Then at an IMTS show where I demo'ed BIAX scrapers for DAPRA is where I saw a Glendo Accu-Finish lapper and I bought one with 260, 600 and 1200 grit lapping wheels. I never considered HSS after that.

Check this out. We are discussing scraping and lapping ..scroll to #65 to see the set up.Also see the longer scraper handle and clamp in Sanvik Insert. As the others have said we have wrote about this dozens of times before, but you new guys haven't been here. But as Lazlo and old member 10 years ago showed me, you Google your question and put Practical Machinist on the end of the search and you will see all the old posts.

You also need to rough grind the blades those carbide insert blades on a green wheel or the 260 grit diamond lap
before finishing them to a 60 radius 2.3" diameter circle. Matt C just took a drafting compass and drew circles on a piece of paper and laminated it and he uses that as a guide. I never use more then a 90 mm or 3.5" circle. (wife bought me an Amazon Echo(Alexa)talking computer for Xmas..sure works great for figuring out the math, I just ask her/it to convert mm to inch and she tells me, no more calculator)

I rough scrape using a radius 90 mm / 3.5, finish scrape at 60mm /2.3" and point spot/technique 40 PPI with 40 mm/ 1.57" or 20 mm / 0.79 " for super small and narrow and short cuts. Scroll to pos 65. :-) G-Day Rich
 
You can grind a 40 on one side and a 60 on the opposite side. Plus depends on how high you hold the handle in the back. The higher the angle the narrower the width of the cut. Experiment is what I would say. Practice makes perfect. I have never used that paste. Ask Tctool(I think is his name...real name is Jan) or Forrest Addy.
 
Hi Richard,

Experiment is what I would say. Practice makes perfect.

Thanks again for your help.

Here are some first practice attempts at square cutting 1/8" x 1/8" pockets. The 40mm (1 1/2") and 60mm (2 1/4") radius blades made scrape marks that were too narrow. So I made a 90mm (3 1/2") radius blade, and that makes scrape marks that are about the right width.

On the cast iron piece I've drawn a pair of purple lines 40mm apart, the same as the ways, and a blue strip which is where the oil groove runs. The current scraping marks are at 60 degrees to
the direction of travel, so I also made some +- 60 degree lines as a guide.

The first set of scrape marks (first photo) was done by pushing the blade forward. My main issue is that once the blade is moving, it's hard to stop. So some of the pockets are much too long. The depth of these is about 5 - 8 microns, which is 0.0002 - 0.0003". I've only done this in one of the directions, not in the other.

attachment.php


The second set of scrape marks (top of second photo) was done by holding the blade more vertically and then bumping it with my fist. This is the top strip in the photo.

attachment.php


These are marks are deeper than the previous ones, 10-15 microns depth so 0.0004-0.0006".

The original oil pockets on the ways are much more regular than mine. I don't yet have the technique and coordination to do anything that comes close to those.

Please give me your comments, I'll do some more practicing tomorrow.

Cheers,
Bruce
 
The reason your getting different length scrape marks is your pushing the scraper with your arms. You need to put a pad on the end of the scraper handle and pull the scraper into your body or bicep and elbow and push with your body and not your arms. Also if you use the scoop method that I call the Tap Tap method you can start to get the same length. If I were you I would get a smaller test bar say 3/4" thick x 3 1/2" wide and 10" long and practice on that. Put the part closer to the edge of your table or in a vise and rock on the balls of your feet and not using your arms. Pretend your arms are stuck to your side and move your body in and out. Start to practice with a 60 mm radius blade and if they are log at first that is ok. Try to get 1/2 long at first. The scrape mark should be about 1/8" down to 1/16" wide. Cut across the part 2 times in both direction Making the scrape mark and no scrape mark the same width. Then stone the part and do 2 more passes the same way but shorten your scrape mark. Be sure to move ever so slowly parallel to the table keeping the scraper handle at 45 deg.to the part. A bit of a dance and rhythm to get used to.

Practice until it feels comfortable. It may look like hell at first like what you have now...but your trying to get perfection right at first. Practice makes perfect. In the classes I don't let the students blue up their parts until they have practiced the hand scraping progressively shorter stokes for 2 to 3 hours. Press down with about 2to 5 pounds just to bend the handle about 1/8" at first the depth may only be .0001 but as you get the rhythm

Pic's. Matthew in UK Class - Body scraping see how he holds the scraper against his belly area, note his scrapers below with handles; Hand scraped part still practicing. Chart showing points and percentage. Yours should look like 2 nd column from right. 20 PPI to 40 PPI: Boston student pump scraping to get 40 ppi using a mag. light; German scraping hand at Huddelemeyer with arms tucked close to body and pushing with body rocking on balls of his feet.
 

Attachments

  • 20171215_172230.jpg
    20171215_172230.jpg
    99.7 KB · Views: 215
  • 20171213_091318.jpg
    20171213_091318.jpg
    88 KB · Views: 209
  • PPI Booklet Chart.jpg
    PPI Booklet Chart.jpg
    92 KB · Views: 239
  • 20160823_094709_resized.jpg
    20160823_094709_resized.jpg
    96.9 KB · Views: 202
  • DSC02996.jpg
    DSC02996.jpg
    47.4 KB · Views: 194
Last edited:
The scraper is so important to get it right. Perfecting pushing with your body to control length may seem awkward as hell at first but it will come 2nd nature after a while. In the classes I sometime tell about the night I lost my virginity and the experienced woman said...you must have done this before? I said heck this is easy as I move my hips in and out all day long...lol...i had a problem making short strokes though....lol

Sorry to be so crude in your wonderful thread, but thats the motion you use. LOL

Pic's: Student at Bourn & Koch class 2017 scraping with-out pad, using his shoulder socket to rest handle and pushing with upper body; Student hand scraping holding flash light to scrape under dovetail; Member Other Brother showing off his work at B&K 2016 class; Hunter in Make a Wish class showing technique used to hand scrape; yours truly scraping a Swiss screw machine slide pushing down with shoulder socket.
 

Attachments

  • B&K class. Pic's 1.3.jpg
    B&K class. Pic's 1.3.jpg
    100.1 KB · Views: 182
  • TEX Class 2.22.17.19.jpg
    TEX Class 2.22.17.19.jpg
    99.7 KB · Views: 159
  • 20160316_111712.jpg
    20160316_111712.jpg
    97.5 KB · Views: 147
  • Hunter class.5 (1).jpg
    Hunter class.5 (1).jpg
    93.5 KB · Views: 159
  • 2013-12-05_08-36-22_303.jpg
    2013-12-05_08-36-22_303.jpg
    82.7 KB · Views: 172
For the record, here is my quick-and-dirty jig for grinding radii from about 12mm (1/2") up to 200mm (8") onto carbide scraper blades. It works well.

The jig is meant for use with a "Deckel SO style" single point tool grinder (mine is an Asian clone that uses 5C collets). The wheel is a cup wheel with a diamond loaded resin strip.

The jig is made from 12mm film-reinforced plywood and a piece of softwood. The lower part is shown at the bottom of this photo. The softwood has a dovetail profile and slides into the dovetail holder on the grinder, where it is clamped with the gib clamping screw.

attachment.php


The top part holds the scraper and scraper blade. The scraper is held down with a handwheel. Inside the top part is what woodworkers call a T-nut or blind nut.

attachment.php


A 4mm hardened steel pin provides the rotation point. The holes are every 10mm. By moving the pin and moving the scraper you can generate any radius in the range. The radius is measured with a ruler from the blade tip to the center of the rotation pin. Here it is assembled and ready to mount on the grinder

attachment.php


and here it is about to be used to grind a 60mm radius onto the wide side of a 20 x 25mm carbide blade

attachment.php


I suppose that I could have made this from metal but it would have been heavier and taken longer. Film faced plywood is nice for things like this.

Cheers,
Bruce
 
Hi Richard,

Thank you for helping me. I can't quite see the end of the tunnel yet but I think I'm getting closer.

The reason your getting different length scrape marks is your pushing the scraper with your arms.

You were right. I took a cutoff from a piece of beech butcher-block and made a pad.

attachment.php


That made a big difference. A natural place for me to push seems to be the sternum/breastbone, but I'll experiment.

My cast iron test bar or training block is more-or-less your dimensions, just a bit thicker, wider and longer. Anyway, I'm now holding it in a metalworking vise as you suggest.

I have gone back to using a 60mm radius blade as you suggested. Previously I was using the 20mm side of a 20x25 blade, but it was hard for me to predict where on the edge it would cut. So then I put a 60mm radius on the 25mm side, and that made it easier for some reason.

Cut across the part 2 times in both direction Making the scrape mark and no scrape mark the same width. Then stone the part and do 2 more passes the
same way but shorten your scrape mark.

Richard, I have a question here about what I am trying to accomplish. Is the idea for me to do what Tyrone expressed as "break up the shiny areas"? So scrape oil pockets on about 50% of the surface and leave the other 50% untouched? That way I won't mess up the geometry, which still seems to be good, but will fix the stick-slip problem.

So following your instructions above:

1 - scrape marks along first diagonal line (covers 25%)
2 - scrape marks along second diagonal line (covers 25%)
3 - stone the part
4 - repeat 1, 2, 3.


When I do step 4 above, is it correct that I want to land in the SAME scrape marks as in steps 1 and 2? So still leaving 50% of the original surface untouched?

Practice until it feels comfortable.

I do need to keep practicing, but feel like I am making progress. I was teaching one of my nieces to ice-skate a couple of weeks ago, and kept telling her to relax. She was so tense it was holding her back. I feel like I need to do the same. I am tensing lots of muscles trying to control the cut, whereas I need to relax and not fight myself. Here is my next attempt at steps 1 and 2 above.

attachment.php


Here is a further attempt (just steps 1 and 2). This time to help me see where I was cutting, I use a wide felt-tip marker to put a uniform blue ink layer before cutting. This went faster than the previous set, and I think I'm starting to get some rhythm.

attachment.php


Sorry to be so crude in your wonderful thread, but thats the motion you use.

Richard, what can I say, you're a good teacher!

Cheers,
Bruce
 
I would say cut off 50% per line in both directions on the test piece over and over again to get the hang of it.
I meant to scrape it several times over and over on your practice piece and then one time in each direction on your grinder bed and table.

When you feel comfortable on the practice bar, then start to scrape your grinder base in the middle of the ways and work you way out to the ends....Why not start on one end and go to the other end..??? Think about it and tell me. Now the students or readers who know please don't tell him right off...let him think of why we do that...? lol

Or you can start on the table bottom from the ends and work your way to the other ends...:-) but why not do that on the bottom??? hmmmmmm ..lol

When your scraping to just get more oil pockets XXXX 50% or just like yours but scrape marks closer together or side by side and each line of scrapes separated by the same width or length scrape make. That is why we call it a checkerboard. On a checkerboard you have 1 white square then a black square besides on another.

Look a the picture of all the scrape marks PPI and percentage. Look at the bottom 40 PPI and 40 %. That's a checkerboard. The repeat over and over again is for practice. We use a yellow highlighter too just to dull the shining surface so you know you scraped the spot. Or if you want to magic marker sharpie mark spots side by side on diagonal lines you could, but I generally don't do that.

Scraping the complete bed and table ways like this will assure you get proper lubrication and it won't change the geometry. 50% high spots 50% low spots. Sip the Swiss machine building company say 40 to 60 % contact, so I say 50%.

Another tip is to mark a line in the middle of your blade/insert that at like a rifle site. Also if you start with the scraper blade about 1/4" above and behind the spot about 1/2" and as you move your body forward you press your arms down with about 2 to 5 pounds pressure and lift up immediately you will hear the blade tap and if you move fast enough to the right or left going in and out you will hear a tap, tap, tap, tap sound.

One SUPER important thing not to forget is to stone off ONLY the burrs left from the scrape marks. Light pressure only or if you push down hard with the stone with WD-40 or mineral spirits wet stoning the scrape marks will defeat what you just did. Stoning to hard will eliminate the high spots and it will be 80% contact and you will get stick slip again sooner then later.

If you have the confidence of pushing down to get proper depth. Then on the table ways scrape those scrape marks deeper. Minimum of .001" to .002" This will be the same as 1/2 mooning it. Only do this to the bottom of the table. Why? You tell me again :-)

I like your pad, but a rubber cover will feel better after a while....more cushion for the pushin....lol
and your sharpener is cleave as hell. I just eye ball it using the biax gage at first and then follow what I have after that.

Remember the 5 Richard King-Way Scraping Rules:
1. Scrape individual marks in diagonal line to the side of the part or scrape and skip the same width as the cut.
2. Scrape individual marks in a new line just above or behind the last line, separated the same size as the mark.
3. Scrape for depth of each mark, measuring minimum of .0002" and max of .001"
4. Hinge (pivot)your part when bluing up the part on a surface plate or hinge the straight-edge your using to blue up the part. Hinge is approximately 30& in from each end. The proves the part your scraping is not high in the middle or high on the ends. Some call this the rotation of points.
5. Always wipe the part or straight edge blued or not blued with YOUR HAND so you feel the dirt left from the rag.
6. Stone to remove the burr only, do not stone hard to stone off the high spot you just created.

G-Day :-) Rich
 
Last edited:
Hi Richard,

I would say cut off 50% per line in both directions on the test piece over and over again to get the hang of it. I meant to scrape it several times over and over on your practice piece and then one time in each direction on your grinder bed and table.

OK, thanks very much for explaining, I got it now.

What I tried today is the following on the test bar:

- With a magic marker, painted the whole surface dark blue for contrast.

- With a black sharpie, laid down a grid of black lines with 1/4" spacing in both directions.

- Lining up the scraper blade front side and left side on the grid lines, cut a series of pockets at the same distance from me (depth), moving left to right. By working off the grid, this makes a straight line of cuts at uniform spacing.

- Back up one grid line and repeat.

- Back up another grid line and repeat.

- And so on.

This gives me a nice "half-checkerboard" of 1/8 x 1/8" squares on a 1/4 x 1/4" grid. So 25% coverage.

But then when I rotated myself 90 degrees, and repeated, I could not consistently land in the correct spaces in between to cover the other 25%. I can hit the right depth some of the time. But my left-right control sucks. I can't predict where the blade (left/center/right) is going to cut.

Any suggestions? I did draw a "rifle sight" line on the blade, but it didn't help.

One encouraging thing. Making the jigs to grind radius, and the cast iron honing disk has paid off. The blade is sharp and cuts clean and predictable. Just not where I want it to.

Cheers,
Bruce

PS: I tried the tap-tap-tap. It works great, the problem is, I have zero control. Meaning I can predict which square inch I will land in, but no better than that. I also can't make anything that resembles a straight line of scrapes.
 
Practice makes perfect

Take your marker and dot the test bar and shoot the dot with your rifle hand scraper...lol. I say to the students be a sniper and not a machine gunner. How long is you scraper ? When scraping for accuracy you need to have a scraper that is shorter then for roughing. You need to have your head directly over the blade so you can aim the sight.

Having it out to far you have no control or you are hoping you hit it.
Richard King Scraping Class - YouTube

Check this out. scroll up to minute 12. I have a silly look on my face...as this was a candid camera interview and one of the students behind the camera was making faces at me. LOL...I figured it was for his home use not you tube. So many youtube shows now...

Here is another from a Stefan my friend, student and interpreter in Germany scroll to min 10 Scraping basics - Scraping flat - Part 1 - YouTube

His part 2 is another good one. If i didn't know i would have thought i was doing them. Almost word for word what I taught him. LOL But he is a great student. :-) Rich

the good part about checkerboard is around 13 min. Scraping basics - Scraping flat - Part 2 - YouTube
 
Bruce,
The three things that help me being more accurate with landing my strokes are:
1) Place the hand closer to the blade flat on the top of the scraper and use it for controlling both the downward pressure and the tilt of the whole scraper.
2) Use a wider scraper handle, so that you increase your sensitivity in tilting. Probably, you'll need to build your own with relatively thin bar since the commercial ones are too thick and rigid.
3) Increase the angle between the scraper and the piece (i.e. rest it higher on your body): this come with the compromise that it is much easier to get chatter marks (i.e. ripples perpendicular to the direction of scraping).

Paolo
 
Hi Richard,

How long is your scraper?

A hair over 16 inches from the tip of the blade to the end of the handle.

I've been practicing, and I've found an approach that seems to be working. Using this I have scraped oil pockets into the test plate in three different sections: left, middle and right. My procedure is

- cover the test plate with blue ink (magic marker) for contrast

- draw parallel black lines at 45 degrees. (In the second photo these were 8, 7 and 9mm apart in the left/middle/right sections.)

- scrape along each black line, moving the blade "backwards" to uncover the latest scrape

- now rotate 90 degrees, and scrape "by eye" going left to right along each of the "alleys" left between the black-line scrapes.

Here is the result with the 9mm spacing for the lines.

IMG_7773.JPG


And here is the result with all three spacings:

IMG_8222.JPG


Before I remove the ink, the scrape density looks higher than afterwards. I think that might be because each scrape peels away a layer of ink at the start and end, so the mark looks longer than it is.

Note: I did a very quick job grinding this plate and left a herringbone groove pattern thats about 0.001-0.002" deep. That's useful for judging the depth of the scrapes.

I have got three questions.

First question, is this looking better? Do any of these have about the right density? For scale the test plate is 4" x 12".

Second question: just after I scrape each mark, is it OK for me to immediately make it deeper by pulling the blade back and rescraping the exact same mark? Or is this A Bad Thing?

Last question: After lightly stoning the test plate with a bit of mineral spirits, I put some drops of bedway oil on it, and then laid on a ground hardened parallel which was 150 x 40 x 10mm (6" x 1.5" x 3/8"). It still stuck/wrung to the test plate, even with the oil pockets. Is that because the parallel has no pockets itself? Or because my oil pockets are not right yet?

Cheers,
Bruce
 
Last edited:


Back
Top